
|
 April 16, 2017, 06:51 PM
|
#51 | |
|
Senior Member
Join Date: August 26, 2016
Location: North Dakota
Posts: 1,636
|
Quote:
But, when I used 750 Tempilaq, I could tell when seating bullets that it was more uniform. Testing over the chroney confirmed it. But to avoid over heating the neck, you better get the timing right. The machine better be dumping the case as soon as that stuff melts. I'm sure if I'm wrong jeephammer will dispute this, but I read anything over 787 degrees is overheating for any length of time. So while 730 may be "perfect" I found hitting 750 and immediately arresting the process yeilds great results. If they only made 730 Tempilaq.... |
|

|
|
April 16, 2017, 09:00 PM
|
#52 |
|
Junior member
Join Date: February 27, 2015
Posts: 1,768
|
Yup!
I hit on the temperature over & over, not just the 'Target' temp, but NOT overheating the brass, The reason for the 800*F Paint I use doing setup, just to make SURE I don't over cook the brass. You hit the nail on the head, it doesn't much matter how you get the case up to target temp, It matters you get the case up there to your target temp, get it off the heat without overcooking... and do your cases CONSISTANTLY. A little undercooked is better than overcooked, you ARE going to get some benifit from annealing. Might not be 'Perfect', but very few of us would know the difference between 'Perfect' and just a non-destructive annealing job. When I see someone hit the same hole, day in, day out, with every rifle they pick up I would consider that guy *Might* have stumbled onto 'Perfect'. The rest of us look for 'Better', more consistant, longer brass life, etc. I REALLY like the longer brass life, several times normal usually, And I find my rounds are more consistant, since I shoot almost exclusively used brass. Between case rolling with a die that gives a little nudge to the primer pocket, and annealing, and NOT shooting super hot loads, cases last like crazy... Like stated immediately above, it's up to everyone to decide how much time/energy/equipment you want to put into preparation. Go with what you know, but it never hurts to know a little more than you did yesterday! Mississippi, 730*F works in *Most* cases, but it's hard to hit with a torch, Electrical annealing lets you target that temp more closely. 750*F with a torch was my target temp, and worked quite well, I had to build a rig to drop the case out of the flame, I couldn't get them out by hand fast enough, by the time I SAW the 750*F paint melt, my HAND wouldn't react fast enough to stop heating beyond 800*F. My reflexes aren't what they used to be... What I finally did was use a lower flame temp, Took a little longer (by about 4 or 5 seconds) but got more control over the situation. Those little 'Crack head' cigar torches worked quite nicely instead of the plumbers torch... Last edited by JeepHammer; April 16, 2017 at 09:12 PM. |
|
|
|
May 29, 2017, 03:50 PM
|
#53 |
|
Junior Member
Join Date: May 29, 2017
Posts: 1
|
First time poster here. Just want to say thanks for all the knowledge and advice, you guys are passing on. I'm new to annealing and I feel confident, I will do it right (at least I hope so ;-) ) I bough one of Mikes reloading bench machines and I'm ready to do my first batch.
|
|
|
|
May 30, 2017, 08:28 AM
|
#54 |
|
Senior Member
Join Date: March 1, 2009
Posts: 4,232
|
according to massreloading.com the grain structure of the brass begins to change slightly under 500 degrees Fahrenheit. At 600 degrees F it would take your brass one hour to anneal. However at 800 degrees F, brass will take about few seconds to anneal. Since we want to contain the heat to just the neck area we nee to heat up the neck quickly and cool it of before the heat affects the rest of the case.
As I have stated before I use a cordless drill with a deep well socket in a darkened room with a tub of water and a plumbers torch. The spining drill ensures an even annealing, I put just the end of the neck into the flame when the neck glows red towards the bottom I pull the case out of the flame and drop the case in the water Also for those not color blind the color of the case will tell you its temp. At 400 to 750 red heat is visible in the dark, 470 - 850 you can see it in twilight. Not as exact as Tempilaq or a high dollar annealing machine but this method has been used for a long time by a lot of people
__________________
“How do I get to the next level?” Well, you get to the next level by being the first one on the range and the last one to leave.” – Jerry Miculek |
|
|
|
May 30, 2017, 01:28 PM
|
#55 |
|
Senior Member
Join Date: April 10, 2008
Location: Alaska
Posts: 7,014
|
If I have my facts right, if you see red you have overdone it.
Done in Dark does not matter. What you describe is over annealing of the neck and or shoulder but not on down the case (hopefully) Once its overdone, then it will never work back to right tension. Its permanently changed. As noted a bit underdone helps even if not perfect. Overdone simply does not help (neck tension) but as long as it does not go down to the base you are not hurting anything, You get to use the brass a lot, you don't have the accuracy but most people don't shoot good enough to tell. And the myth goes on about it no big deal to anneal right (and the water is a waste) |
|
|
|
May 30, 2017, 08:23 PM
|
#56 |
|
Senior Member
Join Date: March 1, 2009
Posts: 4,232
|
the facts about seeing color
https://www.hearth.com/talk/wiki/kno...tal-glows-red/ and all the temperature affects is the speed of annealing. I won't post a wall of text on grain changes in metal but take my word that the difference between heating a metal to 500 F and 1000F when annealing is the time it takes the recrystallization to occur. The problem being is that you want the temp to come up fast and not last long so you do not anneal too far down the case past the shoulder. At 500 if I remember correctly recrystallization would take one hour and at about 750 it is 6 seconds. If you annealed at 500 of course the entire case would be annealed not just the neck and shoulder. I am looking at a brand new never been fired Lapua .308 and can tell the annealing extended app 1/4 inch down the case wall past the shoulder because of the "rainbow" as I call it . Any way the method I described above has worked through thousands of firings for me through the years with zero issues so if it ain't broke why fix it. Loose primer pockets are the main reason I retire old brass, occasionally I will toss one just because I see something that I don't like in the case wall or neck, but that is rare
__________________
“How do I get to the next level?” Well, you get to the next level by being the first one on the range and the last one to leave.” – Jerry Miculek Last edited by hounddawg; May 31, 2017 at 09:52 AM. |
|
|
|
May 31, 2017, 10:12 AM
|
#57 |
|
Junior member
Join Date: February 27, 2015
Posts: 1,768
|
For some reason, everyone confuses 'Micro-chrystlline' (very small, fractured chrystals),
With 'Mono-Chrystlline', (one large, loosely connected Chrystal structure). For some reason people keep posting the heating points/glow references for ferrous metals, instead of NON-Ferrous metals, especially brass. You *Might* see a very faint glow at reasonable annealing temps, in a completely dark room... But *IF* you do, you are right on the edge of ruining the brass. My eyes & reflexes simply can't be trusted to produce a consistant anneal time after time with the 'Dark Room' method, so I use a micro adjustable timer for consistancy. You don't have to go digital to the 100th or 1,000th second, but a 10th of a second in the heat can make a difference... I don't trust my naked eye/reflexes. Period. I tried eye/reflexes, and when the production went through actual Rockwell & grain structure testing, it was a disaster in terms of consistancy for manufacturing. (Virtually no one is shooting for manufacturing/remanufacturing standards, so that's not a huge issue for the home annealer) ---- This is an 'Example' case study... Ceramic ferrite 'C' core for electrical annealer. This concentrates the electro-magnetic annealing and contains it to the neck/shoulder. Concentration makes the brass heat FASTER on the same power level unit. The opening in the 'C' ferrite was very small, just enough to allow a .223/5.56 brass to enter the opening. The brass overheated at the mouth while the thicker shoulder brass would not reach full anneal temp. Opening the gap up at the mouth end of the ferrite made the annealer LESS efficient at the mouth, allowing for a TIME increase to fully anneal the shoulder, WITHOUT overheating the mouth of the case where the brass is very thin and DOES NOT have the bottom of the case for a 'Heat Sink' to draw heat out like the shoulder does... No, not going into specifics since this might be proprietary for a production annealer... This is also the reason I tell people to use a 'Pen' torch instead of a plumbers torch... More precise heat control that can be 'Aimed' at the thicker parts of the case so the thinner parts don't get over-cooked... This is also why I tell people to use a smaller torch... Fuel pressure regulator! As pressure drops in the fuel container, the flame becomes 'Cooler' and your timing changes! Changing to a fresh, high pressure can of fuel can seriously overheat the brass if the torch was adjusted with a low gas cylinder... These are mistakes I've already made and found through proper scientific testing, just trying to save the serious annealers some aggravation! (Tool throwing, beating head on wall, pulling hair out problems that in retrospect should have been obvious...) One pound cylinders suck rocks... 20 lb 'grill' tank & regulator, small 'Pen' torches gave a WAY more scientifically repeatable product... And EVERYONE can get a cheap grill regulator & grill tank! This isn't NASA only stuff I'm talking about... |
|
|
|
May 31, 2017, 11:33 AM
|
#58 |
|
Senior Member
Join Date: April 10, 2012
Location: San Diego CA
Posts: 6,876
|
I was kinda avoiding this thread . There are so many annealing threads and most have the right info or get corrected before I get to them so I've stopped posting in them . How ever when I see guys saying anything to the fact that any type of glowing red neck or shoulder is the correct temp I feel I need to chime in .
I've done a fare amount of annealing as well as testing to see what works when using the torch and drill method . I used tempilaq inside the necks as well as just below the shoulders . 750* inside the necks and 450* below the shoulders . 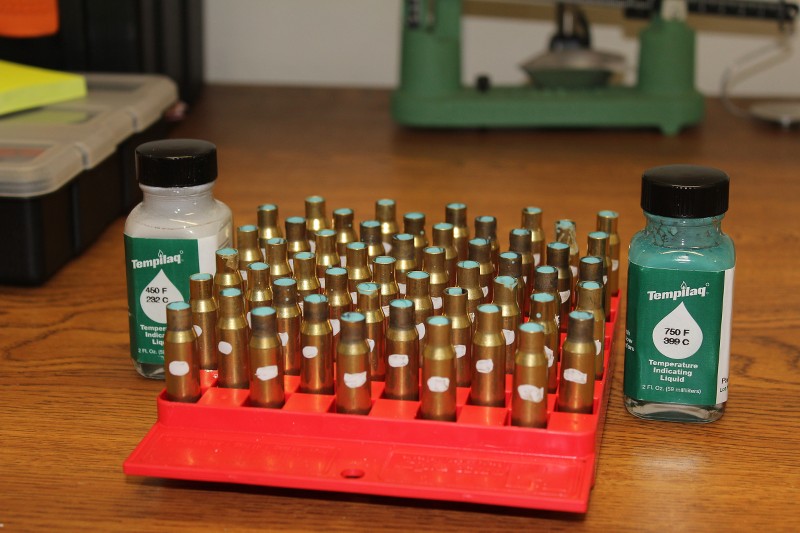 The pics below were taken right when both tempilaq locations stated to melt This is MAPP gas at normal operating temp ( hotter then propane ) 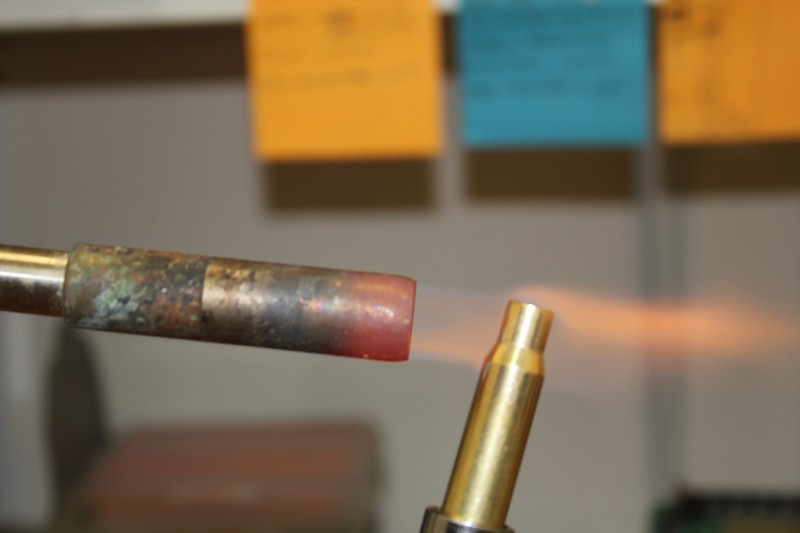 This is a propane torch turn down 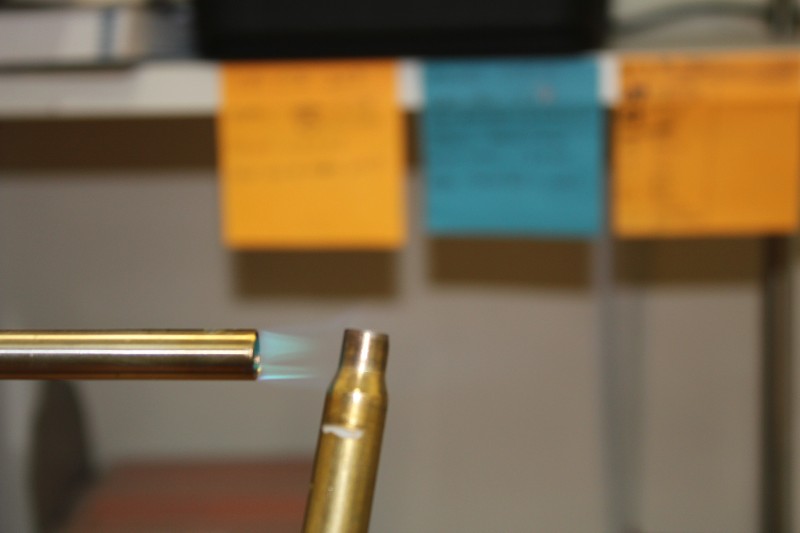 Using two completely different flames ( temperatures of heat ) Neither turned the case red hot or even close to it really . If your cases glow you went to hot period . Of all the annealing and testing I've done including in low light . Never have my cases reached the correct temp and glowed any type of color .
__________________
If Jesus had a gun , he'd probably still be alive ! I almost always write my posts regardless of content in a jovial manor and intent . If that's not how you took it , please try again .  
Last edited by Metal god; June 2, 2017 at 10:56 AM. |
|
|
|
June 2, 2017, 10:47 AM
|
#59 |
|
Junior member
Join Date: February 27, 2015
Posts: 1,768
|
MG, I agree. (Really good pictures to show the difference in flames!)
I've watched electo-magnetic annealing (no flame) operate in a dark room, with temp indicators for correct annealing temperatures, And I've not seen any 'Glow' from the process. Since I've not tried ferrous metals in the dark at these temperatures, I don't know if they will 'Glow' or not, but brass certainly doesn't 'Glow' at reasonable annealing temps. 'Glowing' of any kind is just another old wives tale that has been repeated so many times it's just taken as 'Fact'. |
|
|
|
June 2, 2017, 01:35 PM
|
#60 |
|
Senior Member
Join Date: September 6, 2016
Location: North Iowa
Posts: 247
|
Okay newbie annealer here, I've gotta ask how important of indicator is the look to whether or not it was a successful anneal? Looking at Lake city brass and the rainbow discoloring down the case I can assume what the right way should look like. I recently gave annealing a try for the first time. Torch and spinning in hand as well as drill. I kinda prefer by hand since I didn't have any tempelac. Drill is probably more consistent though. I was erring on the side of caution to rather under anneal than over. Pic below(LC the left two)I was able to get some good rainbow look- but most didn't get that far.
I did manage for a couple to get to that almost glow stage and I agree that has to be too far. Again I didn't have any tempelac as I'm sure I'll get chastised for attempting without 
__________________
From my cold dead hands..... |
|
|
|
June 2, 2017, 02:10 PM
|
#61 |
|
Senior Member
Join Date: April 10, 2012
Location: San Diego CA
Posts: 6,876
|
The discoloring has "NO" correlation to whether or not you reached the correct temp . I tested this as well and found the heat/temperature of the flame as well as location and angle of the flame on the case greatly contributes to the discoloring or lack there of on the case .
I had a good picture showing this but since changed computers and imageshake lost the one I uploaded so I no longer have it . How ever my pic above using the propane torch on low had no anneal marks after heating it to the correct temp . as seen in the pic Sorry I just went looking through my annealing photos and it appears I have many missing . This is the only pic I have left that gives a general idea what "my" 308 cases look like after annealing . Then after tumbling those marks are almost completely removed 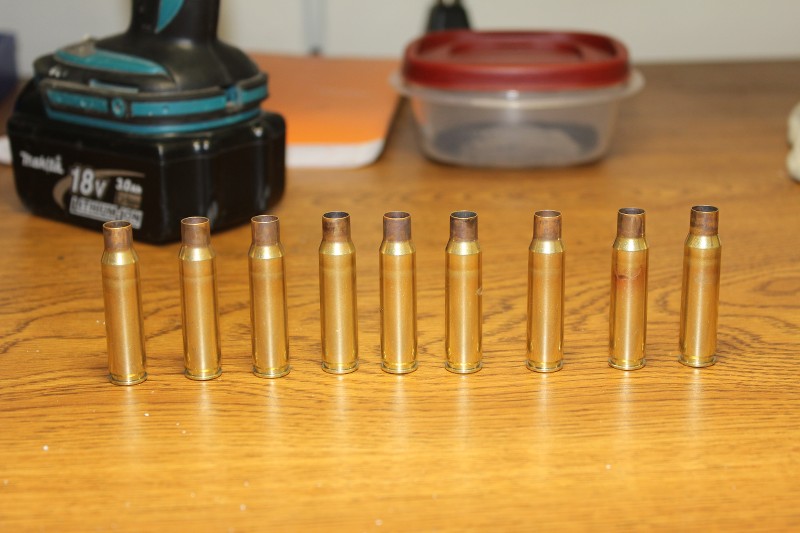
__________________
If Jesus had a gun , he'd probably still be alive ! I almost always write my posts regardless of content in a jovial manor and intent . If that's not how you took it , please try again .
Last edited by Metal god; June 2, 2017 at 02:18 PM. |
|
|
|
June 3, 2017, 12:40 AM
|
#62 |
|
Junior member
Join Date: February 27, 2015
Posts: 1,768
|
I found when I remove ALL case lube, cleaners, waxes etc. I get a lot less discoloration, almost none in fact, just like Metal God.
Factories used natural gas, and they don't clean the lube off so they get more discoloration. LP gas doesn't discolor like natural gas does simply because natural gas is corrosive. Military doesn't care, while civilian producers are going to polish the case afterwards. The 'Rainbow' is the heat transition zone, between annealed and non-effected. I only see this when the cases have been cooked right to the limit or beyond, but like I said, I clean off lube before annealing & I only heat to the point to get consistancy, not to 'Dead Soft'. Those last 5 Rockwell points aren't worth ruining cases for. I like a nice consistant case neck hold/tension rather than annealing for a particular 'Color' or other outdated dogma about what I'm 'Supposed' to be doing. |
|
|
|
June 3, 2017, 08:28 AM
|
#63 |
|
Senior Member
Join Date: March 1, 2009
Posts: 4,232
|
well you guys have worn me down. In the interest of consistency on neck tension to see if I can further reduce my velocity SD.
I ordered a motor, speed controller etc to build a home grown annealing machine. There are dozens of plans out there but one of the simpler designs would be found here https://www.youtube.com/watch?v=k0xE...nd%20Reloading total parts on Amazon including a tempilaq stick was 60 bucks using already owned shop scrap, existing torch etc
__________________
“How do I get to the next level?” Well, you get to the next level by being the first one on the range and the last one to leave.” – Jerry Miculek |
|
|
|
June 3, 2017, 10:08 AM
|
#64 | |
|
Senior Member
Join Date: July 18, 2008
Posts: 7,249
|
Quote:
Everyday I am reminded there are times GOD bangs his head on his desk, we have a radio station that gives a list of Darwin winners for the day; the opening for the show starts with: "Reasons GOD bangs his head on his desk". F. Guffey |
|
|
|
|
June 3, 2017, 12:27 PM
|
#65 | |
|
Senior Member
Join Date: March 1, 2009
Posts: 4,232
|
Quote:
Since I only do annealing of 400 cases twice a year at most the thought of spending several hundred on an annealing machine was hard to get past. That buys a lot of powder and bullets with which to work on range time technique. However just about anyone with a couple of basic hand tools can assemble their own for less than $100. Now I am not saying that this alone will get me down to single digits on the chrono SD's but having the case necks at the same hardness cannot hurt. That's why I read this forum, even when I am not posting it makes me reevaluate my methods and hopefully improve my reloads. Just my 2 cents worth
__________________
“How do I get to the next level?” Well, you get to the next level by being the first one on the range and the last one to leave.” – Jerry Miculek Last edited by hounddawg; June 3, 2017 at 12:34 PM. |
|
|
|
|
June 4, 2017, 12:00 PM
|
#66 |
|
Senior Member
Join Date: April 10, 2008
Location: Alaska
Posts: 7,014
|
I am going to weigh in with some more information and repeat some that my brother has found (and JH lists in his last response as well, i.e. the residue in a case and what it does to the process)
First I want to bust a myth that I keep seeing, the case is bright and shiny and they don't anneal like Lapua does. Yes they ALL anneal, most polish it off, Lapua and PPU use it as a badge of having done it (my take) and a way to separate themselves from the other brass low lifes (joke) (I am increasing impressed with PPU rifle) I got my Annie in and I had brass that was due for annealing so I did batches of brass and did some loading after as I had a nice day to go play at the range. Purely by chance, my Annie (electric induction heater for those not up to this) got setup to where I could look down the case mouth while running it, the room was lit and broad daylight out. Suggested start point for the Annie is 2 to 4 seconds for 30 caliber. My brother had come up with 1.9 and I figured that it was better to start conservative (he has changed due to cleaning his cases and I will add that to this in a bit but his anneal time actually went up with clean. ) I got just a hint of red glow at the end of some of the cases at 1.9. Hmmm, we know that is iffy at best. Now the benefit to the Annie is I am just holding the case, the timing is being done automatically (down to the tenth JH mentions). I can focus fully on the case as its going to cutoff by itself. Ok, we know under is better than over (taken with a bit of salt here, over is ok as long as over does not go down the case, it just permanently softens the case and you have good hunting cases but not target grade and target is what I do) . So, when all was said and done, I am down to 1.7 seconds which percentage out of the time involved is a lot. Also note that not all cases got a hit of red inside at the higher setting, but 1.7 made sure there was none . I am still getting the hint of what I call color change blush down the outside of the case. Then as I was testing on throw away cases I had a couple of 270 cases. Full red glow down the neck at 1.9. Yep, another variable. Add in that the Annie changes output as it warms up, you do the first 10 and then set aside and then do them again when cool. I am guessing that no two Annies are the same power output wise either. If I was doing this by hand and look, the red glow would have bloomed larger and further down before I could react (exactly as JH noted) I also would be too busy with the rest of the process to respond fast. As noted, the variable is also how much carbon is in the case (if you don't clean them out like I have not yet and JH and my brother have found you get much more consistent results) So that takes us to MG, going with the inside of the case with templac at least if they are dirty is the better way to go. That gets into a test and timing issue. There is a term in the tech world called "noise" What that means is if your equipment sees the noise it can't see the underling data. You have to eliminate noise (variables) . For us its all those variables. My brother and JH have both hit on one of those important variables, carbon in the case (which I would not have thought been an issue). I can adjust somewhat by reducing the timing, I may not get quite as good an anneal, but I can also adjust that by doing it more often (and I tend to keep 600 to 1000 cases of each of 3 calibers brass around so I have large process runs so I can do a lot at once and not back and forth all the time. But this also gets us back to torches, trying to control all the variables of a torch is really difficult. MG has worked hard at it and maybe the only one who has truly succeeded. I suspect with the Annie I can stay in a safe zone, with a torch you better be doing serious on going quality control testing like MG or the heat content of your propane or map, humidity in the air, carbon and timing all can bite you. Ie. induction is vastly better and as we have seen, even then not perfect without a last cleaning step (more money, more bench space taken up, more time spent at it) My take is that for all but a select few, the torch guys are fooling themselves. They are most likely over annealed on the neck, shoulder maybe is ok and have not gotten down the case to where it would bite. I am going to play with the Templac inside the case just out of curiosity. And while the Annie is a great machine, I will send Doug an email and suggest starting at point of 1.5 seconds for 30 caliber ammo. 308 and 30-06 both react very close to the same. 7.5 Swiss will be interesting as its a larger case and shoulder vs the other two. I may well have a variable there to adjust for. Eventually I will probably move to the case cleaning for the run through of when I do the annealing anyway (plan is 1 in 5 shootings) In the mean time as this goes on, there is a lot to think about in all this. |
|
|
|
June 4, 2017, 12:07 PM
|
#67 |
|
Senior Member
Join Date: April 10, 2008
Location: Alaska
Posts: 7,014
|
Houndog:
This is not meant with any disrespect and your information was definitely interesting. and nothing to do with wearing people down, out of a spirited technical discussion we can get rid of fake news (urban legends) Then each person can make an truly informed decisions. I am not one that makes his mind up quickly, annealing is one of those where I have floated ideas but have not had it firmed up, but the in person work with the Annie as well as the rest posted here and talking with and seeing my brothers results I am fully on the side of Induction and feel torches do not truly work for a true anneal for 95% or better. As Mr. Guffey has pointed out, a candle works, kind of slow though. As for the rest, I don't think there is any real low cost way to go about this (short of an induction unit that you build yourself) Where is Heath Kit when you nee them? MG is the only torch type I have seen post that has a quality control program in place that I think may work (and think is an operative word here). I am firmly convinced for 95% or better, torches do not work for the full desired result. That does not mean disaster, just not a fully correct anneal. Avoiding split necks is not the goal, split necks are a symptom. Getting the right tension on the neck is the goal and when that occurs split necks do not occur. They also do not occur if its overdone. Solving a symptom does not mean the underlying issue / goal is addressed or achieved. But if the biggest goal is to avoid split necks and throwing away brass, then a torch can indeed do that and as long as the body is not over heated, no harm done. Last edited by RC20; June 4, 2017 at 12:14 PM. |
|
|
|
June 4, 2017, 01:43 PM
|
#68 |
|
Senior Member
Join Date: March 1, 2009
Posts: 4,232
|
For those who want to get super precise on their annealing ditch the torch and the induction heaters and use a electric lead melting pot and low temperature nitrate salts for less than $100.
Set the thermostat to exactly 700 or 750 with a infrared thermometer and make a jig that would hold 4 or 5 of the cases so you can dunk them neck first into the molten salts to the bottom of the neck/shoulder and use a timer. That would be a more precise than torch and about 1/5th the cost of a induction heater Then if you really want to go the extra mile you can have a industrial lab do a hardness test on a annealed and a unannealed case neck to see if you are getting sufficient softening. Or you could just continue using methods which have served thousands of reloaders for decades now
__________________
“How do I get to the next level?” Well, you get to the next level by being the first one on the range and the last one to leave.” – Jerry Miculek Last edited by hounddawg; June 4, 2017 at 01:49 PM. |
|
|
|
June 4, 2017, 02:30 PM
|
#69 |
|
Senior Member
Join Date: April 10, 2008
Location: Alaska
Posts: 7,014
|
The concept of a forums to exchange ideas, disagree and present evidence for or against a concept.
I suppose there is a version of Breitbart reloading if you want to confirm what you knew all along. Some years back we got one of the single best books on fasteners and their uses I ever came across (Bowman company) In that book it discussed lock washers and their total lack of working. Somewhere around 1970s, they were declared not only useless but a hazard to joint clamping (they break, said joint looses tension) and are not approved. Some years after that, BMW motorcycles specifically prohibited them on their drive shafts. Yep, I have found them cracked and loose on one side of drive shafts on cars To this day, equipment continues to come through that has lock washers. I do a proven fact based things to avoid problems. I don't go to bars (people get killed there a lot), I don't do drugs (that is another area of a lot of casualties) I drive defensively etc. My retirement account is in the hands of a proven professional who knows what works on the average (and does not tell me I won't suffer pain along the way). So just because people have done it that way forever, that covers a whole lot of other aspects does not mean its effective, be it praying or lock washers or annealing practices. |
|
|
|
June 4, 2017, 02:44 PM
|
#70 |
|
Junior member
Join Date: February 27, 2015
Posts: 1,768
|
RC, I backed WAY out of conversations on several subjects simply because of the 'Noise',
Old wives tales, guys that were Uber vocal (and disrespectful), Guys that admit they did zero testing, and yet insist their 'Torch/Glow' method was the ONLY correct way to do things since they had been doing it that way for 20 years... The guys that INSIST the are no benefits to annealing, it's all a waste of time, money & effort. When I got shouted down about posting clean brass annealed differently than brass that was so contaminated it smoked like a chimney I haven't posted about it since... Shouting down science seems to be the perfered method rather than doing the science for themselves or even accepting a vairable they hadn't thought about before could possibly be present. When the very idea of learning something offends, I can't do one little thing for any of those groups, and the posts seem to just make them blow their tops. For the guys that DO OWN some sort of temperature indicating device (thermocouple & multimeter, templaq, whatever) often find things we talk about to be actual variables that need to be addressed. I experimented with 'dirty' heat, 'clean' heat, induction heating, both resistance & magnetic induction, and all have different vairables & quirks... What you are seeing with the 'Annie' isn't uncommon, you just have to be bright enough to notice the vairables, and a method of temperature indication would help you a bunch! I found you CAN heat the brass so fast with an 'Annie' you don't get complete annealing before you overcook the brass, I used a ferrite 'C' core and am currently widening & shaping the opening to get a better anneal. The brass was actually cycling too fast for proper annealing (Rockwell test proven, not guessing), And by widening the gap in the ferrite the annealing was being fine tuned for specifically what I'm doing the most of (milbrass). Widening the gap makes the annealer (Annie) LESS EFFICIENT, taking slightly longer but giving a more consistent PROPER anneal. This can be related to guys using high temp jet torches or mapp gas, when compared to cooler flame torches for slightly longer, giving the annealing PROCESS IN THE BRASS time to fully happen. Remember, we are waiting for a thermo-molecular PROCESS to happen, not just bang into a present temp... Now, until I started using a ferrite core, I hadn't banged into the time constraint, Coiled core induction heated slow enough for the process to happen before I overheated the brass, The ferrite focused the field so much the brass reached my target temp then started to cool BEFORE the actual thermo-molecular process of annealing was finished. (One FAST annealer! Much faster than any torch I ever used because of the human reaction time factor, torch heat had to be conservitave) On review, I now know why the factories use big open induction annealing coils on production lines, to allow the brass TIME and still maintain precise control of the annealing process... With the power of the units they use, they could literally turn the cases to slag in a couple seconds, but with big open coils the power is unfocused but still very uniform. You are going to find the templaq a real eye opener! Keep doing exactly what you are doing, observing, researching & learning! I look forward to your posting of experiments & results! |
|
|
|
June 4, 2017, 02:58 PM
|
#71 |
|
Junior member
Join Date: February 27, 2015
Posts: 1,768
|
When someone posts they have been doing a proven ineffective, or worse yet, damaging or degrading practice for 20 years I have to feel sorry for them....
When they turn around and crawl up my butt for showing where they went wrong, and insist I do things their defective way simply because THEY are doing it that way, That's when I stop feeling sorry for them... And I read the same Bowman (and Lawson) stuff you did on lock washers! I read it 10 years earlier when NASA originally produced the results all those articles quote. NASA quoted the government research article from just after WWI recommending lock washers on certain applications, but way back then the research proved the ineffectiveness of lock washers... And YUP! They still come on everything.... |
|
|
|
June 4, 2017, 03:16 PM
|
#72 |
|
Senior Member
Join Date: August 26, 2016
Location: North Dakota
Posts: 1,636
|
I am new to annealing. I have annealed several thousand cases by now....But still consider myself a novice.
As someone with a PH.D., I can attest that once you head down the rabbit hole of a science, like metallurgy, physics, statistics etc, that you wind up realizing just how ignorant you really are. It is why people specialize. Like medical doctors, some focus on the nervous system, some on cardiovascular, some on the skin. Handloading is kind of like that. My brother is happy to take the book loads, and pick a charge near the middle He trims only when the cartridge is longer than book vale, doesn't care if they are different lengths. He doesn't anneal, mixes primer lots, brass lots, powder lots, and seats to SAAMI COAL. Most of his loads are 1-1.5 moa. I on the other hand have at least tried most reloading tricks. Do a lot more case prep, anneal, turn necks etc etc. I made a load for his rifle once, his .375 HH working up the load. My load was about 0.5-0.75 MOA. When I told him all I had to do to get to 0.5 MOA he reminded me most/all of his kills are less than 200 yards .  What I'm saying is, I think some folks find a method that works well enough for them and there isn't anything wrong with it. The shouting down and ridicule that comes from folks is obviously unnecessary, and likely comes from those folks not wanting to believe there is more to it than they know. |
|
|
|
June 4, 2017, 03:26 PM
|
#73 |
|
Senior Member
Join Date: April 10, 2008
Location: Alaska
Posts: 7,014
|
I have the temple borrowed from my Brother so will see what those results are inside with a fire case.
I certainly have either missed clues in the past or even glossed over them when the fact indeed were trying to tell me what the problem was (lots of controls, generator, Switchgear) Somewhere they stay in the hopper though, I don't throw them out with the bath water, they are still there and come back when I refocus why I am not getting an answer that works. The light comes on and usually followed by something like "you twit" you could have saved yourself a lot of trouble if you paid attention. So it goes, I clam nothing close to perfection, just that I keep trying. And I told my brother up front, if he had asked me if the carbon was an issue that affected the anneal, I would have said not but would be interested in the results. I agree with both of you on the impact, my issue is separate, its money for the setup and space to do it in. I won't fool myself that its not there. Machinery is funny, it does not care for BS nor politics, though you can fool yourself into thinking it worked because you cussed at it or the Hurricane went away because you were praying. |
|
|
|
June 4, 2017, 03:42 PM
|
#74 | |
|
Senior Member
Join Date: March 1, 2009
Posts: 4,232
|
Quote:
__________________
“How do I get to the next level?” Well, you get to the next level by being the first one on the range and the last one to leave.” – Jerry Miculek |
|
|
|
|
June 4, 2017, 04:05 PM
|
#75 |
|
Senior Member
Join Date: January 3, 2017
Posts: 1,583
|
I will be the first to agree that induction heating is more efficient than using a flame. I will also be the first to admit that improperly used both methods are just as inadequate and used properly both can produce excellent results. I built my own annealer. It uses a synchronous motor that holds a constant speed. It uses a regulated flame that is set to heat the brass to 750F in 5 seconds. It is constantly checked with tempilaq on the inside of the neck. Since the process of annealing cartridge cases requires the brass to reach a through temperature of between 700 and 800F the process can have a range. (however small you might like to keep it) I have less than $50 in my annealer and I can process about 200 rounds in 20 minutes or 600 an hour if I just keep the hopper filled. (it only holds 200 30-06 rounds) Once I get the flame regulated I can load the hopper and walk away. I can do some reloading or brass prep or whatever I like for the next 20 minutes. I like that it works well and that I built it myself and that I don't have to continuously babysit it. Machines are supposed to free you up while they do the work. There is no reason, in my mind, to have a machine that needs a slave to feed it. It is not freeing you up to do other things, it's not doing the job.
Is it a lab quality tool? Not even close but it is accurate enough for my hobby. |
|
|
 |
| Tags |
| annealing brass life , annealing frequency |
|
|


