
|
|
|||||||
| Forum Rules | Firearms Safety | Firearms Photos | Links | Library | Lost Password | Email Changes |
| Register | FAQ | Calendar | Today's Posts | Search |
 |
|
|
Thread Tools | Search this Thread |
 October 10, 2016, 12:38 PM
|
#1 |
|
Junior Member
Join Date: November 1, 2014
Posts: 4
|
Problem with .223 Handloads
I'm new to handloading and I recently had a problem with my first batch of .223 handloads and I'm hoping someone can help explain what occurred.
I loaded a test batch of 10 rounds, all identical, first two fired fine in my AR 15, third round did not fire, when I tried to eject the round i couldn't extract it with the charging handle, I had to take the rifle home and use a rod with a block of wood to extract the bullet. It was clear in looking at the round that the primer was never struck by the firing pin. So I'm pretty sure I have a headspace problem and that is why the primer was not struck, I checked some previously fired cartridges with my wilson case gauge and it looks like my chamber is .005 larger than SAAMI specs and I resized my brass pretty close to the minimum on the case gauge. The thing that baffles me is, why couldn't I extract the round with the charging handle? I feel like I'm missing something, like I didn't have enough taper crimp and when I released the bolt to chamber the round the bullet pushed back into the case wedging it in the chamber, if this was the case it is probably a very good thing the firing pin didn't strike the primer. Any help would be greatly appreciated. Here is some additional data. My brass was all once fired Federal Cartridge, that I fired previously. I cleaned brass with steel pin tumbler I used the bootleg case lube mix - lanolin and ipa I'm using Dillon carbide dies on RL 550b I used wilson case gauge when adjusting resizing and sized to minimum None of my resized cases were over 1.750 I trimmed the 10 rounds after resizing to be identical at 1.740 I ran the brass over crimp removal tool and primer pocket cleaner tool with my lyman case prep I used CCI small rifle primers Bullet - sierra mk 69g hbt Powder - Varget 25.3g Overall Case Length 2.260 Set the taper crimp to be .002 |

|
|
October 10, 2016, 12:45 PM
|
#2 |
|
Senior Member
Join Date: May 3, 2009
Location: Central Texas
Posts: 3,930
|
If it were me I would start by turning the sizing die down another half turn.
__________________
No matter how many times you do it and nothing happens it only takes something going wrong one time to kill you. |
|
|
|
October 10, 2016, 12:53 PM
|
#3 |
|
Senior Member
Join Date: October 30, 2011
Posts: 110
|
Check the stuck round using a case gauge. I purchased some "ready to load" brass, checked for OAL but not size. I had a few that wouldn't extract and had to use a brass rod and hammer. Come to find out the company did not completely size the case as it would fit 90% down but hang up in my case gauge.
Sent from my iPhone using Tapatalk |
|
|
|
October 10, 2016, 12:56 PM
|
#4 |
|
Senior Member
Join Date: September 2, 2010
Location: Plainview , Long Island NY
Posts: 3,863
|
How did you set up your F/L die in your press? AR's run better with .003 headspace, you mentioned minimum, what is that measurement? After sizing & trimming , checking in your case gauge are they above the top edge, if so do they chamber in your weapon? Also are you jamming or jumping your bullets?
|
|
|
|
October 10, 2016, 01:36 PM
|
#5 |
|
Senior Member
Join Date: June 17, 2010
Location: Virginia
Posts: 6,903
|
Do not treat a gas gun like a bolt action.
1. Do NOT fool around setting "precision" case headspace. Fully size it. (+1/8 turn past shellholder contact) ...(That eliminates headspace problems) 2. Do NOT crimp -- at all. Screw the seating die down to contact the empty case, then BACK OFF at least 1/2-3/4 turn and lock it. ...(That eliminates case/shoulder bulge) That will solve your problem |

|
|
October 10, 2016, 02:21 PM
|
#6 |
|
Junior Member
Join Date: November 1, 2014
Posts: 4
|
RE: .223 handload issue
Thanks for the replies
My case gauge max length is 1.760 A spent case measures 1.765 My case gauge min length is 1.741 A case i resized measures 1.743 I followed the Dillon video on resizing instructions and turned down the die until the case was between min and max on case gauge. I am still puzzled as to why round wouldn't extract. I did check every round with the case gauge after reloading and before going to range. |
|
|
|
October 10, 2016, 02:35 PM
|
#7 |
|
Staff
Join Date: March 4, 2005
Location: Ohio
Posts: 21,063
|
Braddxon,
Welcome to the forum. Most likely you didn't fully resize the case, which can fatten the lower portion or leave the shoulder forward of its normal position or both. When you chambered the round it wedged into the chamber with the case head not fully inside so the bolt couldn't turn fully closed. The gun is design to lock the firing pin out of going forward when the bolt hasn't fully turned into place. This is to prevent out-of-battery firing, which can destroy a gun, so it's actually a good thing that it worked. I don't know what press you have. If it is a cast iron or steel press, then it is right to turn the resizing die in an extra eighth of a turn beyond the point where it makes firm contact with the shell holder when the ram is up (turn it into firm contact with the ram up, then lower the ram and turn in an additional 1/8 turn). If it is an aluminum press, you need an extra quarter of a turn. The Lee help video demonstrates this very clearly on an aluminum press, and shows how to run the press ram up with a lubricated case in it to check for a crack of light remaining between the die and the shell holder. There should be none when the setup is correct.
__________________
Gunsite Orange Hat Family Member CMP Certified GSM Master Instructor NRA Certified Rifle Instructor NRA Benefactor Member and Golden Eagle |
|
|
|
October 10, 2016, 02:42 PM
|
#8 |
|
Staff
Join Date: March 4, 2005
Location: Ohio
Posts: 21,063
|
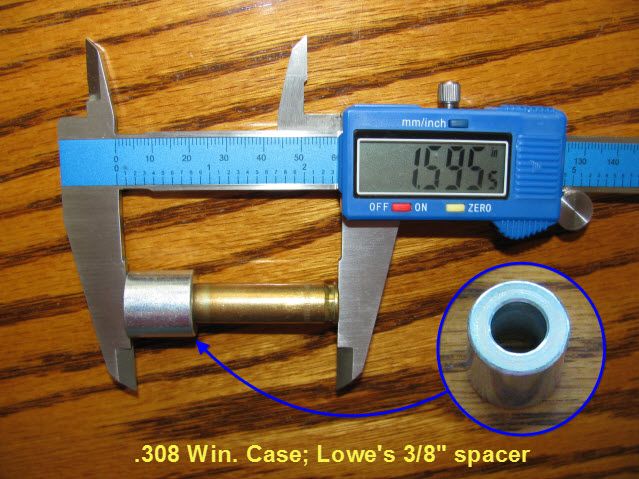
You posted while I was composing. For the Dillon press, follow their instructions. If you don't have a case comparator, use a spacer as shown below for a .308 cartridge, but with a smaller spacer that lands about in the middle of the .223 shoulder. Measure a fired case this way, then measure your resized case this way. It needs to be 0.002" shorter after resizing in order to feed reliably.
__________________
Gunsite Orange Hat Family Member CMP Certified GSM Master Instructor NRA Certified Rifle Instructor NRA Benefactor Member and Golden Eagle |
|
|
|
October 10, 2016, 02:44 PM
|
#9 |
|
Junior Member
Join Date: November 1, 2014
Posts: 4
|
RE: .223 handload issue
Unclenick thanks for your reply, your explanation makes the most sense, the case was definitely wedged into the chamber. I'm still a bit puzzled as to why my checking every round with the case gauge wouldn't have caught this?
|
|
|
|
October 10, 2016, 03:15 PM
|
#10 |
|
Senior Member
Join Date: September 2, 2010
Location: Plainview , Long Island NY
Posts: 3,863
|
Unclenick
As always nice explanation. |
|
|
|
October 10, 2016, 04:01 PM
|
#11 | |
|
Senior Member
Join Date: June 17, 2010
Location: Virginia
Posts: 6,903
|
Quote:
The only case gauge that matters in the final analysis is the actual rifle's actual chamber. If it don't fit that gauge... it don't fit. While UncleNick's counsel to use a comparator to size a couple of thousandths less than a fired case is spot on, I've found gas guns to oft times produce some strange fired-case dimensions -- nature of the beast. So unless you are willing to (a) get a good comparator like Hornady's; AND take the time to graaaaaaaadualy resize several cases to where the (extractorless) bolt will fully/effortlessly/completely close on the case -- then use that comparator reading to baseline to size 0.002" less, you're in a crapshoot. Oh... and did I mention that cases develop different "springy-ness" with age/work-hardening ? That means a sizer die 'set' from one brass lot to the next will result on more -- or less -- actual sizing after springback on those lots/manufacturers. So at this point, it's far better to simply fully-size (+1/8-turn), and never crimp to ensure reliable functioning -- each time/every time. 
Last edited by mehavey; October 10, 2016 at 06:12 PM. |
|
|
|
|
October 10, 2016, 05:08 PM
|
#12 |
|
Staff
Join Date: March 4, 2005
Location: Ohio
Posts: 21,063
|
Braddxon,
It depends on how the gauge is made. The main purpose is showing that length of the case body and neck are correct. Width is a problem. Due to the springiness Mehavey mentioned, some cases, especially those fired in oversize chambers, never go fully back to size in a standard die. I've had range pickup 30-06 from Camp Perry in the past that I could run through my Redding sizing die and still see as much as 0.005" difference from head to shoulder datum location among them, and have to run them through a second or third time to get everything within a couple of thousandths. Some of that, in cases fired by self-loaders, is often actually due to bent rims that resizing doesn't fix, especially if the bend is overhanging the mouth of the shell holder slot. Getting 0.002" shorter than as-fired is based on the observation that a lot of new commercial brass is about that much below SAAMI minimum chamber length, so it should be good enough. Due to the springiness issue, some cases may have to be sized far enough that less springy ones come out shorter than that. That's OK in a self-loader, and better than the reverse. The variation in cases and chambers creates a problem for the gauge maker. If he simply makes the gauge with a chamber reamer that produces SAAMI minimum diameters, some guns will eject cases so fat they can't fit such a narrow gauge even after resizing unless they've been sized in a small base die. Here's a link to dimensions for reamers for a series of popular AR chamber types. One look will clue you in on what the gauge makers are up against if people with all those types of chambers are going to use their same gauge. In particular, if your gauge is as wide as a 5.56 NATO chamber, it will accept case diameters that will jam in a tight 223 chamber. You can appreciate why those of us with equipment to replace and chamber our own barrels often also apply the same reamer to a length of barrel blank or to the old barrel (after trimming) to create a gauge that really matches the new chamber. Short of that, take the upper off your gun and pull the carrier and bolt and drop your finished rounds in your actual chamber and see that they drop back out when you turn the barrel up and don't wedge in it. That will find any cases that could wedge in the chamber. A length gauge may miss an unresized case that isn't too fat for it because overall case length grows during resizing, not before.
__________________
Gunsite Orange Hat Family Member CMP Certified GSM Master Instructor NRA Certified Rifle Instructor NRA Benefactor Member and Golden Eagle |
|
|
|
October 10, 2016, 06:41 PM
|
#13 |
|
Senior Member
Join Date: August 29, 2005
Location: Central Florida
Posts: 1,325
|
You don't just check for length, you must use a head space gauge to see if it will chamber OK. I have a Lyman head-space gauge, that checks for head-space, and length at the same time, if it don't pass the gauge test, it don't get loaded. ( this is after it goes through the full length resizing die)
|
|
|
|
October 10, 2016, 07:50 PM
|
#14 |
|
Junior member
Join Date: February 27, 2015
Posts: 1,768
|
A L.E. Wilson case gauge (headspace) is MUCH better than 'Crank Down The Dies'...
It will tell you EXACTLY when you have the headspace from Datum Line to bolt (Headspace) within accepted tolerance when you are sizing brass. It will also tell you when loaded rounds have had the shoulder bent from roll/taper crimp dies when used on loaded rounds. Costs about $20 and is the 'Last Word' for common reload, and its a 'No Fail' gauge for AR rifles. No calipers, no making/building anything, certifies rounds will work in ANY common .223 chamber. The same gauge used with caliper/feeler gauges will allow you to custom fit brass into a SPECIFIC rifle (advanced), But for a beginner, its the best money you can spend when you have PROBLEMS... Last edited by JeepHammer; October 10, 2016 at 08:01 PM. |
|
|
|
October 10, 2016, 09:17 PM
|
#15 |
|
Senior Member
Join Date: January 20, 2009
Location: already given
Posts: 115
|
Alternative possibility:
Sometimes things are way much simpler than they seem. There is one good check that can be made easily and absolutely determine if the cause is simple. braddxon: "I loaded a test batch of 10 rounds, all identical, first two fired fine in my AR 15, third round did not fire, when I tried to eject the round i couldn't extract it with the charging handle" OK, lets compare what you said there to this: I recently obtained a NEW M&P Sport II (AR 15). Took to the range so right out of the box. Normally I will briefly swab the barrel of a new gun but was really eager to fire the M&P so no clean of any sort. Like I said, new gun, so I pay really close attention to the first rounds fired, meaning brass recovery and examination of first few rounds. Fired six rounds, other than an unusual set of twin, slightly etched arcs on the brass, no adverse signs. Like the OP here the seventh round did not fire and when I tried to eject the round, I could not extract with the charging handle. Once the jammed round was extracted, two things were apparent. The primer was not struck at all by the firing pin. The round also had similar slightly etched arcs on two sides of the case about two thirds of the way up from the base, like the first six rounds fired. Conclusion, something is in the chamber that should not be, causing the arcs and probably the seventh round jam. Rifle disassembled, bright light into chamber, close examination. Small brass pieces really flattened into the chamber in position to readily explain the brass etch marks. Once brass pieces were removed, rifle has performed flawlessly for around 500 rounds now. Where did these brass pieces come from. The gun was new in the box. BIG MYSTERY. And yes, I did examine the barrel for any obstruction before taking to the range. I doubt I would have seen the chamber brass pieces without a really bright light. |
|
|
|
October 11, 2016, 08:18 AM
|
#16 |
|
Junior member
Join Date: February 27, 2015
Posts: 1,768
|
You ARE going to get flared case shoulders if you don't trim every case to EXACTLY the same length,- then use a roll/taper crimp on the rounds.
A slightly longer brass hitting a roll/taper crimp is going to over crimp, and put too much pressure on the shoulder. Just physics, the pressure IS going to move brass, too much brass and he movement is going to be somewhere you don't want it. A solution WITHOUT trimming every round, which gains you nothing in blasting ammo, Is a Lee 'Factory Crimp' die that pushes on the crimp from the sides, not the top of the brass. ($20) A headspace gauge used as a 'Last Word' gauge catches the expanded shoulders before they hit the chamber and jam. ($20) ---- As for 'Wood Block & Hammer'... Next time, push the pins, take the top end off, Use a pair of needle nose pliers, so you make contact with both sides of the bolt carrier, getting direct push back without side loading, Pry between bolt carrier & upper receiver just behind the front pin lug. The bolt carrier/bolt/round will pop right out without any chance of damaging anything. |
|
|
|
October 12, 2016, 11:30 AM
|
#17 |
|
Junior Member
Join Date: November 1, 2014
Posts: 4
|
RE: .223 handload issue
Thanks everyone for the great advice! I think with your help I have a pretty good idea of what happened.
I picked a Hornady headspace comparator kit yesterday at Cabelas. I checked the headspace on a number of unfired American Eagle .223 rounds, I was suprised to find quite a bit of variation, but three of the rounds were identical and I used those to set zero on my calipers. Then I took the seven rounds I had left from my test batch of .223 handloads and checked the headspace. Six of the rounds were within .001 of each other, but one round came in at .0035 over. Then I took the ejector out of my bolt and checked to see if the rounds would chamber, the six within .001 chambered no problem. The round that was over.0035 would not chamber on the first try and I tried it again and it would chamber. Based upon this, it seems to make sense that the round I had problems with was not sized enough, (I didn't pull the handle down all the way) or wasn't sized at all. Thanks again for your help, I really enjoyed trying to figure out what happened, and in the process I learned a lot about how to set up the sizing die to get the correct headspace. braddxon Last edited by braddxon; October 12, 2016 at 11:51 AM. |
|
|
|
October 13, 2016, 02:02 AM
|
#18 |
|
Senior Member
Join Date: September 12, 2015
Location: Issaquah WA. Its a dry rain.
Posts: 1,774
|
Ill offer a much simpler solution that has been 95% of my issues. The issue creats the exact problem you speak of.
Rim deformation. An ar ejects HARD and being as it does it can easily make little dents/dings/high spots in the rim. A case guage will catch this but you have to check every case with the guage AFTER SIZING. If a case failed to seat into the guage have a close look at the rim, Ill bet you find an issue there. Ive learned that a jewlers file can knock some of the offending dings off the rim and some are beyond repair and get chucked into the recycle. If I have "repaired" a rim and think it will be questionable I mark it with a red sharpie for the sake of learning/expementaion. Some might say discard the case entirely. The choice is yours what is safe but I am only talking about the outer edge of the rim. On removing the round. Look up "Motar-ing" an AR. Basically you collapse the stock if adjustable, gun on safe of course, one hand pulling on the charging handle the other holding the rifle. Smack the butt of the rifle against something solid, good bench, the earth, mother in laws head. JK! Start soft, work up the Umpff as needed. This uses inertia to get the BCG/Buffer moving rearward and will almost always get a round out. There is a chance of ripping a rim but Ive never seen it. Last edited by Chainsaw.; October 13, 2016 at 02:14 AM. |
|
|
|
October 13, 2016, 04:57 AM
|
#19 |
|
Senior Member
Join Date: March 8, 2016
Location: SE Louisiana
Posts: 300
|
The same thing recently happened to a friend of mine. The stuck cartridge was cause by neck bulging when he applied a crimp using the seating die.
As suggested before, simply do not apply a crimp.
__________________
Bayou NRA Life Member "Keep Calm and Reload" |
|
|
|
|
|


