
|
|
|||||||
| Forum Rules | Firearms Safety | Firearms Photos | Links | Library | Lost Password | Email Changes |
| Register | FAQ | Calendar | Today's Posts | Search |
 |
|
|
Thread Tools | Search this Thread |
 August 7, 2016, 06:47 PM
|
#1 |
|
Senior Member
Join Date: February 20, 2005
Posts: 2,474
|
1911 barrel fit / bump how to fix
Need help with figuring out my next steps for a project 1911.
I took a 1911 build class and I am working towards finalizing all of the various aspects of the gun prior to getting it sent out for finishing. Overall I am both satisfied and disappointed with the gun, the class and the instruction that I received. I realize that there is so much to learn that no mater what one is likely to see imperfections in their finished product however I feel like there could have been much better coverage of many things, mentorship and such from the instructor. I fully intend to finish this gun up and then do 2-3 more and then consider doing another build class with a pistol smith school to finally get to a point where I feel confidant and competent with what I am doing. No career change here, I just like to build things and develop skills. Gun has approximately 200 rounds through it currently with no significant issues or problems and passes the various 10-8 function and extraction tests. However when I began a more detailed inspection and cleaning I noticed a severe degree of barrel bump occurring as evidenced by flattening of the barrel feet immediately in front of the flat "in battery" lock up area of the feet. Gun is a Caspian frame / slide 5 inch with Kart barrel, GI recoil system that I fit and cut the barrel feet for with a Brownells cutter kit. Currently gun is running a number 5 (.288 center to center) link that has been "egged out" as we were encouraged to do to assure that the feet were riding on the slide stop pin when in battery. Looking at the current set up it is clear that I can not solve this problem with the current parts as they are for even with minor smoothing of the flattened impact area in the transition region it would appear that this will simply re-occur with the very much egg shaped slide stop pin hole in the link. I have number 1-4 links that have not been modified and they would appear to not be long enough to function, in other words if even a number 4 link were installed then the slide stop pin could not be inserted. I have read at this point copious amounts of opinions as to what this does or could indicate. The best explanation that I have found comes from Ed Brown who indicated that while when in battery the barrel feet should ride that slide stop not the link (link riding the slide stop is bad for repeatability hence our "egging it out"), but the link should ride that slide stop pin in the transition zone up into battery, i.e. that slide stop pin should not crash into the barrel feet rather there should be a rotating motion around the slide stop pin / link hole as the barrel transitions up into battery with the barrel feet making their way onto the slide stop pin. This would appear to be the design intent of JMB and is counter to those whom state that the single function of the link is to pull the barrel down and out of battery. Examining a number of well put together 1911's and even messing with some dyekem on them to see where things ride in the link it appears to me that Mr. Brown is correct, the smooth guns without this "barrel bump syndrome" are experiencing rotation at the barrel link for this transition. The ones that do not have a pronounced bump at times as my class gun did and that I was blaming on break in or that the barrel was "hard fit". Now the questions I have are as follows: 1. Ed Brown advises against longer links however in my gun it would appear I have no other option other than starting over a new barrel and fitting that? We were taught that using a longer link delays unlocking and lightens recoil. True / false or what is the trade off here? 2. What exactly would be the cause of needing a longer link in a build? Tolerance stacking from all of the hand fit / file parts vs. a blueprinted gun such as the semi-custom houses build? 3. What direction to go in? My thought is to obtain an unmolested #5 link and see if that will provide the needed motion in the transition zone and still not ride the link when in battery. If it does I will modify it in a much more judicious manner to slightly relieve the upper most dimension as opposed to the wholesale egging we were seemingly encouraged to do since the link's only function is to pull the barrel out of battery. Any and all thoughts on this would be most welcome. |

|
|
August 8, 2016, 04:37 AM
|
#2 |
|
Senior Member
Join Date: November 13, 2006
Posts: 8,286
|
Well,I'm not 100% sure I'm getting the right vision from your words.That may be my reading comprehension.
Last one I did,and I am an amateur,after fitting the hood,I did a Prussian blue printing of the bbl lugs in the slide.Kart bbl.I used the alignment block on the lower lug/feet.Printoff was beautiful.Engagement mic'd good. I then assembled it,frame,bbl,slide.I used pin gages to determine the largest pin I could put through the slide stop hole.I forget,but lets say it was .165.You decide if you use .199,.200,or .201 for the SS pin/hole and the clearance,but lets say te .165 pin told me .035 needed to come off the feet. Now,I did not use the Brownell's lug cutter.I made a fixture that held the bbl,indicated and located by way of the link pin hole in the bbl underlug. I used a 5mm carbide end mill.So in the "y" axis,Ioffset,touched off,and set my dial to get my .035 off the feet.I set "y" zero at my final location to give me my cut. I'm not doing the math again,but the 1 deg bbl tilt over the .035 or so full lockup flat is about .0006.I fudged that in with the "y" crank,then offset the .035 or .040 toward the breech to give me the flat. Then I returned to the same "x" zero I got from the link pivot hole. I forgot to mention,I set this up on a rotary table on a Bridgeport.The axis of rotation of the rotary table was exactly coaxial with the link pin hole.I set the rotary scale to zero after indicating the length of the barrel to the "x" travel the machine. Once I had the cutter in the right place,I cranked the rotary table to cut this same radius around the barrel feet. Since I know I have a .1967 cutter,and I know the "Y" offset from the link pin hole,I have a good,hard number for link length. No "egging" of the hole needed. I use marker ink on the feet,assemble,make sure no interference slide stop to feet swinging on the link.This may take light,careful hard fitting,checked at test fire. The .0006 offset I allowed for the 1 deg ramp on the feet,I just let the cutter radius give me the ramp.I positioned the cutter X + .035(flat length),cutter y -.0006(clockwise in my setup,feet toward me.) Brought the quill down to plunge the cut.raise the cutter. Now position x zero(in line with link pin hole,and y zero,(The location that cuts .035 off the feet per my measurement,then plunge the cutter. Lock the quill,and crank the rotary table...was it 30 or 60 deg?I forget. Now,if you go to youtube,thereis a series of vids about the Weigand barrel underlug fitting fixture.It is a tool for those who have no rotary table.I made a similar setup to hold the barrel on a rotary table.I did not need the pins,etc. I think if you watch this process,a light bulb will come on for you. https://youtu.be/qFwkeYGMdbM?list=PL776BD876D84617FA For what it is worth,I roughed this first with a 3/16,.1875 cutter first.Went through the whole process,then switched to the 5mm .1967 end mill.And yes,I bought a Lisle brand R-8 5mm collet.THis two step process provides for a .005 fin cut using exactly the same numbers. Allof the critical dims are in Kuhnhausen Last edited by HiBC; August 8, 2016 at 05:04 AM. |
|
|
|
August 8, 2016, 08:47 AM
|
#3 |
|
Senior Member
Join Date: March 26, 2005
Location: Osborn, Missouri
Posts: 2,697
|
RsqVet, I always hate trying to diagnose gun problems on the internet, but here goes.
First thing about barrel link numbers is do not take them as gospel, if your instructor did not have you take the actual measurements of the hole spacing in the link he failed to teach a valuable lesson. I've measured links stamped #3that were actually #4 and #4's that were actually #3's so it's important to check the hole spacing so you know what you have. Also with the lower lug cut correctly you should not have to egg shape any link holes. Now if you are flattening the radius on the lower lug caused by barrel bump you do not have the lower lug cut correctly. I agree with Ed Brown ( he's pretty knowledgeable on 1911 pistols) you should not have to run a longer link. I don't know who your instructor was but it sounds to me he may have taught you wrong. Best Regards Bob Hunter |
|
|
|
August 8, 2016, 10:14 AM
|
#4 |
|
Senior Member
Join Date: September 28, 2008
Posts: 10,442
|
It kind of sounds like this particular instructor has his noggin stuck in the past, well before a click of a keyboard quickly brought a multitude of parts to the front door.
__________________
Walt Kelly, alias Pogo, sez: “Don't take life so serious, son, it ain't nohow permanent.” |
|
|
|
August 8, 2016, 10:14 AM
|
#5 |
|
Senior Member
Join Date: June 16, 2008
Location: Wyoming
Posts: 11,061
|
I'm not sure of the theories on the link that you mentioned.
I have been involved in building 1911 match guns for the Guard. Converting USGI as issued 1911s to NM 1911s for Bullseye shooting. When the gun was put together, we took a hand full of different size links to the range. We chose the size based on what was the most accurate for that gun. They were pretty much all different. I seriously don't think any one can tell you, without shooting different links, what is the best for your gun. Only the gun itself can tell you that.
__________________
Kraig Stuart CPT USAR Ret USAMU Sniper School Distinguished Rifle Badge 1071 |
|
|
|
August 8, 2016, 11:28 AM
|
#6 | |
|
Senior Member
Join Date: March 26, 2005
Location: Osborn, Missouri
Posts: 2,697
|
Quote:
To long of a link can/will cause barrel timing issues so proper size link is very important. Barrel timing is one of the most critical over looked things on 1911 pistols and is the main cause of the ruining of many a good barrel and slide. You need to know what your radial lug engagement is and how far off center is your firing pin strike. If a #4 ( 0.283 hole spacing measured) is not long enough ( this most likely is a good thing) then you still have enough material for the correct fitting of the barrel lower lug. When building custom guns from the frame up with slides hand lapped to the frame and properly fit barrels, my guns always required using a #3 (0.278 hole spacing measured) link. I fit my barrels to a hard fit with a centered firing pin strike, I also cut the lower lug to give me the longest dwell time possible using slide stops with a 0.200 pin. If you want to take a class on building 1911 pistols you might want to contact Bob Marvel or Bill Laudridge of Cylinder&Slide. Best Regards Bob Hunter |
|
|
|
|
August 9, 2016, 01:50 PM
|
#7 |
|
Moderator Emeritus
Join Date: April 27, 2013
Location: Ohio
Posts: 1,923
|
Bob hit the nail on the head, as dwell time makes the life of the gun.
From what I've read at a few other places on the internet, many think the link should end up exactly vertical, from pin to pin, with the slide fully forward at battery, but that is not the case. The link should have a small amount of over travel, which increases the dwell, or the amount of time the barrel is locked to the slide during firing. With the slide all the way forward, when fired, the barrel lugs are actually out of the slide recesses a small amount. As the slide goes back, the lugs go up, and deeper into the recesses at TDC, then when the link passes TDC, then they start to pull back out until the barrel is released from the slide, well after the bullet is gone, and the chamber pressure has dropped. Instead of the link being vertical, it is actually angled forward a few degrees, when the slide is at battery. Bob is spot on about this. I think some get a misconception about this over some cross-section drawings of the pistol that I've seen, where it looks as if the link is vertical, when the slide is forward at battery. |
|
|
|
August 9, 2016, 04:01 PM
|
#8 |
|
Member In Memoriam
Join Date: March 17, 1999
Posts: 24,383
|
"Those who can, do. Those who can't, teach." (Old saying.)
Jim |
|
|
|
August 10, 2016, 12:08 AM
|
#9 |
|
Senior Member
Join Date: November 13, 2006
Posts: 8,286
|
Dixie,(and Mr Bob),agreed on the pin to pin and dwell thing.I forget whether I picked it up off the Weigand vid or the Kuhnhausen dwgs,but the linear distance,assuming muzzle is left,breech is to the right,barrel feet toward you...
And the "x" axis is the length of the barrel,from pin to pin as the zero point,I offset .035 dwell toward the breech from pin to pin.But that .035 is supposed to be at 1 deg. one deg is approx. .0175 per in.So,.035 times .0175 = a .0006 "y" offset. That would be .0006 clockwise with the crossfeed crank.At that location I plunged the 5mm end mil. I just let the cutter radius over .035 be the 1 deg ramp.I don't worry about a tenth or two on a Bridgeport.Its pointless. Then,spindle up,I go back to the pin to pin zero location,bring the spindle back down,and do the radius with the rotary table. The radius is concentric with the link pin axis,and tangent to the .035 dwell at 1 deg. Purely by the numbers,once the slide stop pin is off the dwell flat,the radius should,in theory,have .0006 clearance around the radius during linkdown. I know,ink,try,verify. When used this setup,my measurement said #3 link,the frame/slide contours were right there,and I could just barely feel the dwell flat climb on to the slide stop as it fully locked . I'm kind of excited about this because after watching the Weigand lug cutting process,I built my own tooling for the rotary table.Its a laid over Vee-block,a clamp design that gives me cutter access,an end stop for the rear face of the barrel foot,and a jack screw to help clock the barrel so the lower lug indicates flat. First time I used it,the job came out great. Another different approach I used when I checked my locking lug Prussian blue fit,barrel to slideafter I fit the hood. I had a depth mic number from the top of the slide to the barrel hood with the barrel locked up,using the largest pin gage that would go through the frame slide stop hole. So,OK,I know the barrel dia. Center of the barrel will be 1/2 that.Add the distance from slide top to barrel. Now,put a firing pin in place,depth mic slide top to firing pin.Add I/2 dia of the firing pin.Its another way to chk firing pin center. With the largest gage pin through the frame,with a great Prussian blue-off barrel to slide,the firing pin was centered. This was my first Kart barrel.It was not the EZ fit. I give Kart a great deal of credit for sending me something that was RIGHT!I mostly just verified it was right and grinned a lot. I know that the traditional gunsmith way to all this is with the Brownell's lug cutter,files,etc. I can't help but apply what I learned building tools. It won't be my last Kart barrel. Last edited by HiBC; August 10, 2016 at 12:24 AM. |
|
|
|
August 10, 2016, 06:08 AM
|
#10 |
|
Moderator Emeritus
Join Date: April 27, 2013
Location: Ohio
Posts: 1,923
|
LOL, Jim I have heard that. I can honestly say that my Vo-Tech teacher, years ago, knew his stuff, but I have seen others that only teach out of a book, which isn't necessarily correct.
One instance, though it doesn't concern Gunsmithing, is history, either world or US, and much of that has been proven to be incorrect, having a one-sided view. The tales told about George Washington, when I was in school in the 1970s-1980s, are a good example. I wonder if they still teach that he would never lie? Sadly, my teachers would never discuss anything outside the text. It had to be "approved" curriculum only. Anyhow, a good teacher will be a working gunsmith/pistolsmith, in this, that has hours of machine shop experience and understands metallurgy. Actually, a BSc in mechanical engineering would be a boon. Teacher qualification has been a problem with Vo-Tech trades for a long time. |
|
|
|
August 10, 2016, 07:29 AM
|
#11 |
|
Senior Member
Join Date: March 1, 2000
Location: Boise, ID
Posts: 8,518
|
I'd question why such a long link appears to be necessary?
Using a Caspian frame and slide "set" would result in specs closer to mid-range, you'd think?
__________________
Runs off at the mouth about anything 1911 related on this site and half the time is flat out wrong. |
|
|
|
August 10, 2016, 10:59 AM
|
#12 |
|
Moderator Emeritus
Join Date: April 27, 2013
Location: Ohio
Posts: 1,923
|
HiBC, I measured the angle from a set of original 1911 shop drawings, and I think I came up with 2 degrees. Of course, the difference between 1 and 2 degrees is almost negligible at that short of a distance between the pins. The main thing is that the slide recess is deep enough to accept the barrel lugs, when the link swings back to TDC, and that when the link is forward, the firing pin is centered on the cartridge or the center-line of the chamber. If the link was vertical, a firing pin strike would be a little low on the primer, due to the barrel being held high by the link, and the lock-up time would be a shorter.
I think the drawing on the net, that most view, was from a series of drawings that showed the gun at battery, then firing, and several more of differing positions of the slide moving rearward. They chose the image that shows the slide just after firing, when the link had swung up. If I recall, that image shows no bullet, only the cartridge. Below is a good drawing of a cutaway/section view before firing. One can see the link swung forward and the amount of lug gap at the top. 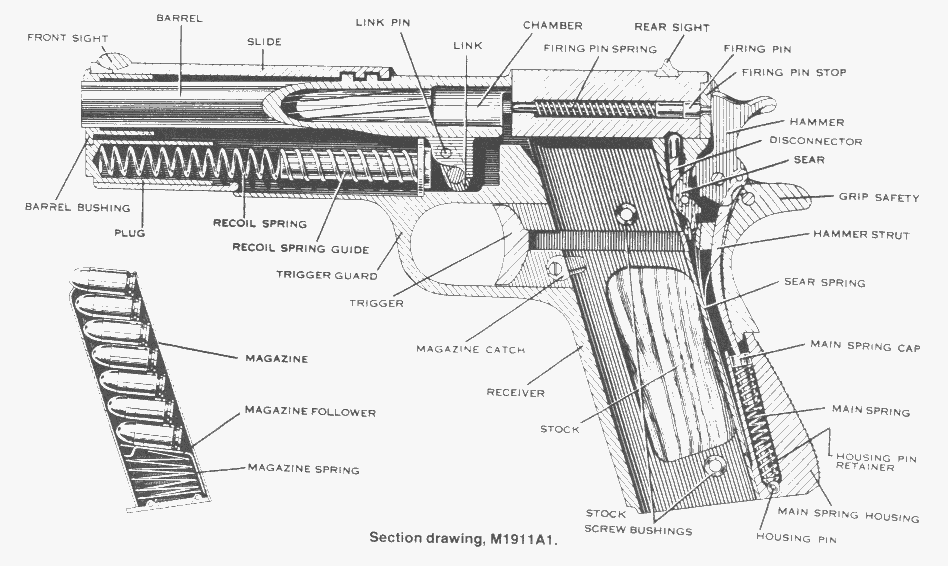 Copyright 2016 historical firearms |
|
|
|
August 10, 2016, 07:51 PM
|
#13 |
|
Senior Member
Join Date: November 13, 2006
Posts: 8,286
|
Thank you,Dixie. I do understand,and we do have it right.
This will show you the Weigand fixture that inspired my fixture. His fixture has stop pins and pivots to work around not having a rotary table.It IS a nice fixture,and I learned from it. I'm quite experienced at using a rotary table to do similar work. The fixture I built holds the barrel in similar fashion.I just do all the rest with the rotary table. https://youtu.be/rVcEn0EN3Wk My Kuhnhausen "M1911/M1911a1 Pistols;A shop Manual" is a paperback 3rd edition. In mine,on page 109,plate 94,just below center of the page,and slightly to the right,a series of dimension for the barrel underlug are given. There is a .140 +/- .002 dim from the link pin hole back to the end of this dwell we are discussing. If you do not have the drawing,its the rearmost part of the "hook" on the barrel feet that stops on the slidestop pin. Given that the pin is a nominal .200 (or ,199),the radius of the slide stop pin is .100,subtract that from the .140 dim,and that leaves a design dim (ref) of .040 +/-.002 for the length of the dwell cut..My .035 is a touch short!! Oh well.There are about 4 pages of barrel dims following on those pages. |
|
|
|
August 12, 2016, 02:03 PM
|
#14 |
|
Senior Member
Join Date: February 20, 2005
Posts: 2,474
|
Gentlemen --
I thank everyone for their input. I have learned much in looking at this "issue" with my project gun and hopefully solving it. Without this issue I would have kept thinking "all the link does it pull the barrel out of battery" As to the class I fully intend to take the class offered by Cylinder and Slide after another project build or 2. They always have been awesome to deal with and I am certain they offer a great class. I have no intention of going into this for a job, I just enjoy it and want to be able to do it "Right" and I realize that the is much to learn….. more than can be learned building one gun in one week for sure. My motto for my first build was accept that your first born may be a little deformed. I say this because I went into it with stars in my eyes wanting to produce a "perfect" this or that to my exact liking. I quickly realized that just was not in the cards for my or I suspect anyone's first build. I have no huge regrets over my first class though looking back at some of my notes, and some things that have been said here and elsewhere I will say that one should take gunsmith classes from gunsmiths and tactical training from tactical "operators" and not vice versa. I wish that I still had a mill and could avail myself of the excellent fixtures for use in barrel fitting. Sadly in a move I sold my Rockwell mill (6 x 24 table, R8 spindle about 1000 pounds) and have never found another or similar. I can’t do Bridgeport size and refuse anything imported or in the "mill / drill" spectrum of machine. To Bob Hunter's point I ordered 2 number 5 links being an optimist and I got a number 5 and a number 2. At by measurement and by stamping so it was just a case of miss packaging however I had a good chuckle on that and was glad I ordered 2. Currently on my gun, with the barrel in the slide, with my bushing installed and the barrel feet centered in the slide with the test block the firing pin hole is dead center as measured with a gauge bar from Brownelles passing down the barrel into the firing pin hole. The new number 5 link appears on visual inspection to work / solve this prior issue --- I will be putting it all together latter today and test manipulating it prior to a hopeful test fire tomorrow. My remaining questions are several, most pressing of which, is if I have a centered firing pin hole how the heck did I end up with a number 5 link length? |
|
|
|
August 13, 2016, 08:12 AM
|
#15 |
|
Senior Member
Join Date: April 4, 2012
Location: South Jersey
Posts: 2,217
|
RSQVET- fyi Bridgeport machines are made in China. Pretty sure every manual mill and lathe are now made outside of the US with the exception (maybe) of some hardinge lathes. I often look for TOS machines when shopping. They are Chek made. And colchester lathes. Currently I have 17pcs of manual equip in my shop 3 cnc lathes and 2 cnc Mills not to mention all the support equipment.
Good luck with your build. I am a machinist that likes to work on my own guns. I am currently working on a 1911 also. Fitting a Schumann barrel as well as a bunch of other mods into a kimber frame and slide.
__________________
Concentrated power is not rendered harmless by the good intentions of those who create it. Milton Freidman "If you find yourself in a fair fight,,, Your tactics suck"- Unknown |
|
|
|
August 13, 2016, 10:51 AM
|
#16 |
|
Senior Member
Join Date: February 20, 2005
Posts: 2,474
|
Sadly aware that few if any new machine tools originate here... though at the price points I am looking at would not be new anyway. Equally sad the supply of not total junkers seems to be getting smaller; or I am just geographically isolated from areas where they are more plentiful.
Well put it all back together and I still have the problem of lug bump though to a less severe degree. I am re-reading Kuhnhausen on the subject and it would appear to me that I did not radius / fit the forward slope of the lugs enough, unsure if this is a point I missed or we were not taught. My barrel feet were basically cut and then we assembled with a test link and lapped it in --- without this step it would seem that some degree of bump / peening / issue will always happen. Any other ideas? |
|
|
|
August 13, 2016, 11:19 AM
|
#17 |
|
Senior Member
Join Date: November 13, 2006
Posts: 8,286
|
I'm not a gunsmith.They may know better how to do this old school.
If I had to find my own way, I'd figure out the correct link to match my initial lug cutter location.FWIW,I have never used the Brownell's setup.It MIGHT be that you can hand crank "mill" the .040 dwell and the radius with the Brownell's tool.I'm not saying you can,but it looks like a "maybe" to me. But,knowing the link size based on measuring ,I might select that link. I might get a very fine,sharp scribe.Instead of putting the link in the middle,where it goes,I might pin it on the outside of the foot.Then,using the scribe inside the slide stop hole,I might scribe a fine line by swinging the link through its arc. Then I might carefully file to approach that line.As I got closer,I might swing the link with a slide stop pin over the feet,I might magic marker them first to identify high spots. No need to file low spots.Just high spots.Note,don't file the surface the lug cutter established for you. After getting close,I might marker it on the feet,and assemble slide,barrel,slide stop,bushing in the frame and hand cycle it.Once again,the marker will wear off the spots where it contacts the slide stop. I don't know if that's the best way,but,old school with a file,I don't know what else to do. Another concern you have,is what is called the "timing test".Its in Kuhnhausen. A brief,incomplete version,:When you draw the slide back,until the vertical face of the barrel underlug contacts the vertical impact face of the frame,the link needs to have pulled the barrel down sufficiently to fully disengage the barrel locking lugs from the slide locking lugs. Running a longer link ...the geometry might not work out so well.For a given vertical travel down,to unlock and provide clearance,a longer link requires more slide travel.So,then you compensate by taking steel off the vertical impact faces...Which might be more steps down the wrong path.In full lockup,the barrel feet rest on the slide stop pin.If the link is longer than necessary,its the link that is holding the barrel in lockup.Not good.As far as "egging" the hole,I have not needed to do that. Its real important that the "timing" is correct.If those lugs do not fully unlock with clearance,They will almost unlock.Then the edges/corners of the locking lugs get battered and displaced.Barrel and or slide are ruined. Last edited by HiBC; August 15, 2016 at 04:26 AM. |
|
|
|
August 14, 2016, 02:21 PM
|
#18 |
|
Senior Member
Join Date: March 26, 2005
Location: Osborn, Missouri
Posts: 2,697
|
 Boogieman, I fit a lot of Schuemann barrels and the Tribrid barrels (like the one in the picture) with the gain twist rifling was the most accurate pistol barrels I've ever used, they literally would shoot holes in holes. That being said I no longer use or recommend Schuemann barrels as he does not stand behind his product. RsgVet, I still believe you need to re-think your barrel fitting, I can't imagine you needing a #5 barrel link. As I stated earlier if that's what your instructor told you I don't believe he knows his back side from a hole in the ground, I certainly hope his last name did not start with a V. Best Regards Bob Hunter |
|
|
|
August 15, 2016, 04:52 AM
|
#19 |
|
Senior Member
Join Date: November 13, 2006
Posts: 8,286
|
With just your barrel with link in hand,and your slide stop.
Have the link down,where is would be in lockup.Now,put the slide stop pin through.Does the slide stop pin rest in contact with the barrel feet? If the link is too long for the slide stop pin to rest on the barrel feet,the link is too long.If you have elongated the hole of the link...order a link assortment maybe. Now,if you have a link,with no elongated hole,that will (A) Allow the slide stop pin to rest in contact with the barrel feet,(the spot you cut with the Brownell's lug cutter,through the frame.)Thats requirement one.Slide stop pin goes through the link,and is in contact with the feet. Measurements are maybe better,so you can select a length,but this check is functionally useful. Now,(B) Once you have this ballpark idea of the correct link,to see if the radius is properly cut,with the slidestop through the link,see if you can swing the link and slide stop pin around the radius without interference.If it binds or interferes,a longer link is not the answer.Elongating the hole is not the answer. The steel making the interference is removed from the barrel underlug radius. I am NOT saying this is the right way to set them up.This all needs to be right fully assembled,in firing. But real quick,it will tell you if you are even close. Last edited by HiBC; August 15, 2016 at 05:02 AM. |
|
|
|
|
|


