
|
|
|||||||
| Forum Rules | Firearms Safety | Firearms Photos | Links | Library | Lost Password | Email Changes |
| Register | FAQ | Calendar | Today's Posts | Search |
 |
|
|
Thread Tools | Search this Thread |
 February 2, 2011, 08:12 PM
|
#1 |
|
Member
Join Date: November 18, 2010
Location: Auckland, New Zealand
Posts: 15
|
My take on improving Howa 1500 factory trigger - in THREE parts
Pa r t 1 Howa 1500 trigger / Weatherby trigger
Being an owner from new, of the Howa 1500 Varminter Supreme in Stainless, 308 calibre, some of you already know I have had the barrel shortened by an inch and had a custom removable over-barrel suppressor fabricated. (photos to come...) Next task was the all-discussed factory trigger.. Creep creep, you got it.. Yes, adjust this and the safety stops working... Mind you, in my days of firearm training, It was enforced that one wasnt to rely on the mechanics of a safety, but to use the semi-ready position of the bolt until actually ready to fire... Im sure this is a can of worms, so I shall not discuss this - my practices are mine alone.... I have spent a quiet public holiday pulling apart and photographing each step, in case there are other owners out there who cannot justify the costs of importing a quality aftermarket trigger, being outside the USA.... Whether right or wrong, this is what I have done to see alot of improvement in the sear surfaces... and no one anywhere it seems, has posted pics of the trigger in bits... and if nothing else, was an education... -this has quite a few images to see, grab a coffee or beer- 1. Some of us are familiar with this, the Howa trigger group.. 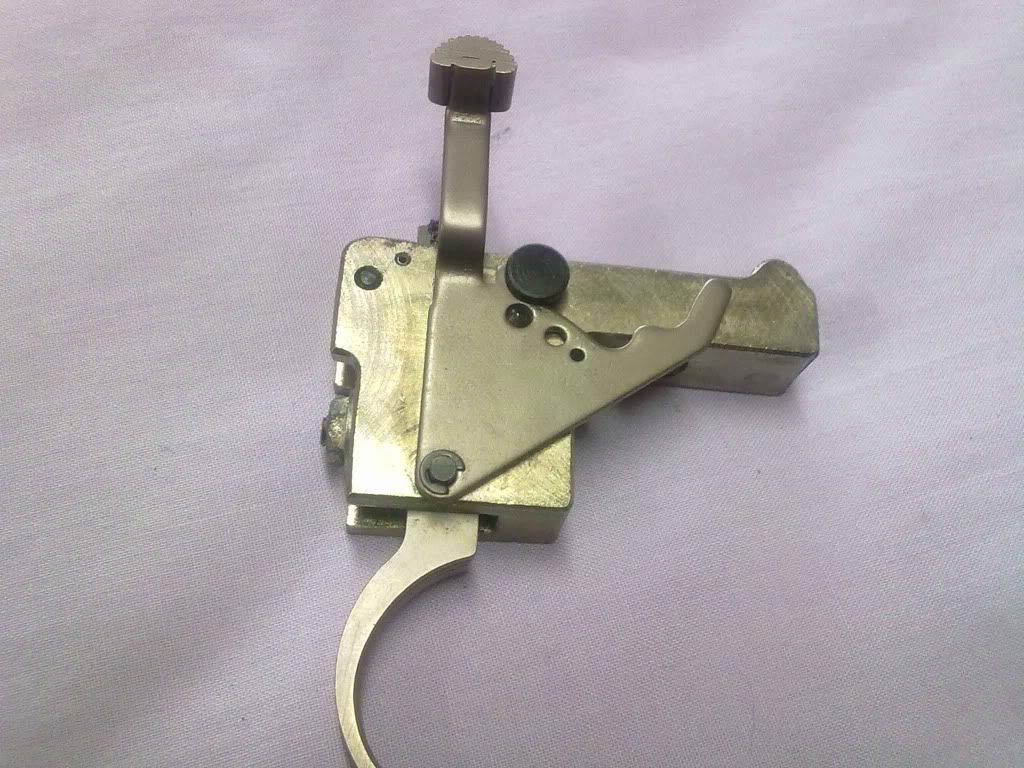 2. I first removed the circlip and the Safety tang retaining pin. 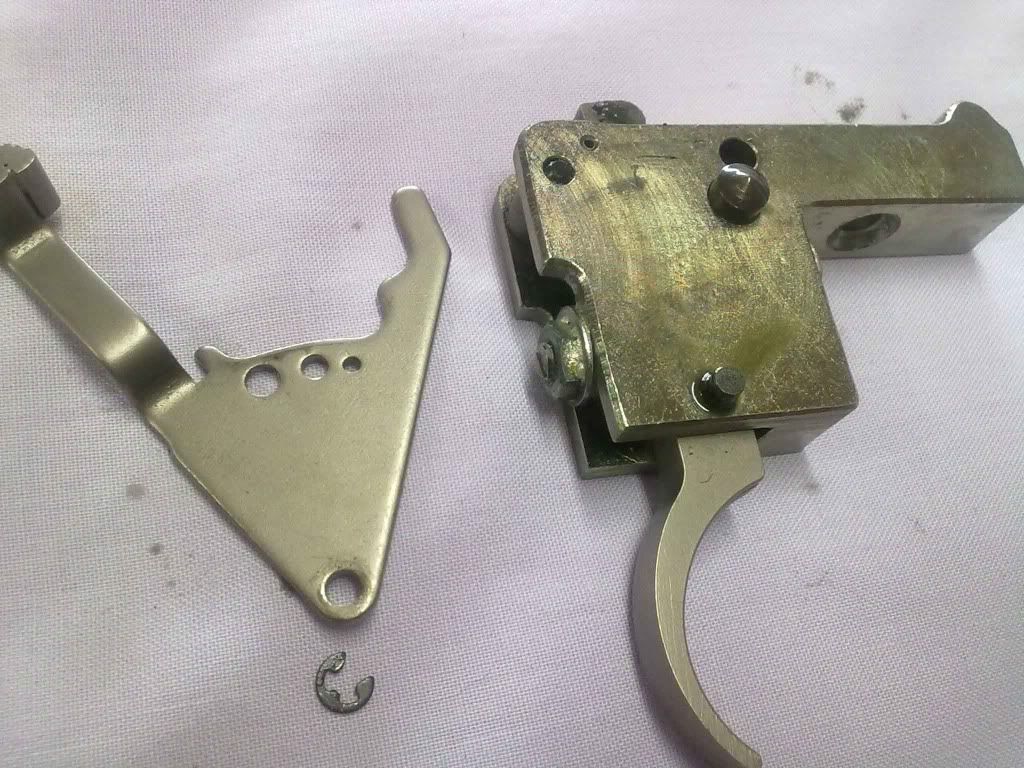 3. After removing the safety tang, the conical locator pin and spring are ready to fall out.. 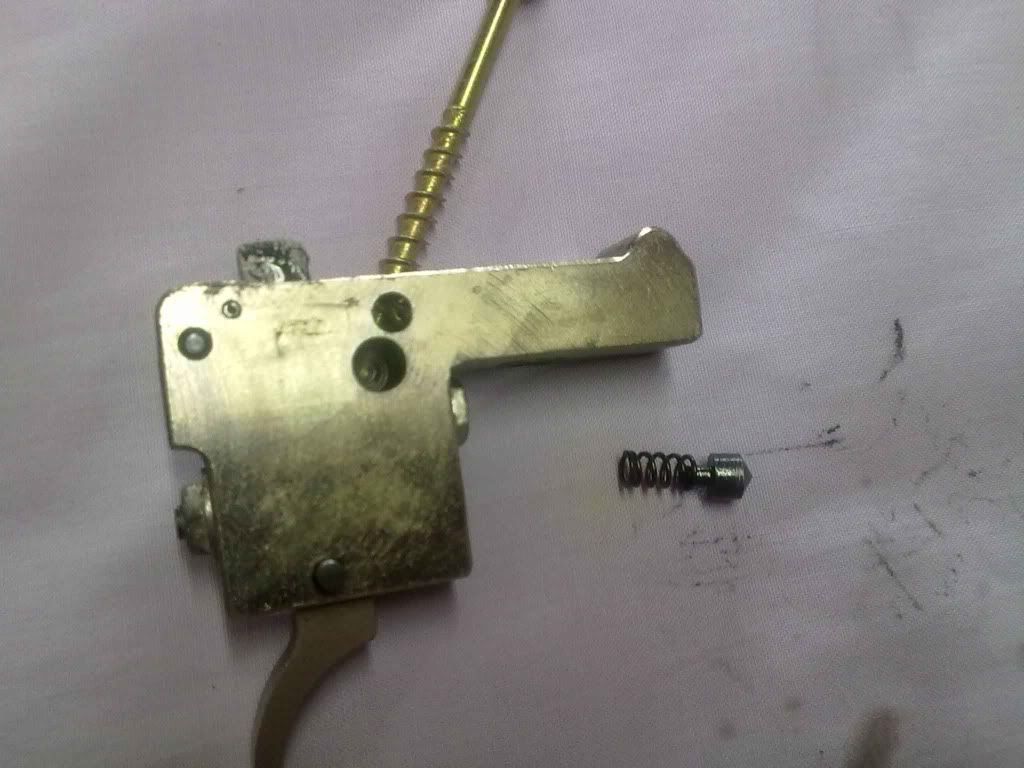 4. I then removed the rear adjusting screw completely - this frees the trigger internally from the front spring. 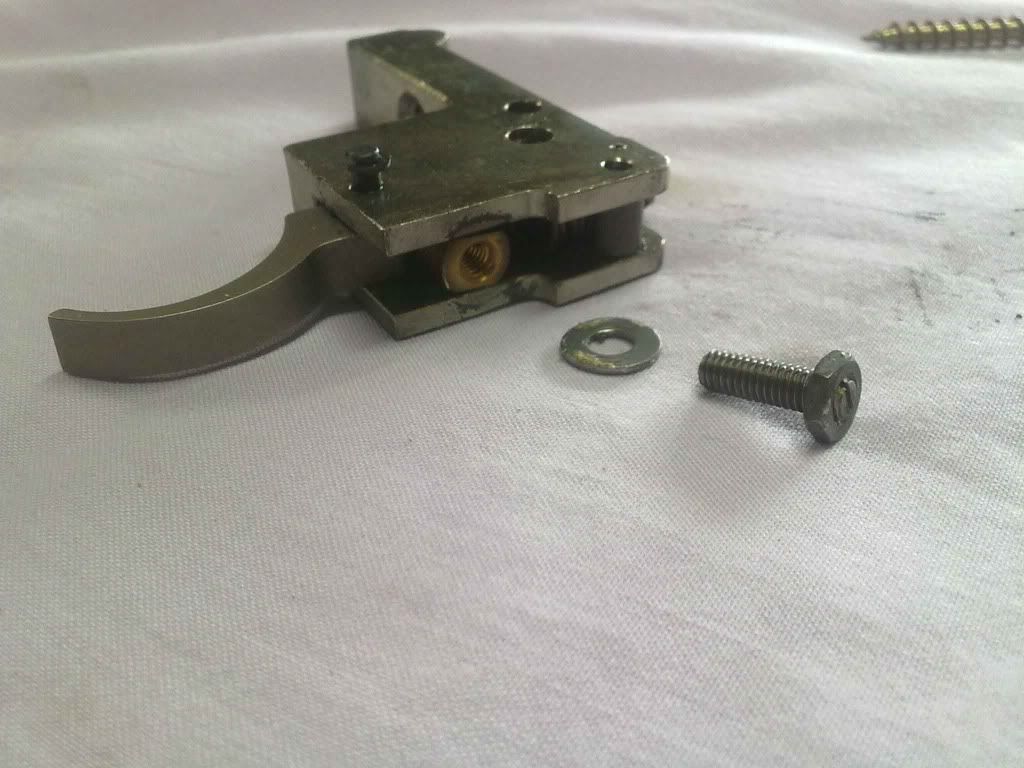 5. The trigger will now be loose, but captive, until the pin nearest the trigger curve is removed. i found that because earlier we had removed a circlip, the pin and other circlip can come out the other way, allowing the trigger to be removed... 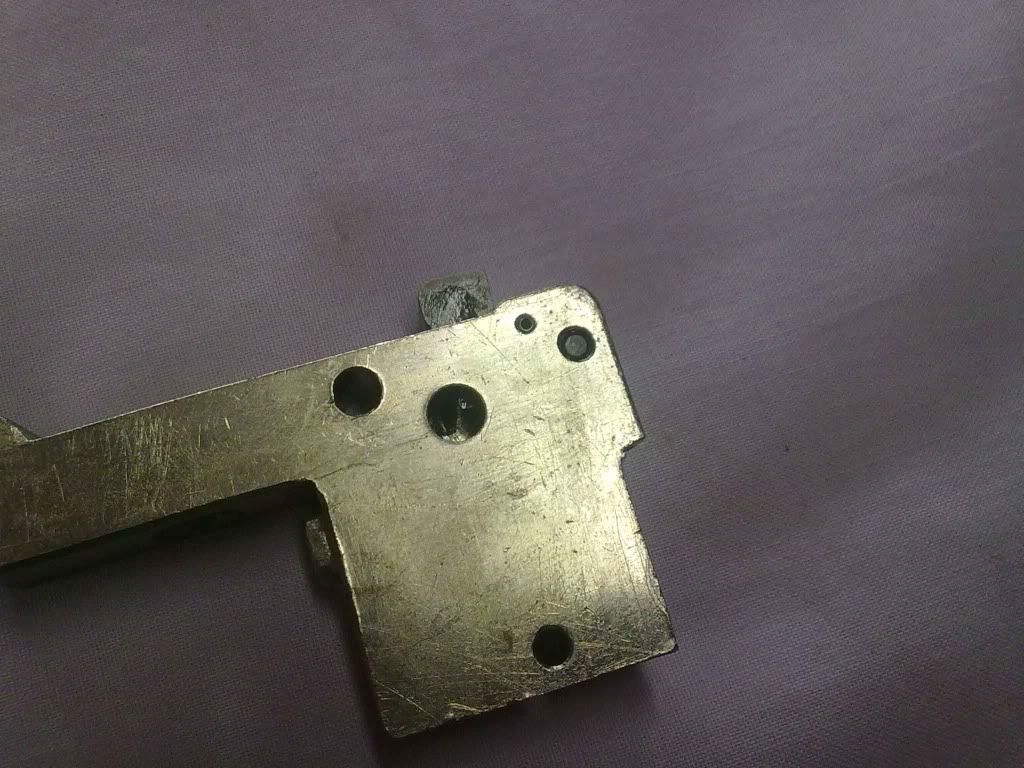 6. If we look at the top of whats left , it will look like this... we want to then remove the tiny pin holding in place, the 'L' shaped sear... 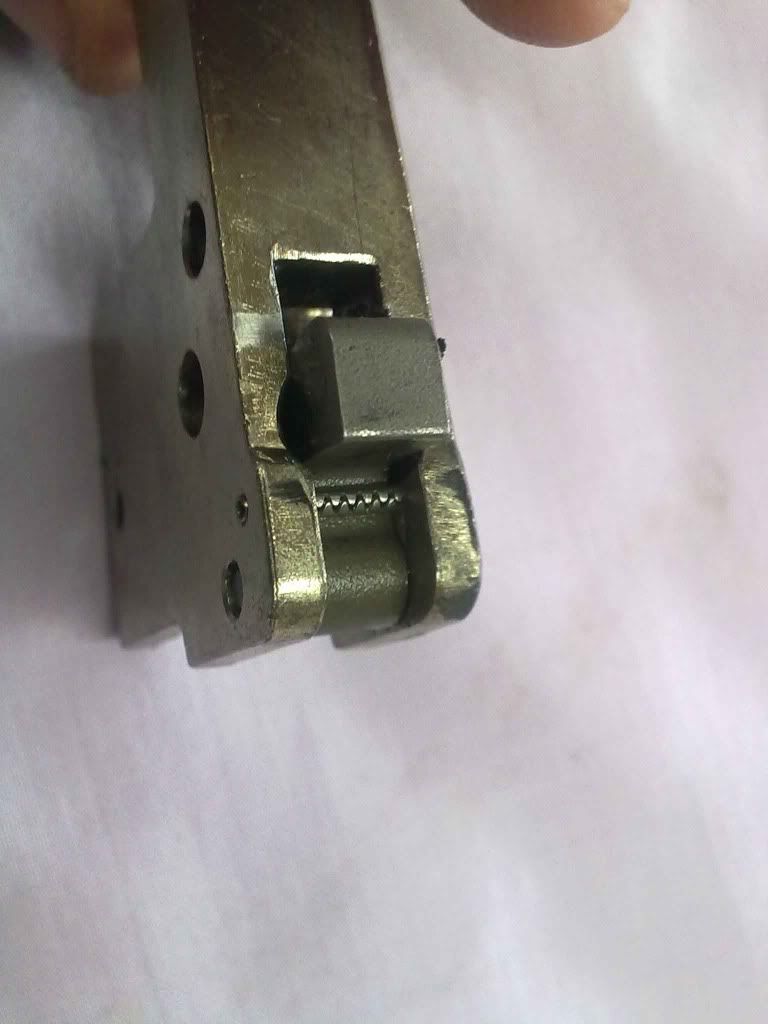
Last edited by oorklandboy; February 2, 2011 at 08:51 PM. Reason: add keywords, improving google results |

|
|
February 2, 2011, 08:14 PM
|
#2 |
|
Member
Join Date: November 18, 2010
Location: Auckland, New Zealand
Posts: 15
|
Part 2 of 3... (too many pics for one thread..)
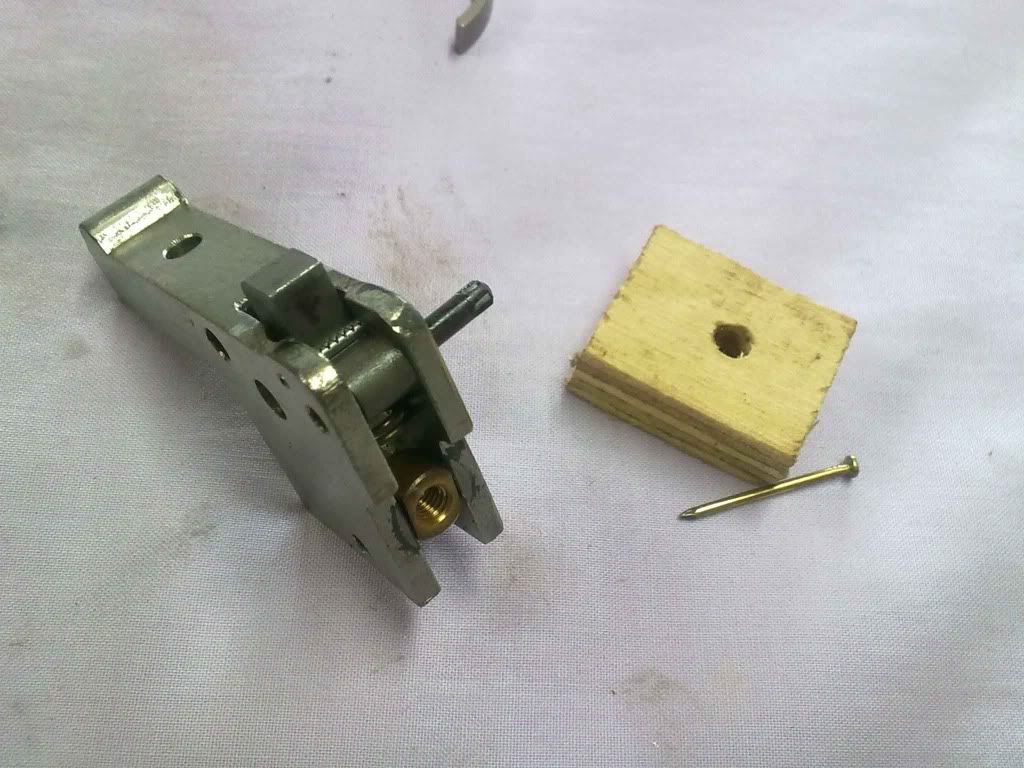
7. Find something tiny but tough enough to drift this pin out... easy on the hammer... The wood with hole was underneath the pin, allowing the pin to come out without hitting the benchtop... This is repeated for the larger pin also... image shows larger pin half out...
 8. Be wary, I was lucky enough to be on a cloth-covered workbench, and found myself looking at a random spring... it has come from deeper in the unit, being the front trigger tension spring... this had a habit of falling right out, when the trigger unit was held in the wrong way... 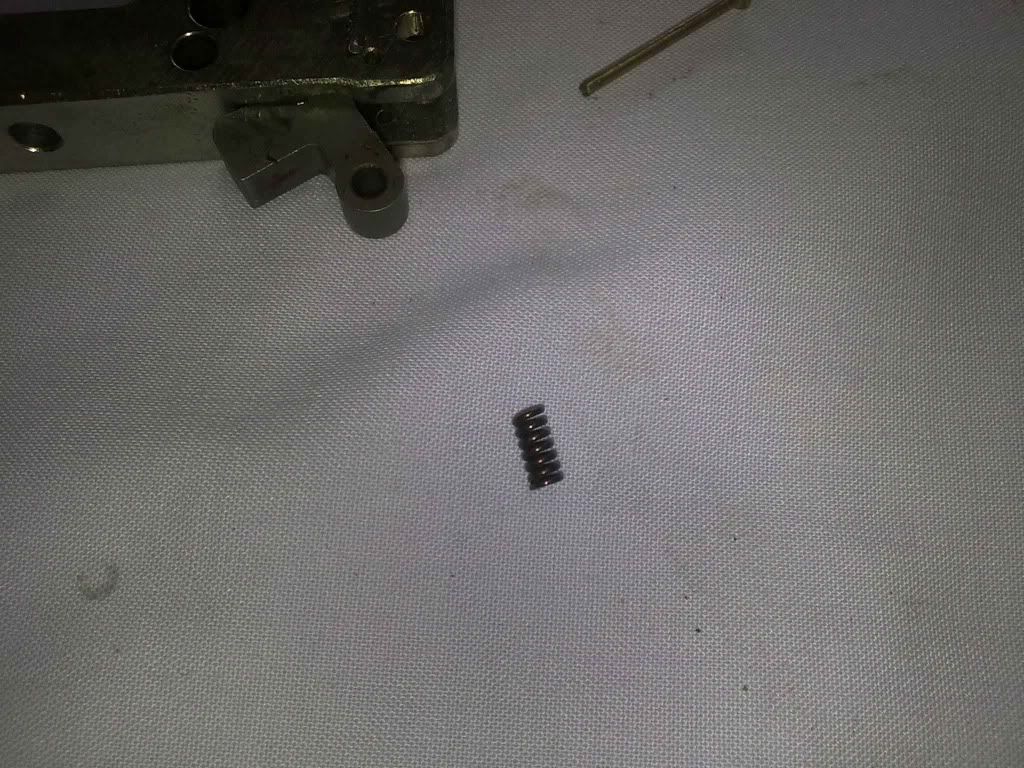 In between the brass fitting and the coil spring, is a hole (looking vertically into it) this is the home for the potentially loose spring. I used the same tool for removing the tiny pin to locate spring back into position. 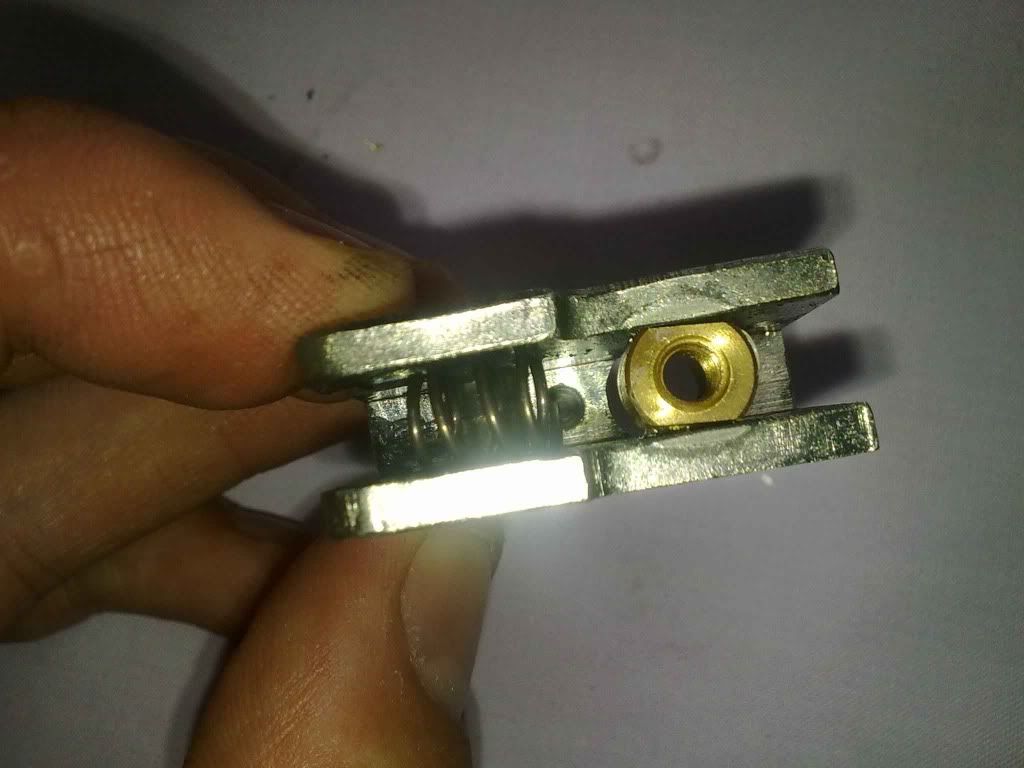 9. After reading other articles and forums re the Howa trigger, I faced the foward part of the trigger - whether you choose to do this, is entirely up to you - though what is evident is the lack-lustre metal finish from the factory, which I wanted to tidy up while apart - also it removed a fraction of metal to potentially help with the problem of "adjust creep screw/no safety" issue. This image shows metal finish from factory... 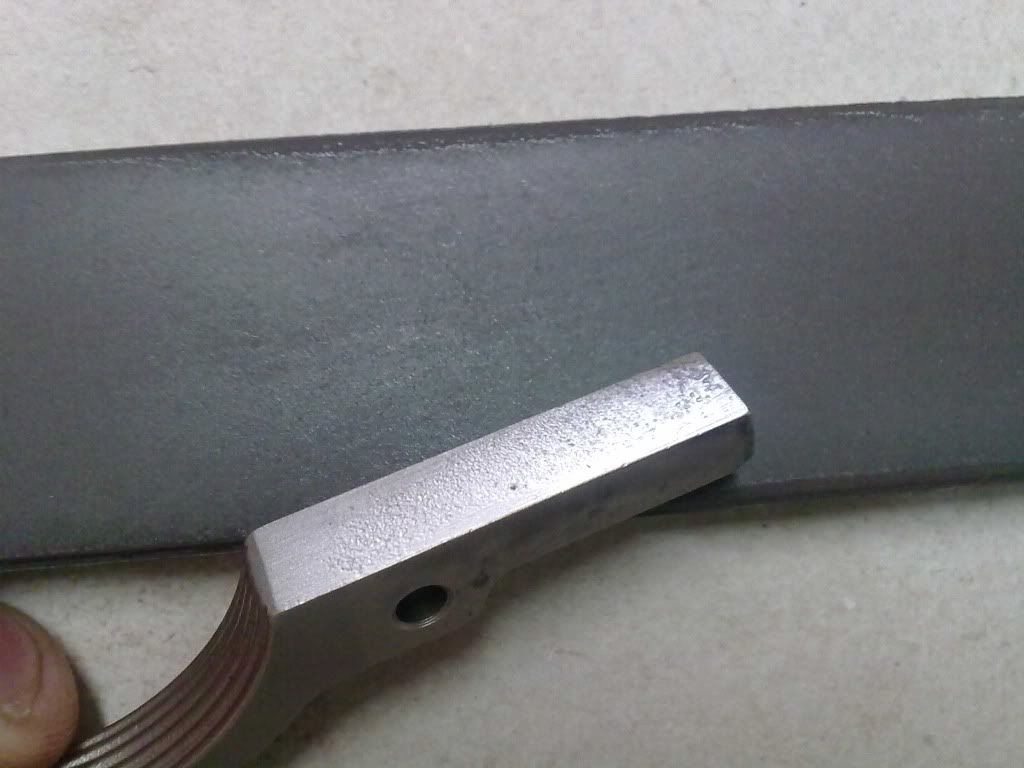 For metal removal/polishing, I used a Spyderco Spyderco Pocket Stone (Double Stuff) ~ 303MF stone combo that I picked up while in the US a few years ago. I used the white side for sear work - they say its a 'fine', but I've never come across anything finer, and worked well without much if any metal removal - just a polish was what i wanted, and got using Inox on the stone. 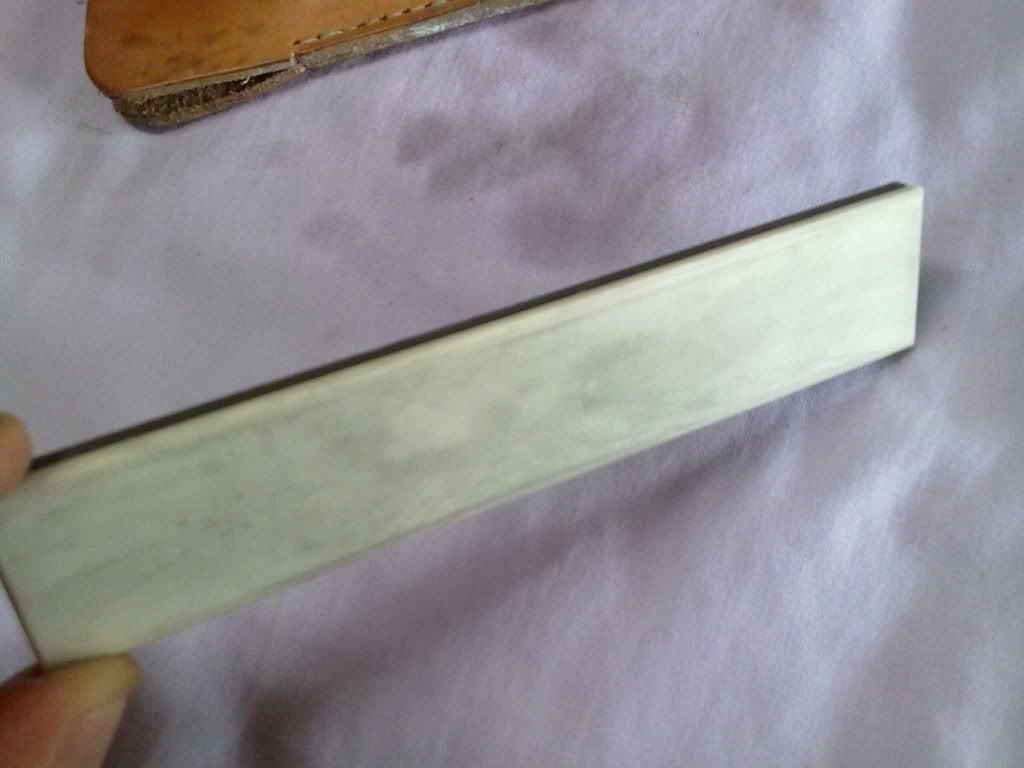
|
|
|
|
February 2, 2011, 08:15 PM
|
#3 |
|
Member
Join Date: November 18, 2010
Location: Auckland, New Zealand
Posts: 15
|
three of 3...
10. While on the trigger, there are two sear faces to look at... see image below for reference... These two faces were cleaned up and resulted in near mirror finishes... a vast improvement on the factory finish.
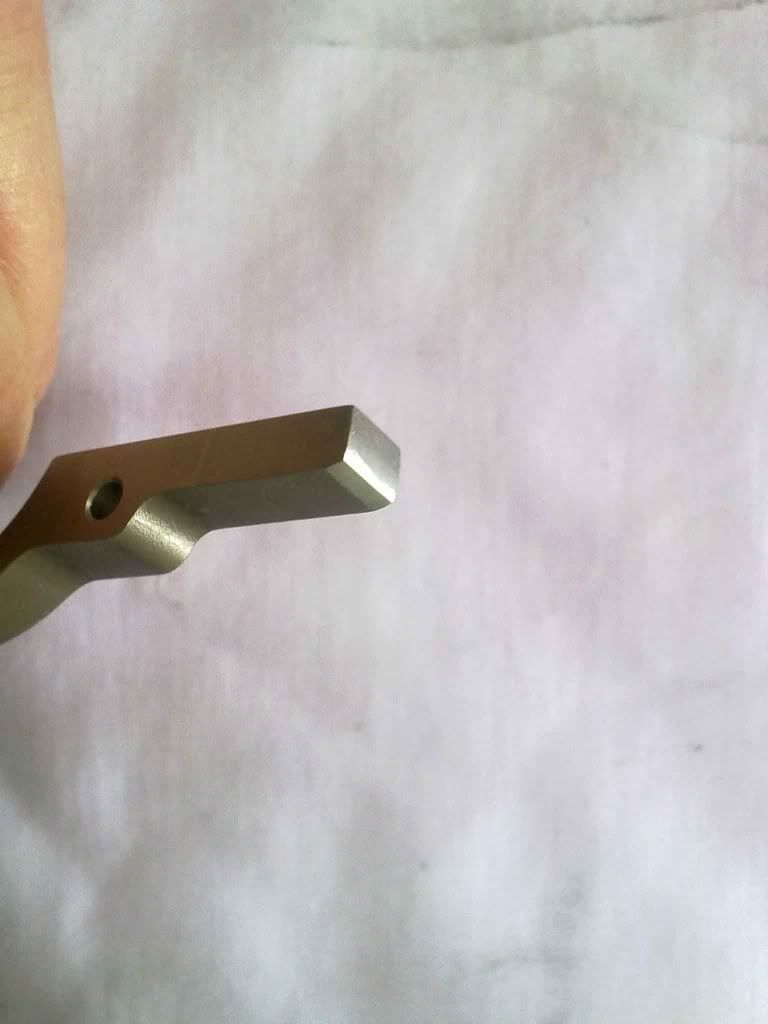 11. After removing all the pins, now the "L" shaped sear will be free. Here the layout and interaction of these two parts can be seen - therefore perhaps the critical faces where 'creep' is present, and could be eliminated, hence some time was spent on these sear surfaces... see images below... Interaction of sears:  Sears in Battery:  Sears about to release (firing pin) [ As trigger is pulled, pivot moves trigger foward, against L sear, which then drops, allowing firing pin in bolt to come foward...] [IMG]http://i1084.photobucket.com/albums/...ttorelease.jpg[/IMG] Sears release, firing pin released:  12. Hence, time spent on faces of 'L' sear. I also touched up the 'back' of this, where it engages the firing pin mech, intending a cleaner 'break' as it moves down, to release the firing pin... Motion of stoning was always in same way as faces moving on each other... (not a great pic of LHS sears..) Pin and screw in pic shows points of contact.. first image is of L sear, before work.. this surely is where alot of the creep is felt... just check the machine marks on the sears...!  For reference, as per the L sear faces, also the trigger sears cleaned up, noting that there is a small angle on the top of the trigger sear... again, perhaps critical in minimising creep where these surfaces rub...  Well, thats about all I have to offer - certainly open to comments or questions if I can help... Just reverse the process of disassembly to reassemble... watch the small trigger spring is in place, and trialed on empty chamber to then adjust screws for trigger travel and/or pull weight. In my case, an improvement was immediate and safety still working OK... its just a guide to the internals of the Howa manufactured trigger... Cheers Last edited by oorklandboy; February 2, 2011 at 11:40 PM. |
|
|
|
February 2, 2011, 11:00 PM
|
#4 |
|
Senior Member
Join Date: October 29, 2008
Posts: 206
|
Thanks for all the time and detail. I might try that after I pick up my first Howa.
|
|
|
|
February 2, 2011, 11:11 PM
|
#5 |
|
Senior Member
Join Date: December 13, 2009
Location: central Wisconsin
Posts: 2,324
|
Do ALL factory triggers come with those horrible finishes on them? No wonder the Weatherby Vanguard I tried had such a gritty feeling trigger.
|
|
|
|
February 2, 2011, 11:24 PM
|
#6 |
|
Member
Join Date: November 18, 2010
Location: Auckland, New Zealand
Posts: 15
|
Im guessing that , yes, this is the case from what I have read on forums that date back a fair while... that the Howa/Weatherby line of triggers arent that great.. It would be fairly easy enough for one to go online and drop in an aftermarket Jewel or Timney, as I wanted to do, but at the costs they sell here locally (NZ) and the dramas of paperwork to have these leave the US by a retailer was just too prohibtive in my case - a damn shame really.... I think at a mere glance, NZ retailers DOUBLE the costs of the US price tag.. Typically greedy...
Maybe labelled as a gift it may get here.. hah! |
|
|
|
February 3, 2011, 12:29 PM
|
#7 |
|
Senior Member
Join Date: April 25, 2008
Posts: 224
|
Looking at the trigger, I can tell you that it is either a direct copy of the Mossberg ATR100/4X4 trigger, or it IS the same trigger from those guns and Mossberg makes them for Howa.... These triggers can be easily tuned down to 1 lb. or less SAFELY if you know what you are doing with them.
They are one of the easiest triggers to work on in my experience. I only wish other manufacturers would start using this exact trigger across the board. |
|
|
|
February 3, 2011, 01:10 PM
|
#8 |
|
Member
Join Date: November 18, 2010
Location: Auckland, New Zealand
Posts: 15
|
Thanks for the info Kawabuggy
 Can I assume you yourself have spent some time having a play with these triggers... Im certainly keen to learn more if you're willing to share... Can I assume you yourself have spent some time having a play with these triggers... Im certainly keen to learn more if you're willing to share...  Would you mind? If not here, then a PM..? Would you mind? If not here, then a PM..?Mossberg aye? Hmmm, the cauldron of manufactures of these firearms/parts gets deeper! Yes, it was fairly easy enough to figure out and work on... If a Mossberg product, did the triggers IN the Mossbergs have a rough finish as the Howa tends to be, and require work/replacement..? |
|
|
|
February 3, 2011, 04:07 PM
|
#9 |
|
Senior Member
Join Date: April 25, 2008
Posts: 224
|
Sent you a PM with a link to a write up (with pictures) on the Mossberg trigger. Look at the pics, and you'll see how similar they are.
|
|
|
|
February 3, 2011, 09:13 PM
|
#10 |
|
Member
Join Date: November 18, 2010
Location: Auckland, New Zealand
Posts: 15
|
Kawabuggy - damn fine work!! Kudos to you, and you're on the money, re the design of the triggers - got to be the same...
I read further down, and saw your addition re the later variants, re the adjusting screws.. re travel and pull... Well done Sir... and thanks! |
|
|
|
February 4, 2011, 06:05 PM
|
#11 |
|
Senior Member
Join Date: September 28, 2009
Location: Texas
Posts: 547
|
Nice writeup and photos.
__________________
TSRA Life Member, NRA Endowment Life Member, SAF Life Member My EDC - STI Shadow My blog - firearm reviews, etc. |
|
|
|
February 4, 2011, 07:28 PM
|
#12 |
|
Senior Member
Join Date: July 18, 2010
Location: Independence Missouri
Posts: 4,586
|
Bravo mate!!!
I'm headin to the gun cabinet to get mine started!! At the same time I'm going to get on Midway USA, and order a Timney just in case I goof the process.
__________________
Keep your Axe sharp and your powder dry. |
|
|
|
March 1, 2011, 02:28 AM
|
#13 |
|
Member
Join Date: November 18, 2010
Location: Auckland, New Zealand
Posts: 15
|
Hooligan,
How did you get on...? |
|
|
|
November 1, 2012, 05:42 PM
|
#14 |
|
Senior Member
Join Date: October 4, 2011
Location: Australia
Posts: 318
|
Sorry, i know this thread is very old but just wondering - does this adjustment make ordering a timney trigger redundant or would a timney still be better overall?
Cheers |
|
|
|
November 1, 2012, 07:39 PM
|
#15 |
|
Member
Join Date: November 18, 2010
Location: Auckland, New Zealand
Posts: 15
|
The only reason i perservered with this is due to the ridiculous costs that NZ retailers sell the Timney for... If a Timney is affordable for you, I'd go the Timney....
Though i DID learn a fair bit going through the process... perhaps get the timney and still have a go pulling the factory one apart... NZ is nice, but everything is costly... very costly.... |
|
|
|
November 1, 2012, 10:54 PM
|
#16 |
|
Senior Member
Join Date: October 4, 2011
Location: Australia
Posts: 318
|
You won't win sympathy from me my friend
 Here in Australia, everything is still expensive but i still can't have an AR-15 or M1 garand like you can. Here in Australia, everything is still expensive but i still can't have an AR-15 or M1 garand like you can.I used to live in auckland but was too young to realise the freedom  They haven't changed the laws about semi-autos have they? |
|
|
|
November 2, 2012, 06:29 AM
|
#17 |
|
Senior Member
Join Date: July 18, 2010
Location: Independence Missouri
Posts: 4,586
|
Well it has been some time,,,, Oorklandboy I installed a Timney on mine and adjusted it down to 2.5 lbs, where it breaks like a glass rod. It lets this rifle shoot wonderfully.
__________________
Keep your Axe sharp and your powder dry. |
|
|
|
November 2, 2012, 12:49 PM
|
#18 |
|
Senior Member
Join Date: February 12, 2005
Location: North central Ohio
Posts: 7,486
|
Very nice write-up with great photos. I found it interesting and informative. That all said, I must be one of the luckier Weatherby (Howa) Vanguard buyers because the one I bought came with an excellent trigger: light pull, smooth take-up/let-off and virtually creepless. I wouldn't change anything on it-and I'm kind of a fanatic when it comes to insisting on a good trigger, be it a rifle or a handgun.
__________________
ONLY AN ARMED PEOPLE CAN BE TRULY FREE ; ONLY AN UNARMED PEOPLE CAN EVER BE ENSLAVED ...Aristotle NRA Benefactor Life Member |
|
|
|
November 2, 2012, 02:30 PM
|
#19 |
|
Senior Member
Join Date: November 11, 2011
Location: Chicago area
Posts: 277
|
Oorkland, did you get the latest 1500 with the 3 position safety? If so, the rifle came with a twostage trigger designed to have some take-up before it broke.
|
|
|
|
April 28, 2013, 11:08 PM
|
#20 |
|
Member
Join Date: November 18, 2010
Location: Auckland, New Zealand
Posts: 15
|
Davery25, if you mean we can still own, them, we can...
though anything with a flash suppressor on them, or a bayonet lug has to be removed, otherwise its classed as an MSSA, military style semi auto... bit contentious with thumbhold stocks too... Nice work hooligan1 - what sort of groups can it shoot? Im managing 1/2 MOA with hunting and 1/4 MOA with Palma target projectiles... thats with the overbarrel suppressor on too... Joe Chicago - now this is news to me... yes, it IS that style, with the 3 position safety... ive probably destroyed that behaviour with my fiddling, though the trigger is predictable none the less... thanks for that information though.. I dont think its well advertised as such... |
|
|
|
April 29, 2013, 06:39 AM
|
#21 |
|
Senior Member
Join Date: July 18, 2010
Location: Independence Missouri
Posts: 4,586
|
Hey man it's been awhile, but it shoots wonderfully, with five different loads the average is around 3/4 inch at 100 yds, some group tighter than others,.
__________________
Keep your Axe sharp and your powder dry. |
|
|
|
|
|


