
|
 March 4, 2014, 05:04 PM
|
#1 |
|
Senior Member
Join Date: February 17, 2013
Location: South Louisiana
Posts: 432
|
Mihec 452-200
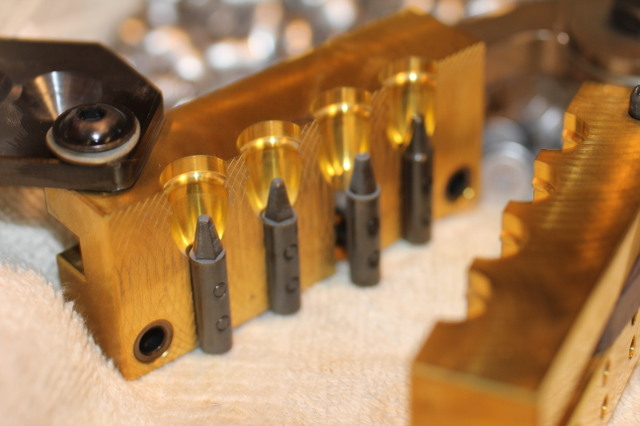
Just received a new Mihec mold, and it's a beauty. That is a massive sprue plate compared to my Lee mold. I'm curious as to what others do to prepare this mold for use. I hear that some heat treat these molds...some don't. Any advice is appreciated. Photo taken before I washed it.
Last edited by Swampman1; March 4, 2014 at 05:15 PM. |

|
|
March 4, 2014, 06:10 PM
|
#2 |
|
Senior Member
Join Date: April 8, 2000
Posts: 2,101
|
Yea and this is what they look like after your done pouring out a batch,
As for prepping the mold, just scrub it out with some REALLY hot water and dish soap, using a stiff tooth brush and your good. Make sure you let it get GOOD and dry, then put a drop or two of the supplied oil on a Q-tip, and as you put the alignment pins through the holes, swipe them down the sides with it. Leave them just snug not tight to start with. Using the tip again oil under the sprue plate before you put it back on and add handles and warm it up on your hotplate. Right before you start to pour lead, slather a little oil on the alignment pins and holes and get to casting. Some folks will cycle the molds up and down on the hot plate a few times, but I usually do that while I am pouring up several batches to go play with.
__________________
LAter, Mike / TX |
|
|
|
March 4, 2014, 07:22 PM
|
#3 |
|
Senior Member
Join Date: January 7, 2012
Location: Auburn, AL.
Posts: 2,332
|
Read a few of these from owners!
__________________
. . . Have a Colt and a smile. 
|
|
|
|
March 4, 2014, 07:45 PM
|
#4 |
|
Senior Member
Join Date: February 17, 2013
Location: South Louisiana
Posts: 432
|
Thanks Mike, Ill try those tips. BTW how do you get the photo to post? All I can do is an attachment.
Beagle thanks for the links! |
|
|
|
March 4, 2014, 11:33 PM
|
#5 |
|
Senior Member
Join Date: January 16, 2011
Location: North Bend, OR
Posts: 743
|
I use a photo hosting site like photobucket, upload the pics to photobucket, then put in links to the pics in my post and the pics show up like in Mikes post.
|
|
|
|
March 5, 2014, 05:45 AM
|
#6 |
|
Senior Member
Join Date: April 8, 2000
Posts: 2,101
|
You can do the Photobucket thing, or when you are making a post, look down on the left hand side just a bit below the text box your typing in. There is a button which says Manage Attachments. You picture has to be a certain size for it to upload, but you can upload them and save them here under your profile name. Then if you want it to show up like mine, just right click on it after you have it uploaded, select Copy Link Location, and insert it under the Insert Image tag above the text box next to the Quote tab.
Hope that makes sense.
__________________
LAter, Mike / TX |
|
|
|
March 5, 2014, 11:15 AM
|
#7 |
|
Senior Member
Join Date: February 17, 2013
Location: South Louisiana
Posts: 432
|
Ok that works, thanks Mike.
|
|
|
|
March 5, 2014, 12:00 PM
|
#8 |
|
Senior Member
Join Date: February 17, 2013
Location: South Louisiana
Posts: 432
|
I'm noticing some of the HP pins don't fit flush when inserted into the mold...some better than others. Would heat treating help? And should the pins be heat treaded or not necessary?
BTW those bullets look awesome in that pic Mike. Can't wait to start. Last edited by Swampman1; March 5, 2014 at 12:06 PM. |
|
|
|
March 5, 2014, 01:34 PM
|
#9 |
|
Senior Member
Join Date: January 7, 2012
Location: Auburn, AL.
Posts: 2,332
|
Don't screw the guide pins (the pins that go through the blocks) into the HP pins completely tight. You should be able to tighten or loosen them easily with your fingers and let that "slack" allow the HP pins to seat themselves when you close the mold. They will fit better after some use, but most users never tighten them completely.

__________________
. . . Have a Colt and a smile.
|
|
|
|
March 5, 2014, 02:06 PM
|
#10 |
|
Senior Member
Join Date: October 19, 2007
Location: Fort Bragg, CA
Posts: 679
|
Heat treatment is unlikely to help and the warping/shrinking that takes place is likely to ruin the fit of the pins.
That is a very pretty mold.
__________________
You only truly believe in freedom if you believe in the freedom of those you disagree. |
|
|
|
March 5, 2014, 06:18 PM
|
#11 | |
|
Senior Member
Join Date: April 8, 2000
Posts: 2,101
|
Quote:
^^^^^^^^^^^^^^^^^^^^^^^^^^^^^^^^^^^^^^^^^^^^^^^ What he said so much better than I did. One other thing I do, and you can if you want or not. I only use one of the little clips per HP pin. In other words instead of having one on the end of every alignment/guide pin, I only put them on the top pins. For one thing they are a pain to find when they fling themselves out into never land, and to date I haven't had anything fall apart or get crooked using them this way. After a few casting sessions however I have had some that loosened up and fell off the end of the pins, which was another reason I cut back on how many I was using. I don't know where they ended up is the worst part.
__________________
LAter, Mike / TX |
|
|
|
|
March 5, 2014, 06:56 PM
|
#12 |
|
Senior Member
Join Date: May 20, 2001
Location: Oshkosh wi.
Posts: 3,055
|
Pretty ain't it?
  I'd add to the above only a few tips. I place the mold in a pan, cover it with water. I then give the water a healthy squirt of Dawn dishwashing detergent, then bring it to a boil on the stove. This assures the cutting fluid that is used in the machining process is dissolved. I also use a teeth brush to scrub the cavities. Then it's on the hotplate on high for at least ½ hour before pouring the first boolits. If you're using a soft lead so you can get some expansion, then you must run the temp of the alloy up to at least 775 degrees. Otherwise the lead will not flow aroung the pins, you'll have voids that you can see in the bottom of the HP cavity. Another tip is; the penta pins usually have a rough surface on the faces/flats of the pins. It's the result of the milling cutter being run too fast. Some fine Emory cloth on a glass plate on those pin faces will smooth them right out. If you don't have any trouble with boolits falling free from the penta pins, first, you're lucky,  then ignore what I just said! then ignore what I just said!
__________________
The more people I meet, the more I love my dog They're going to get their butts kicked over there this election. How come people can't spell and use words correctly? |
|
|
|
March 5, 2014, 09:46 PM
|
#13 | ||
|
Senior Member
Join Date: February 17, 2013
Location: South Louisiana
Posts: 432
|
Quote:
Quote:
On a side note: I've noticed that some insert the HP pins through the left side, and some through the right side of the mold. Does it make a difference? |
||
|
|
|
March 6, 2014, 05:14 AM
|
#14 | |
|
Senior Member
Join Date: April 8, 2000
Posts: 2,101
|
Quote:
I hold the handles in my left hand and pour, wait for the sprue to harden, turn sideways and push the plate with my right hand to cut. Then I turn the mold over and dump. This puts the extended pins on the left side where I can easily push them out with my left thumb or index finger if needed. Usually however, if they are oiled up, they will already be sliding out as I open the mold and the bullets will be falling as soon as they get clearance between the mold halves. The only issues I have EVER had with these molds were when I was pouring up some of the 452-640's and some of the 45 270 SAA's, and using the blank pins for solid bullets. The squared off grease grooves and that flat pin were just enough to hold them in the cavity, and really get me frustrated. It only took a few tries though to figure out it was a heat thing and not a mold thing. What I find is if your pouring HP's they need heat, so I usually pour with an alloy temp starting at around 725, for the larger ones, and creep up the smaller the bullets are. When I pour the solids now, I will start at around 680 or so, and bump it up as needed. Once the mold is good and warm things go a LOT smoother. One other thing I have found with the brass molds vs aluminum or steel, and I don't particularly know why, I don't get "frosted" bullets so to speak, like I do with others. The brass ones when they get too hot, will simply pull the edges of the grease grooves out when they are too hot. So if you see them start falling out with torn or bent rims around the grease groove, give it a break and let it cool off.
__________________
LAter, Mike / TX |
|
|
|
|
March 6, 2014, 09:18 AM
|
#15 |
|
Senior Member
Join Date: February 28, 2012
Location: South Dakota
Posts: 224
|
What I've learned over at cast boolits is that you should heat treat to help release the tension in the metals. This helps the pins also seat a little better. Also in the heat treating process it adds a patina. I think that is the proper name for the term. It is basically adding a some oxidation to the outer layer which helps the bullet drop easier from the mold and also reduces the risk of tinning. I usually take everything apart and place pins and the block into the oven and set to 400 and bake it for about an hour. Then let it cool slowly until it reaches room temp again. I do this about 2-3 times depending on how patience I am before I just have to cast with it. Beautiful mold and bullets.
Edit: Another thing with the pins. The HP or FP pins have threads running all the way through and one side is more flat then the other. Make sure to screw the guide rods into the side that is machined flat and slightly inset. Also don't screw them tight, leave them loose, and don't put them into the oven or heat them up when they are tight. I found it was extremely difficult to get them apart. Last edited by CS86; March 6, 2014 at 09:30 AM. |
|
|
|
March 6, 2014, 12:44 PM
|
#16 |
|
Senior Member
Join Date: January 7, 2012
Location: Auburn, AL.
Posts: 2,332
|
Very true about the patina helping with bullet release and to prevent tinning. I usually just wash mine and start casting, but I do have to put up with tinning, especially where the lube grooves meet on the blocks, until the mold develops a patina. . . usually after 3-5 casting sessions.
 I don't know how many people can wait for heat treating. Once they see that nice shiny mold, they want some nice shiny bullets, fast!
__________________
. . . Have a Colt and a smile.
|
|
|
|
March 6, 2014, 08:11 PM
|
#17 |
|
Senior Member
Join Date: January 16, 2011
Location: North Bend, OR
Posts: 743
|
I PM'ed Mihec over on cast boolits and he says he still has some of these molds available. You guys just had to post pictures of this mold and bullets. Darn you all to heck.
Now I have to buy one.
|
|
|
|
March 6, 2014, 10:51 PM
|
#18 |
|
Senior Member
Join Date: February 1, 2009
Location: Iowa
Posts: 525
|
Some Oxpho cold blue will give the clean brass surfaces instant patina beyond what heat cycling alone will do. It works for me, YMMV.
__________________
"Of all the things I've lost, I miss my mind the most." A. Brilliant |
|
|
|
March 6, 2014, 11:46 PM
|
#19 |
|
Senior Member
Join Date: January 16, 2011
Location: North Bend, OR
Posts: 743
|
Got a link to this oxpho cold blue? What is it? OK. Nevermind. Found it at Cabelas and Brownells. Also found a video describing what it is and shows how quick it clod blues a piece of steel.
Last edited by Vance; March 6, 2014 at 11:56 PM. |
|
|
|
March 9, 2014, 04:50 PM
|
#20 |
|
Senior Member
Join Date: February 17, 2013
Location: South Louisiana
Posts: 432
|
Update
Had a chance to try my new mold this morning. There is a definite learning curve with these molds. When people say it likes is hot...they mean it. My first batch was full of wrinkles. Then I started getting the hang of it. After heat cycling and casting a couple of hundred bullets, the mold has definitely changed to a more "yellowish-gold" tone.
|
|
|
|
March 9, 2014, 05:11 PM
|
#21 |
|
Senior Member
Join Date: January 7, 2012
Location: Auburn, AL.
Posts: 2,332
|
Looks like you definitely got the hang of it. Those should be fun shootin'!!!
Nice job!
__________________
. . . Have a Colt and a smile.
|
|
|
|
March 9, 2014, 09:42 PM
|
#22 |
|
Senior Member
Join Date: February 17, 2013
Location: South Louisiana
Posts: 432
|
Thanks Beagle, just curious, what COL is recommended for this particular bullet? These will be fired in a Colt 1911 and hopefully soon a Springfield XDm-45.
|
|
|
|
March 10, 2014, 04:19 AM
|
#23 |
|
Senior Member
Join Date: April 8, 2000
Posts: 2,101
|
I seat them so that they will pass the plunk test in my barrel.
Once I get that set I make up a dummy round to set my seating depth later on since I load other bullets with different profiles. With the alloy I posted in the other thread these expand really well between the 850 and 950fps range. I don't have any set load just yet as I haven't decided on which powder I want to use. For the most part I have just been testing them with some of the surplus Salut which is pretty close to Unique in burn rate.
__________________
LAter, Mike / TX |
|
|
|
March 10, 2014, 08:12 PM
|
#24 |
|
Senior Member
Join Date: February 17, 2013
Location: South Louisiana
Posts: 432
|
OK thanks Mike, I'll figure it out.
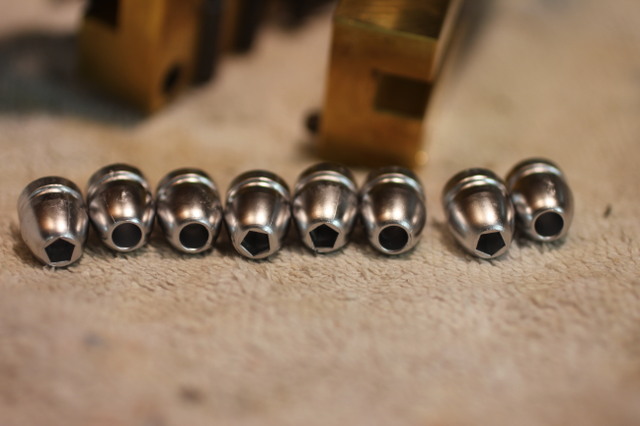
Having fun playing with the new mold. These are my latest ones from this morning. I set the mold on my hotplate, turned it on and let it stay there for 20 minutes on medium. That was almost perfect. First ones out had just a teeny bit of a wrinkle barely visible. The next pour had no wrinkles...so I put the hammer down and ran off about 200. Gonna try the pentas next time. I carefully put an emory cloth on one of them, and it's not perfectly smooth, but better than before. Hopefully it will help in releasing as I understand some have a problem. |
|
|
|
March 10, 2014, 10:20 PM
|
#25 |
|
Senior Member
Join Date: January 16, 2011
Location: North Bend, OR
Posts: 743
|
I paid Mihec for one of these this morning. Can hardly wait.
|
|
|
 |
|
|


