
|
 August 31, 2021, 10:55 AM
|
#1 |
|
Senior Member
Join Date: June 11, 2016
Location: SE Wisconsin
Posts: 1,524
|
Pillar bedding
I have a couple of Savage rifles that need work, one is a model 11 that I have a Richards stock coming for. When I purchased this it was just the barreled receiver and a broken synthetic stock. The trigger guard and the bottom metal were missing so I ordered new from Savage. When I received them they are not metal parts put polymer plastic.
Question is how are these polymer parts going to effect my attempt at pillar bedding or even just glass bedding these stocks? This is a DBM with a Bottom Bolt Release stock. |

|
|
August 31, 2021, 08:56 PM
|
#2 |
|
Senior Member
Join Date: June 17, 2010
Location: Virginia
Posts: 6,883
|
Put a metal washer under the stock screws and it's a solid synthetic/polymer/pillar lockup and doesn't matter.
|
|
|
|
September 3, 2021, 03:29 PM
|
#3 |
|
Junior Member
Join Date: December 27, 2005
Posts: 14
|
Hi,
Pillars are just precision bushings put into the action screw holes for the action and bottom metal to butt up against... So as to not crush and loosen the fit in wooden stocks. As was stated, the make up of the "bottom metal' should not matter. The Pillars will still do their job, if installed correctly. |
|
|
|
September 3, 2021, 04:57 PM
|
#4 |
|
Senior Member
Join Date: June 11, 2016
Location: SE Wisconsin
Posts: 1,524
|
I was under the impression that it was preferred to be metal on metal contact. Not metal on polymer which could compress.
|
|
|
|
September 3, 2021, 07:51 PM
|
#5 |
|
Senior Member
Join Date: June 17, 2010
Location: Virginia
Posts: 6,883
|
Unlike wood, polymers (used in stocks) are fairly incompressible under normal screw/bolt forces (torque) in actions.
|
|
|
|
September 4, 2021, 01:28 PM
|
#6 |
|
Senior Member
Join Date: June 11, 2016
Location: SE Wisconsin
Posts: 1,524
|
OK, Which is why I would assume that Savage used what looks like a polymer pillar in the black polymer stock that came on the Model 11 I just received.
Picked up the 11 as a project as the stock was broken into 2 pcs. right at the back of the mag well, up thru the bolt cutout and across the trigger guard. |
|
|
|
September 4, 2021, 01:34 PM
|
#7 |
|
Senior Member
Join Date: February 13, 2006
Location: Washington state
Posts: 15,248
|
That's a relatively common place for plastic Savage stocks to break. The bolt handle cutout makes a weak point in the stock.
__________________
Never try to educate someone who resists knowledge at all costs. But what do I know? Summit Arms Services |
|
|
|
October 25, 2021, 11:15 AM
|
#8 |
|
Senior Member
Join Date: February 15, 2009
Posts: 8,927
|
What make of stocks was the first to require pillar bedding? Their maker originated the technique.
The most accurate bolt action box magazine rifles I know of are not pillar bedded. |
|
|
|
October 25, 2021, 07:14 PM
|
#9 |
|
Senior Member
Join Date: August 1, 2021
Posts: 455
|
All of my Mauser builds are pillar bedded in the rear from factory, would just transfer the pillar over to new stock, or if it already glued in, I would just make a new one or order a new one.
In my experience, I would suggest that you pillar bed it. For all the rifles I have built over the years, I have lost nothing from doing so, but have gained some steady accuracy and precision from some of the pillar bedding jobs I've done. |
|
|
|
October 26, 2021, 05:26 AM
|
#10 | |
|
Senior Member
Join Date: March 2, 2014
Posts: 11,770
|
Quote:
__________________
"Everyone speaks gun."--Robert O'Neill I am NOT an expert--I do not have any formal experience or certification in firearms use or testing; use any information I post at your own risk! Last edited by stagpanther; October 26, 2021 at 05:47 AM. |
|
|
|
|
October 26, 2021, 08:55 AM
|
#11 | |
|
Senior Member
Join Date: June 17, 2010
Location: Virginia
Posts: 6,883
|
Quote:
Recoil lug at front should be the part taking the beating... rear tang does nothing but split stocks if tightly fitted. (IMHO/Experience) 
|
|
|
|
|
October 26, 2021, 09:16 AM
|
#12 |
|
Senior Member
Join Date: March 2, 2014
Posts: 11,770
|
If the body of the receiver is not held securely to the stock with minimal movement--you will never achieve optimum stability, consistency and accuracy (IMHO
 ). Recoil lugs are not designed for that purpose. ). Recoil lugs are not designed for that purpose.
__________________
"Everyone speaks gun."--Robert O'Neill I am NOT an expert--I do not have any formal experience or certification in firearms use or testing; use any information I post at your own risk! |
|
|
|
October 26, 2021, 11:16 AM
|
#13 |
|
Senior Member
Join Date: March 1, 2009
Posts: 4,232
|
I gave up on figuring it out other than give me a good trigger and a good barrel and I can make it shoot
I have pillar bedded a CZ 452 ( 22 LR), and a Savage 10 action for a 6BR build, both with wood stocks and saw no change in accuracy at all. I also have a Kidd .22 that uses one action screw torqued to 6 in pounds ( factory spec) in one of the flimsiest plastic stocks I have ever seen that shoots amazing groups. I have three other centerfire rifles in off the shelf wood stocks that shoot sub .5 MOA at mid and long range and I will never bother bedding or pillar bedding any of them. If it works why fix it
__________________
“How do I get to the next level?” Well, you get to the next level by being the first one on the range and the last one to leave.” – Jerry Miculek |
|
|
|
October 26, 2021, 11:53 AM
|
#14 |
|
Senior Member
Join Date: June 17, 2010
Location: Virginia
Posts: 6,883
|
Rear tang tight at sides.
Relieved paper's width at rear. 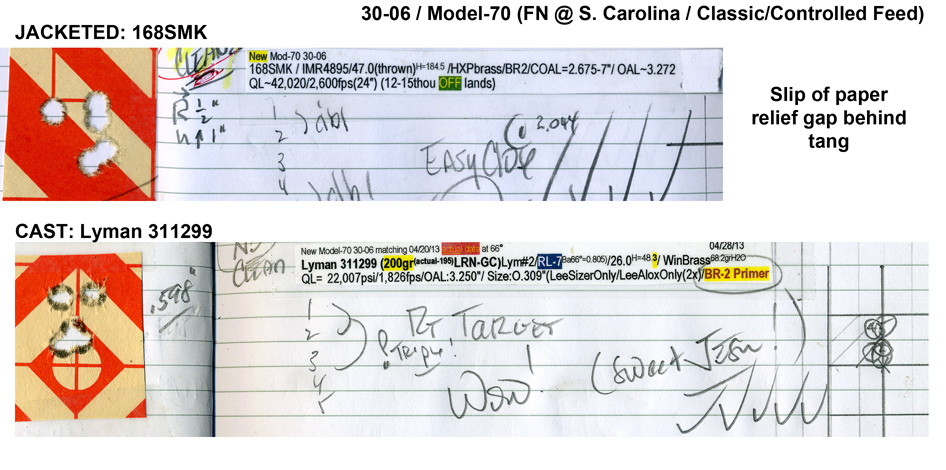
|
|
|
|
October 26, 2021, 01:14 PM
|
#15 |
|
Senior Member
Join Date: June 11, 2016
Location: SE Wisconsin
Posts: 1,524
|
I have since received the stock from Richards and have started working on it.
Yes it is still going to need a lot of fitting and sanding but I love the way it feels when I shoulder it with the receiver and barrel installed. At first attempt to fit everything nothing fit. Nothing. But I soon found that it wasn't very far off and just some light sanding in a few areas and it came together. That was until I tried to assemble everything together. The inletting for the bottom metal and trigger guard were off by 1/4 of a hole with the receiver. I was able to sand and open up the stock to move the Bottom metal a little more forward but it still wasn't enough and I don't want to open a huge gap in the stock. So I decided top open up the holes for the action screws and move them more forward and then I will add pillars and epoxy pillars in place. After opening holes and cutting pillars to fit I dry fitted everything in place only to now find that the magazine will not lock into place while on the stock. Though it will when out of the stock so I need some more relief somewhere in the stock mag area. |
|
|
|
October 26, 2021, 07:52 PM
|
#16 |
|
Senior Member
Join Date: March 2, 2014
Posts: 11,770
|
If we can drag Scorch into this--I would take his advice if you're smart.

__________________
"Everyone speaks gun."--Robert O'Neill I am NOT an expert--I do not have any formal experience or certification in firearms use or testing; use any information I post at your own risk! |
|
|
|
October 27, 2021, 12:41 AM
|
#17 | |
|
Senior Member
Join Date: March 2, 2014
Posts: 11,770
|
Quote:
__________________
"Everyone speaks gun."--Robert O'Neill I am NOT an expert--I do not have any formal experience or certification in firearms use or testing; use any information I post at your own risk! |
|
|
|
|
October 27, 2021, 06:01 AM
|
#18 |
|
Senior Member
Join Date: March 1, 2009
Posts: 4,232
|
Like stagpanther suggested the magazine is hitting the action before the latch can hit the catch on the magazine. You can put some liquid whiteout or chalk or tape colored with sharpie on the back of the magazine where the catch is and see how far up the latch is touching. or put the magazine in the bottom metal with the bolt in place and start tightening the action screws gently and moving the bolt to see where the magazine starts binding the bolt
Then make some shims using aluminum strips cut from soda cans or a bit of bedding compound on the metal or use thin washers between the stock and bottom metal. Tune it using dummy rounds so that it will cycle rounds from the magazine yet still not bind the bolt and the magazine will latch into place. Once you see where it needs to be then do whatever is needed for a permanent fix edit- just remembered making shims with a exacto knife, scissors, and a hand drill utilizing a strip of plastic cut from a milk jug on one of my rifles. It fit the cutout and looked great
__________________
“How do I get to the next level?” Well, you get to the next level by being the first one on the range and the last one to leave.” – Jerry Miculek Last edited by hounddawg; October 27, 2021 at 10:39 AM. |
|
|
|
October 27, 2021, 08:11 PM
|
#19 |
|
Senior Member
Join Date: June 11, 2016
Location: SE Wisconsin
Posts: 1,524
|
Sorry but you both were wrong. The latch on the mag was hitting the stock because the cut relief was not wide enough for the latch to pass through.
From looking at this with the bolt removed I could clearly see the whole area and where the contact was being made. Relieved that area slightly and it all went together perfectly. |
|
|
|
October 27, 2021, 09:25 PM
|
#20 |
|
Senior Member
Join Date: March 1, 2009
Posts: 4,232
|
glad to hear it was a simple fix
__________________
“How do I get to the next level?” Well, you get to the next level by being the first one on the range and the last one to leave.” – Jerry Miculek |
|
|
|
October 27, 2021, 10:10 PM
|
#21 |
|
Senior Member
Join Date: June 11, 2016
Location: SE Wisconsin
Posts: 1,524
|
I have found a good number of areas that have needed a little tough-up work to make thing fit which I find as a good thing. Can remove material but again we can't put it back.
Also finding that these areas that need touch up it really is a very small amount of material so there is a lot of checking and rechecking. I had read some real horror stories about some of these pcs. I really also thought that walnut wood was much harder and harder to sand. I was rather disappointed by how far the inletting was off for the mag-well bottom metal and the receiver screw holes were. Otherwise I am more than pleased and excited about doing this stock. Yes this is my very first attempt at a stock, so going very slowly, asking a lot of questions, taking time to think about what I am doing and the best way that I can approach this. Not certain it will turn out perfect but hoping it to be more than just functional. This is a learning experience I will keep forever however it turns out! |
|
|
|
October 28, 2021, 12:02 AM
|
#22 | |
|
Senior Member
Join Date: March 2, 2014
Posts: 11,770
|
Quote:
__________________
"Everyone speaks gun."--Robert O'Neill I am NOT an expert--I do not have any formal experience or certification in firearms use or testing; use any information I post at your own risk! |
|
|
|
|
October 28, 2021, 08:21 PM
|
#23 |
|
Senior Member
Join Date: June 11, 2016
Location: SE Wisconsin
Posts: 1,524
|
Isn't that the truth! I really do appreciate everyone's input and assistance. I have come across may instances already that were not quite clearly explained by either me or the respondent.
Things that are much easier explained or visualized in person with the parts in hand. |
|
|
|
October 30, 2021, 05:51 PM
|
#24 |
|
Senior Member
Join Date: June 11, 2016
Location: SE Wisconsin
Posts: 1,524
|
This afternoon I was able to get the pillars installed on this Richards Microfit stock. Used long studs to act as centering pins to keep everything aligned; the bottom metal, pillars, action.
After about 3 hours I pulled everything apart to make sure nothing stuck that wasn't supposed to. After a little clean up I reinstalled everything with the actual action screws and all came together beautifully! Last edited by kmw1954; October 31, 2021 at 10:04 PM. |
|
|
|
October 31, 2021, 09:25 AM
|
#25 |
|
Senior Member
Join Date: March 2, 2014
Posts: 11,770
|
3 hours is pretty fast curing!
__________________
"Everyone speaks gun."--Robert O'Neill I am NOT an expert--I do not have any formal experience or certification in firearms use or testing; use any information I post at your own risk! |
|
|
 |
|
|


