
|
|
|||||||
| Forum Rules | Firearms Safety | Firearms Photos | Links | Library | Lost Password | Email Changes |
| Register | FAQ | Calendar | Today's Posts | Search |
 |
|
|
Thread Tools | Search this Thread |
 January 26, 2020, 04:18 PM
|
#1 |
|
Senior Member
Join Date: October 12, 2019
Posts: 819
|
Trouble installing aftermarket Safety on Mossberg 590.
Recently I bought an aftermarket replacement aluminum safety switch for my Mossberg 590, but so far I've had nothing but trouble trying to install it.
The problem is that the stock safety switch is secured with a one-way screw which prevents it from being simply removed. Every guide, tutorial, video, and post on the subject (including official sources) instructs the user to take a hammer and tap the head of the screwdriver until it bites into the screw head, then simply rotate the screw out as you would any other screw. Unfortunately, this method has proven ineffective to me, and has only resulted in the deformation of the screw head, because the screwdriver slips off the screw head, scratching or gouging it rather than biting into it. (Maybe Mossberg has begun using harder screws as of late?) Now the screw is all boogered up from repeated failed attempts at using said method and I'm unsure how to proceed. I'm considering snapping the stock safety off with pliers then removing the screw with vice grips, but only as a last resort. Does anybody have any experience or suggestions on alternative methods of removing the safety screw on a Mossberg 500 series Shotgun? Preferably ones which don't require use of power tools or anything intensive like that. I don't care if I damage or destroy the screw in the process since the aftermarket safety came packaged with a replacement screw, but I don't own a dremel or anything like that.
__________________
Conspiracy theorists are the greatest political spin-doctors of all time. Only they can make the absolute worst political blunders sound like spectacular feats of ingenuity. |

|
|
January 26, 2020, 05:33 PM
|
#2 |
|
Senior Member
Join Date: January 24, 2011
Location: Monroe,NC
Posts: 669
|
if your not going to use the old safety take a Dremel and cut a slot in it or just cut it off. If you use a thin blade screwdriver and push down real hard sometimes it will break loose.
__________________
The man that die's with the most stuff win's! |
|
|
|
January 26, 2020, 06:34 PM
|
#3 |
|
Senior Member
Join Date: October 12, 2019
Posts: 819
|
Like I said, I don't own a dremel or anything like that, unfortunately. I've tried bearing down on it, but it just slips right off with any pressure because it has nothing to engage with and is apparently too hard to get the screwdriver to bite into even when hit with a hammer.
__________________
Conspiracy theorists are the greatest political spin-doctors of all time. Only they can make the absolute worst political blunders sound like spectacular feats of ingenuity. |
|
|
|
January 26, 2020, 10:04 PM
|
#4 |
|
Senior Member
Join Date: August 5, 2012
Location: Carthage, NY
Posts: 231
|
I kinda like the pliers idea.

|
|
|
|
January 27, 2020, 02:21 PM
|
#5 |
|
Senior Member
Join Date: February 13, 2002
Location: Canada
Posts: 12,453
|
"...don't own a Dremel..." That'd be a good thing. Hordes of firearms are destroyed/heavily damaged with those.
However, most safety parts require fitting. What you need to do is buy a cheap screwdriver that's close but a bit bigger and file or grind it to fit. A touch of heat with a soldering iron on the screw head might help too.
__________________
Spelling and grammar count! |
|
|
|
January 27, 2020, 03:44 PM
|
#6 |
|
Senior Member
Join Date: October 12, 2019
Posts: 819
|
That wouldn't help at all. The problem is that the screw head is one-way, cut in such a way that it cannot be rotated counterclockwise because the screwdriver has nothing to engage when turned in that direction.
All the guides online say that you can take a flathead screwdriver and a hammer, then tap on the screwdriver with a hammer to bite into the screw head, but it hasn't worked for me at all. I'll most likely end up just snapping off the stock polymer safety then removing the screw with a pair of vice grips, since that seems to be the simplest solution.
__________________
Conspiracy theorists are the greatest political spin-doctors of all time. Only they can make the absolute worst political blunders sound like spectacular feats of ingenuity. |
|
|
|
January 27, 2020, 06:27 PM
|
#7 | |
|
Senior Member
Join Date: February 13, 2006
Location: Washington state
Posts: 15,248
|
Quote:
__________________
Never try to educate someone who resists knowledge at all costs. But what do I know? Summit Arms Services |
|
|
|
|
January 27, 2020, 10:03 PM
|
#8 |
|
Senior Member
Join Date: October 12, 2019
Posts: 819
|
Oh, I won't.
In fact, I'm thinking of trying something like putting a big ziplock bag over the receiver as I remove the safety if possible to minimize the odds of losing it in the event that it tries to eject itself into orbit.
__________________
Conspiracy theorists are the greatest political spin-doctors of all time. Only they can make the absolute worst political blunders sound like spectacular feats of ingenuity. |
|
|
|
January 28, 2020, 02:40 AM
|
#9 | |
|
Staff
Join Date: March 11, 2006
Location: Upper US
Posts: 28,832
|
Quote:
bag sealed (taped) to the gun on both ends of the work area. beats the heck out of trying to fine a tiny part lost in the carpet on the other side of the room... Good luck
__________________
All else being equal (and it almost never is) bigger bullets tend to work better. |
|
|
|
|
January 29, 2020, 04:51 PM
|
#10 |
|
Senior Member
Join Date: April 14, 2013
Location: Milwaukee, Wisconsin
Posts: 2,693
|
I've done 3 or 4 of these safeties and two on recent guns so i'm sure nothing has changed. What I think is happening is you're taking it to easy on the screw. Go to an area where your parts won't run away. Get a good screwdriver, hammer and if really worried about scratching the finish some masking tape. Hold the screwdriver steady and give it a few good wacks without trying to turn it. Then lightly try to turn the screwdriver while tapping on it like a woodpecker.
It doesn't need to back off that far to easily spin free. As a last resort I might take a hacksaw and cut left to right slowly to make a new screw slot. If worried about scratching things put down ducktape on either side. I bet you could even heat up a thin blade screwdriver and press it on either side of the safety melting it in half. Then snap it off with pliers. If you don't have a replacement screw NDZ sells a hexed screw with their kit. https://www.ndzperformance.com/NDZ-M...mos-es-blk.htm
__________________
NRA Lifetime Member |
|
|
|
January 29, 2020, 04:55 PM
|
#11 | |
|
Senior Member
Join Date: April 14, 2013
Location: Milwaukee, Wisconsin
Posts: 2,693
|
Quote:
__________________
NRA Lifetime Member |
|
|
|
|
January 30, 2020, 02:32 PM
|
#12 |
|
Senior Member
Join Date: October 12, 2019
Posts: 819
|
I'm honestly done with this for the time being. I may come back to it eventually, but currently the safety switch still works, and I just can't see going through even more trouble to destroy it just so that I can replace it.
Besides, considering just how smoothly this "simple" process has gone so far, I have no faith whatsoever that this will be as simple as snapping off the old safety then easily removing the screw with pliers. I've already made the mistake of trusting other folks concerning how "easy/simple" this was supposed to be, and I just don't feel like rendering my firearm inoperable in the event in which this is yet another instance in which "simple" isn't actually simple at all and I broke the safety only to discover that this infernal screw still won't come out because the head breaks off or despite my best efforts the spring/ball goes into orbit. Honestly, I wish I hadn't bothered with this at all in the first place because it's brought me nothing but stress and frustration.
__________________
Conspiracy theorists are the greatest political spin-doctors of all time. Only they can make the absolute worst political blunders sound like spectacular feats of ingenuity. |
|
|
|
January 30, 2020, 06:33 PM
|
#13 |
|
Senior Member
Join Date: April 14, 2013
Location: Milwaukee, Wisconsin
Posts: 2,693
|
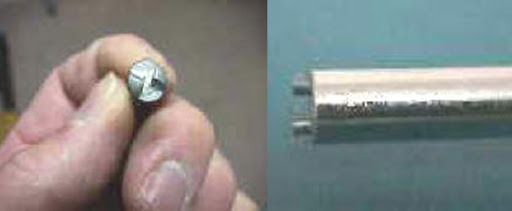
Well maybe you will have better luck in the future. I don't know why you're having so much problems as I don't believe there is any loctite or similar substance on the screw. I don't like the anti tamper screws but you should be able to do it. Back in May I did 2 in about 15 minutes including getting them out of the safe. One was a gun straight out of the box and the other I had 4 years.
You might try and see if the screw budges any tightening it a fraction. I'm sure it's possible someone tried to permanently fix it. You could also get a pointed flat blade screwdriver and tap it counter clockwise at the outer most edge of the screw. This motorcycle image was the only one I could find off hand that kind of explains it. 
__________________
NRA Lifetime Member |
|
|
|
January 30, 2020, 06:59 PM
|
#14 |
|
Senior Member
Join Date: October 12, 2019
Posts: 819
|
I tried that already... I've honestly tried everything I could find...
Every time using every method ended the exact same way, the screw slips out of the notch without budging it at all, leaving the screw a little worse for wear each time. My specific model is a Mossberg 590 Shockwave 12 Gauge with FDE Cerakote finish, which I purchased in December of 2018. I don't know if Mossberg has started using harder screws or has been locktighting them or what, but every one of the "easy" methods I've seen online has proven completely ineffective. My only guess is that the screwdriver I've been using wasn't thick enough at the blade, but that's merely speculation at this point considering that I've used the same screwdriver successfully for many firearms related tasks without issue, (swapping out grips, taking sideplates off revolvers, etc) and it seems like it would work fine for tightening the screw if need be because when turned clockwise it engages the screw just fine. Either way, I don't care anymore. The stock safety works fine and I'm fed up with fiddling with it.
__________________
Conspiracy theorists are the greatest political spin-doctors of all time. Only they can make the absolute worst political blunders sound like spectacular feats of ingenuity. |
|
|
|
January 30, 2020, 09:01 PM
|
#15 |
|
Senior Member
Join Date: April 14, 2013
Location: Milwaukee, Wisconsin
Posts: 2,693
|
I believe the screwdriver I used was thick. I have a Brownells Magna tip but I bet I used one of those cheap 4 in one screwdrivers with 2 philips/flathead bits. This is the video I watched for reference. Sure you've seen it already.
https://youtu.be/dlt-4YmMISc
__________________
NRA Lifetime Member |
|
|
|
January 30, 2020, 11:44 PM
|
#16 |
|
Senior Member
Join Date: October 12, 2019
Posts: 819
|
Yep, that was the first video that I watched because the aftermarket safety I purchased was manufactured by NDZ Performance and a link to that video was included in the included instructions.
As a result, it was also the very first method I attempted to use, but to no avail. If/when I ever try it again, I'll see about experimenting with some screwdrivers with thicker blades, but for the time being I'm burned out with it. Frankly, I'm irritated most of all with Mossberg themselves for their nonsensical decision to use the sort of tamper-resistant, one-way screws you see in public restrooms to secure a safety switch of all things! What idiot lawyer convinced them that was a good idea?! If only it used an ordinary flat head screw or even a hex screw, then it could easily be replaced without the need for any special methods or struggle required.
__________________
Conspiracy theorists are the greatest political spin-doctors of all time. Only they can make the absolute worst political blunders sound like spectacular feats of ingenuity. |
|
|
|
January 31, 2020, 05:39 AM
|
#17 |
|
Senior Member
Join Date: April 14, 2013
Location: Milwaukee, Wisconsin
Posts: 2,693
|
Looks like this guy had a similar instance as you.
https://www.shotgunworld.com/bbs/viewtopic.php?t=320926 I do like the solution of heating up a butter knife and pressing it into the plastic. Then giving it a good turn to snap it off.
__________________
NRA Lifetime Member |
|
|
|
January 31, 2020, 05:41 AM
|
#18 |
|
Senior Member
Join Date: April 14, 2013
Location: Milwaukee, Wisconsin
Posts: 2,693
|
 The tool that was suggested not completely worth buying.
__________________
NRA Lifetime Member |
|
|
|
|
|


