
|
 May 29, 2018, 06:27 PM
|
#1 |
|
Senior Member
Join Date: August 24, 2014
Location: Minnesota
Posts: 639
|
tight bolt close
So, I've been loading for 2 different .308's, one rem 700p and one savage mod 10-t sr. On this last load cycle, I am having a hard / tight bolt closure on the Savage. On the Rem things are smooth like normal. So, I did some measuring:
Tools: Hornady caliper, Hornady comparator to ogive, and Hornady comparator to shoulder datum. Wilson case gauge. First, I dropped them in the case gauge thinking I might have not sized fully. all fit flush with the gauge. Then I took a Fed GMM 168 HPBT from a factory box, cycled it through the savage, bolt closes like normal. measured the round from base to ogive = 2.222. Measured from base to shoulder datum = 1.654. Then measured my loaded rounds base to shoulder 1.662 (average of 5 cases 1.663 to 1.661 max to min) then base to ogive = 2.196 (again average of 5, 2196max - 2.195min one oddball 2.199) Conclusion, both completed rounds measure tip to tail 2.800, base to ogive my loads are shorter by .0255 (probably not the issue) from shoulder to base my loads are longer by .008 (could this be the issue?). I've used this same die-lock ring- press bushing- lee press combo before with the Savage and had no trouble. Case trim is 2.005-2.006 well in spec. I’m a little confused. Fired cases measure from shoulder to base = 1.665 in the savage. extraction is smooth. Using 2 headstamp's FC and Hornady. both range brass and both once fired, both measure same.
__________________
Just a dude with stuff. Last edited by 308Loader; May 29, 2018 at 08:40 PM. |

|
|
May 29, 2018, 06:54 PM
|
#2 |
|
Senior Member
Join Date: May 2, 2015
Location: Deepinnaheartta,Texas
Posts: 318
|
Did you full length resize 308Loader or Neck resize?
__________________
μολὼν λαβέ NRA Life Member |
|
|
|
May 29, 2018, 08:09 PM
|
#3 |
|
Senior Member
Join Date: August 24, 2014
Location: Minnesota
Posts: 639
|
this batch of range brass was SB-FLRS
__________________
Just a dude with stuff. |
|
|
|
May 29, 2018, 08:37 PM
|
#4 |
|
Senior Member
Join Date: October 16, 2014
Location: Iowa
Posts: 1,634
|
Get out a sharpie and draw a couple of lines down the cartridge from the base of the case to tip of the bullet and you should be able to figure out where it's rubbing pretty quickly.
|
|
|
|
May 29, 2018, 09:13 PM
|
#5 |
|
Senior Member
Join Date: September 2, 2010
Location: Plainview , Long Island NY
Posts: 3,863
|
308Loader
Remingtons have more free bore then Savages . Here's what I do . I full size only , when sizing my fired cases , I use a stripped bolt only the housing . You can feel the case size down to zero case head space then size down to .001bolt will have no resistance . I measure the zero case , I record that measurement . The with that case I seat a bullet long test in chamber , size down untill round closes with very little resistance on bolt closure , record that measurement . You from there can size your cases with zero on up headspace ,same with ogive setting. Both rifles have different headspace an head to ogive measurements . Stripping a Savage bolt may be more difficult , Remington is simple. I use the RCBS Precision Mic for both , great tool. |
|
|
|
May 29, 2018, 09:27 PM
|
#6 |
|
Staff
Join Date: March 4, 2005
Location: Ohio
Posts: 21,061
|
308Loader,
Yes, the extra 0.008" is the problem. When you resize, the sizing die first narrows the case as the sides make contact with the die first. This squeezes the case out longer. You then have to push it against the shoulder hard enough to form the shoulder back. This flows the extra brass into the neck, which is why necks often need trimming after resizing and not before. What you want to do is take a flashlight and when one of your cases is all the way up in the die, look for a crack of light between the mouth of the die and the shell holder that is due to the sizing force actually stretching the press frame a little. Back the ram down and turn the die in and check again and repeat until that crack of light is gone. Your cases should then lose the extra length. Figure about a ninth of a turn deeper. With a small base die, both the squeezing that first lengthens the case and the press stretching force are greater than with a standard sizing die.
__________________
Gunsite Orange Hat Family Member CMP Certified GSM Master Instructor NRA Certified Rifle Instructor NRA Benefactor Member and Golden Eagle |
|
|
|
May 30, 2018, 08:28 AM
|
#7 | |
|
Senior Member
Join Date: July 18, 2008
Posts: 7,249
|
Quote:
If your case was flush with the end of the Wilson case gage after sizing you failed to size the case. If that happened to me I would determine if the die made it to the shell holder when I raised the ram. In the perfect world and the case gets sized when the ram is raised there will be no gap between the shell holder and bottom of the die. F. Guffey |
|
|
|
|
May 30, 2018, 08:39 AM
|
#8 | |
|
Senior Member
Join Date: July 18, 2008
Posts: 7,249
|
Quote:
In the quote above I copied a lot of stuff/details that could be repetitive. If you are using Hornady tools that are datum based forget accuracy. The tool you are using is a comparator, the datum has a radius meaning the reloader must learn to zero the tool first. And then there is that thing with measuring before and again after. F. Guffey |
|
|
|
|
May 30, 2018, 07:29 PM
|
#9 |
|
Senior Member
Join Date: August 24, 2014
Location: Minnesota
Posts: 639
|
Dog… “Get out a sharpie and draw a couple of lines.” assuming the sharpie rubs off in the right spot, on my to do list.
CW… “I use a stripped bolt only the housing.” Safety thing? No powder or primer same? “You can feel the case size down to zero” more questions on this. Nick… “Yes, the extra 0.008" is the problem.” What I figured… “I've used this same die-lock ring- press bushing- lee press combo before with the Savage” is my confusion. I get that the Savage – Remington – and the Wilson have different sizes / chamber cuts. (guffy). What once worked ok, now is not. Hence the question and the measuring. ” the datum has a radius meaning the reloader must learn to zero the tool first.” Hu? In the case of a comparator how can one zero? It is a comparison. “And then there is that thing with measuring before and again after.” Did that as you pointed out. Would have expected the case gauge to be SAMMI min-ish. When loading for two Win .308’s. I guess I should load and segregate brass for each rifle. What I’ve loaded to the case gauge and suggested OAL I thought would be fine and is. Don’t get me wrong, everything I shot = 1” @ 100y +/-. Thanks for the reply’s all. Now I have created a bigger problem for myself, installing a rock chucker supreme to replace my Lee classic… talk to you all soon about that. Again, thanks for the reply’s. I’ve been at this for only a couple of years. I know that what I know is only enough to be dangerous, I haven’t gone all the way down the rabbit hole (YET!). By trade I have been in offset lithography, and HFC communications. Both require attention to detail, so I feel I might be able understand this. Like the afore mentioned trades, there is not a school for this sort of thing that I know of. I just have you all
__________________
Just a dude with stuff. |
|
|
|
May 30, 2018, 09:00 PM
|
#10 | |
|
Senior Member
Join Date: June 8, 2016
Location: Cleveland, Ohio Suburbs
Posts: 1,750
|
308Loader:
Quote:
We need to keep in mind that the Hornady® Lock-N-Load® Headspace Gauge system is, as Mr. Guffy and others point out is a comparator type system. That means most of the numbers you mentioned in your first post are just references they are not actual case dimensions which is why they are not close to the dimensions in the link. The Maximum cartridge dimension from base to shoulder datum (where the OD of the shoulder crosses through 0.400" is 1.634" -0.007". The problem with the Hornady gauge is the bushings (.330", .350", .375", .400" and .420") have a machined radius on the holes and are not sharp corner breaks. Most I have seen and used normally measure low but you are coming up with some large numbers. Here is what I am getting at with pictures. I zero a digital caliper: 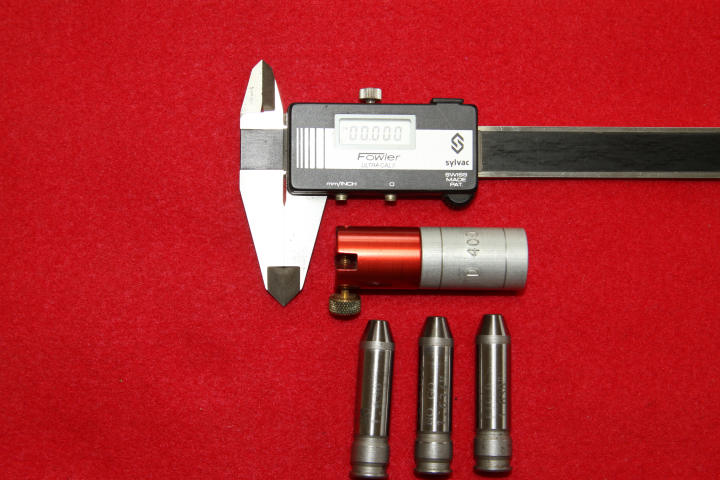 I attach the case gauge: 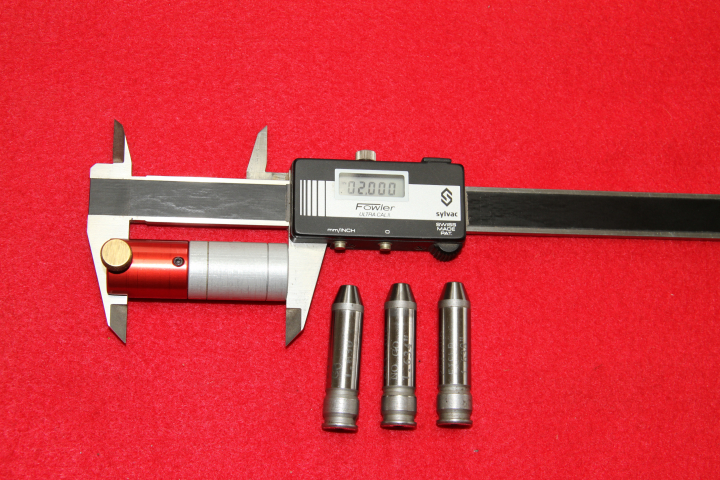 I zero the digital caliper: 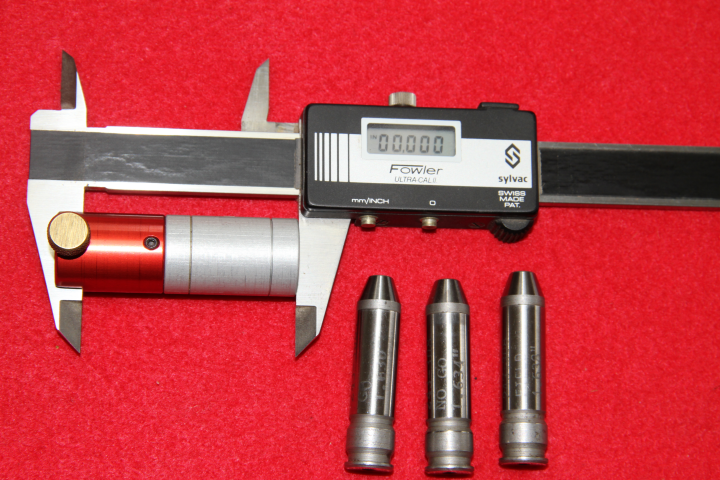 Now rather than measure a case I will measure a known value actual chamber headspace gauge with a known 1.630" dimension base to shoulder datum. 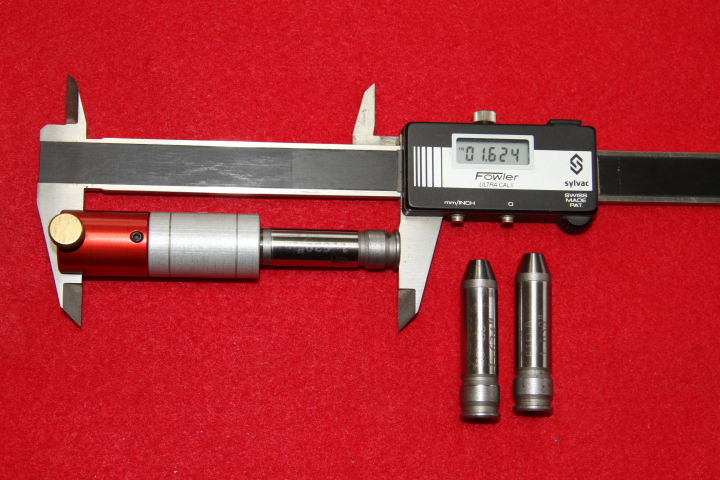 Note the reading is 1.624" using a known 1.630" gauge so my reading is actually -0.006". I will now measure a known 1.634" chamber headspace gauge. 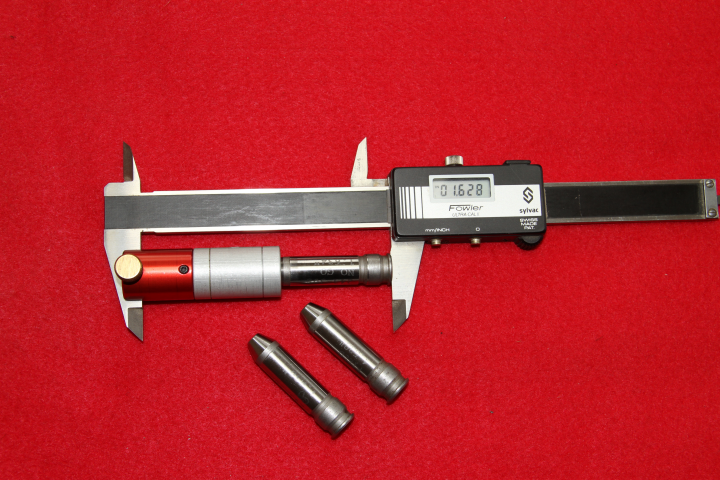 My reading has increased 0.004" as expected (1.624" to 1.628") but I am still 0.006" below my actual gauge. The cause of the error is again, the bushing is not very exact as to a 0.004" corner break. I zeroed off the large flat on my bushing but my hole where I meet the datum on the shoulder is not a true 0.004" diameter. However, the gauge did accurately measure the difference between my first headspace gauge and my second as 0.004" which is actually what the gauge is supposed to do. So the idea of doing this is to fire a case and measure the fired case. Now resize the case and measure again. The idea being I can resize my case for a measurement about 0.002" less than where I started. As long as the system is linear you have a good working "comparator" allowing an accurate comparison of before and after. Real numbers, most factory ammunition, I get cartridges around 1.629" to 1.630". My Federal Gold Medal Match comes in right about 1.630". If you want real numbers and accurate numbers I suggest the RCBS Precision Mic or buy a 308 Headspace GO gauge which should be a 1.630" gauge and set up your Hornady gauge off that gauge. My experience has also been when using good dies, correctly adjusted, my resized brass comes out right around 1.630" when full length resizing 308 Winchester, unless I intentionally set my die higher off my shell holder. When sized to a true 1.630" the cases should chamber and function in any 308 chamber meeting SAAMI specifications. Finally and before I forget, the images are mine and if anyone wants them feel free to download them for your own use. The images are also linked to a domain which I own. Ron |
|
|
|
|
May 31, 2018, 06:08 AM
|
#11 |
|
Senior Member
Join Date: December 22, 2015
Posts: 887
|
Without segregation between cases fired in the two guns, and with multiple loadings (work hardening of the brass) your results may not be unexpected. Especially if you are using the same sizing die setting for both guns (and the shellholder doesn't touch, or very nearly touch, the sizing die when sizing the cases).
|
|
|
|
May 31, 2018, 05:05 PM
|
#12 |
|
Senior Member
Join Date: August 24, 2014
Location: Minnesota
Posts: 639
|
"Mr. Guffy and others point out is a comparator type system. That means most of the numbers you mentioned in your first post are just references they are not actual case dimensions which is why they are not close to the dimensions in the link."
yes, I understand that. after installing both devices to the caliper it was zeroed. "and the shell holder doesn't touch, or very nearly touch, the sizing die when sizing the cases" No crack of light between shell holder and die base here. I'm installing the new rock chucker tonight, witch means all of the dies will be reset. I will try again and see what happens. It just struck me as odd that what once worked fine suddenly didn't. I used the same setup to load for the new savage 3-4 times with no issue, this time it didn't. Thought I might be overlooking something. What really sucks about all of this is the 800 rounds that were sized, some of witch will be resized when I'm done segregating / allotting brass for each rifle. Thanks for the reply's all.
__________________
Just a dude with stuff. |
|
|
|
May 31, 2018, 05:58 PM
|
#13 |
|
Senior Member
Join Date: June 8, 2016
Location: Cleveland, Ohio Suburbs
Posts: 1,750
|
Let us know how the press works out. I have to agree that nothing should have changed but something did. Anyway, please do follow up. After sizing several try the brass for form, fit and function in each rifle and see what you get.
Ron |
|
|
|
May 31, 2018, 08:53 PM
|
#14 | |
|
Senior Member
Join Date: December 22, 2015
Posts: 887
|
Quote:
|
|
|
|
|
June 1, 2018, 08:23 AM
|
#15 |
|
Junior member
Join Date: February 27, 2015
Posts: 1,768
|
I go about it differently than some...
General chambers (Sloppy) a case gauge will get you there 99% of the time. 'Tight' (in or about SAAMI specification) you will need a gauge cut the same as your chamber for it to be efficient. Example: Your case gauge works fine for your Remington, which is probably older than the current crop of super tight chamber rifles.. 1. Rim/Lower Case Bloat. Rim get hammered out oversize, bolt has to resize rim, tight bolt. Rim gets deformed by extractor/ejector (and sometimes by shell holder) and does not get restored by top down sizing dies. 2. The die simply can't reach down below the case holder rim to size out the lower bloat. Exactly ZERO top down dies will remove lower case bloat, which presents as hard to lock bolt, bloat being last thing to enter the chamber. 3. Datum Line Length, Distance from head stamp surface to Datum line on case shoulder. The Datum length is the measurement that fits into Chamber Head Space. 4. Shoulder Angle. An alarming number of dies (and chambers) do NOT have the correct shoulder angle to produce properly sized brass. 5. Neck diameter & length. This one should be self explanatory. |
|
|
|
June 1, 2018, 08:43 AM
|
#16 | |
|
Senior Member
Join Date: July 18, 2008
Posts: 7,249
|
Quote:
Again, I have long chambers, when sizing cases for long chambers I adjust the die off the shell holder with a feeler gage. I have one 30/06 chamber that requires the die be adjusted off the shell holder .014" to get the magic .002" clearance. The chamber is .016" longer than a minimum length chamber from the shoulder of the chamber to the bolt face; that is .011"lomher than a go-gage length chamber. F. Guffey |
|
|
|
|
June 1, 2018, 08:51 AM
|
#17 | |
|
Senior Member
Join Date: July 18, 2008
Posts: 7,249
|
Quote:
Crack of light and or a sliver of light? I use a feeler gage to measure the gap between the top of the shell holder and bottom of the die. F. Guffey |
|
|
|
|
June 1, 2018, 05:53 PM
|
#18 |
|
Senior Member
Join Date: August 24, 2014
Location: Minnesota
Posts: 639
|
JeepHammer, thank you for the more constructive thought on the whole issue.
Ron, I will let you know what I figured out, thanks for the input. Guffy, what in the F is a light gauge. I work with fiber optics, we have light meters to quantify inferred light levels, no gauges. Also how did you install a dial indicator? "the case can have more resistance to sizing than the press can overcome." that was kind of what I was thinking. These cases were donated to my by a friend who fired then once through his ar10. I small base sized them, my Lee press was creaking and flexing more than normal. But as stated before, the first 3-4 batches of 100 worked out just fine. New press is in, and I have reworked the mounting system on my bench. I have a chunk of 2x10 mounted to my bench at a 45 degree angle so that I can work from both sides of it. One side has the single stage and the other has the 4 hole turret for pistol rounds. the previous 2x10 had a crown to it that I think added to the flexing. new 2x10 is perfectly straight, a little shorter, and is anchored better.
__________________
Just a dude with stuff. Last edited by 308Loader; June 1, 2018 at 06:22 PM. |
|
|
|
June 1, 2018, 06:10 PM
|
#19 |
|
Senior Member
Join Date: August 24, 2014
Location: Minnesota
Posts: 639
|
So now that it is crystal clear to me that I need to size different for both rifles. the process for die set up is:
Measure fired case shoulder to head with comparator. assuming the fired case has sized itself to the chamber. Subtract .02 and size to that for each individual rifle by moving die up or down. Seems dumb to ask because I've read about it 1000 times in various places, but the only dumb question I know of is the one never asked. This might have been the first question I asked in my first post here 4 years ago.
__________________
Just a dude with stuff. |
|
|
|
June 1, 2018, 07:29 PM
|
#20 | |
|
Senior Member
Join Date: June 8, 2016
Location: Cleveland, Ohio Suburbs
Posts: 1,750
|
Quote:
If loading for a specific rifle you only want to reduce the head to shoulder datum measurement by about 0.002" not 0.020" but I figure that was a typo. Adjusting the die to give a head to shoulder datum difference of 0.002" should extend brass life as when resizing you work the brass less. Using the die per the instructions, running it down to the shell holder and then 1/8 to 1/4 turn will resize the brass so it should fire in any standard chamber. So you have a choice. Ron Last edited by Reloadron; June 1, 2018 at 07:36 PM. |
|
|
|
|
June 2, 2018, 07:48 AM
|
#21 |
|
Senior Member
Join Date: September 2, 2010
Location: Plainview , Long Island NY
Posts: 3,863
|
308Loader
Sorry I didn't get back sooner . On the stripped bolt is not a safety thing , it's you have a better feel of the sized case , your fired unsized case chambered in your rifle you will feel resistance when closing the bolt in most cases . I set my die high size then chamber that case . I slowly size down the case, each time the bolt will lower with less resistance as the case sizes to your chamber , to a point where it will close fully with a slight resistance , that would be zero headspace , size down alittle more your bolt will close with no resistance . That would be .001 headspace , it takes some time . I do the same for ogive to jump or jam . If your case isn't sized for proper consistent headspace your jump or jam measurement will be all over the place when measuring from base ( case head ) to ogive . Once you know the measurements I use the RCBS Precision Mic to check the sizing for both headspace an ogive . I like .001 for headspace and .002 for jump . Total of .003 wiggle room . To really confused things my cases would expand no lengthen , so I could chamber a fired round without sizing . When I full length sized the case it would get longer , tried neck sizing but full length sizing is more accurate all around for me. The comparators are good but I like the PM much better. Hope I didn't drive you mad with my explanation . I'm better showing the explaining . Chris |
|
|
|
June 2, 2018, 12:46 PM
|
#22 |
|
Junior member
Join Date: February 27, 2015
Posts: 1,768
|
1. Rim Expansion.
Rims expand with firing. Rims get hammered out by extractors, by ejectors. If you see extractor marks on the rim, or ejector marks on the headstamp surface, the brass MUST go somewhere. After just a firing or two, you will notice the headstamp letters/numbers get a lot less 'Sharp', and sometimes even noticably shallower. Avian, the brass MUST go somewhere... Case gauges aren't very accurate. They are fine for 'Sloppy' chamber ammo, but aren't super accurate. The 'Maximum' allowable in that gauge might be over size for your chamber/bolt. Look for brass 'Rub' on the bolt face. There should be a fairly wide, fairly even 'O' on the bolt face. The primer being inset from case head, there should be a clean, No Brass circle the size of the primer pocket centered around the firing pin opening. There should be a No Brass ring around the outside of the bolt face where the case head has a beveled edge. If the brass rub is MUCH more pronounced on top or sides, the bolt face isn't lapped square with the chamber. The RIM around the bolt face, the pocket that centers the case in the bolt, has a lot of brass rub on the INSIDE, you have oversize case heads, or you have an undersized bolt rim. Oversize brass or undersized rim will cause interference and excessive run when the bolt gets closer, and only when the handle is being moved down to lock. Once the brass gets wedged into the rim on the bolt, it will 'POP' and throw out fairly hard when you eject. Depending on the ejector (spring & pin vs. fixed block ejector in receiver) you may be able to wedge a case/cartridge on the bolt when it's out of the firearm. (Spring/pin ejectors won't allow this, if it's a spring pin and the case wedges you have an issue) There will usually be a brass rub on the bottom of the bolt rim face, this is natural since the bolt pushes the round into the chamber and rounds don't always feed smoothly, particularly short action rounds like .308 Win. |
|
|
|
June 2, 2018, 01:06 PM
|
#23 |
|
Junior member
Join Date: February 27, 2015
Posts: 1,768
|
2. Lower Case Bloat/Swelling.
Case pressure spikes really quickly, much faster than the bullet can get moving to relieve the pressure. This will bloat the lower case, virtually everyone finds bloat in the solid part of the case head & hollow powder chamber space, right along with case walls... The problem with this is, the case head (which extends above extraction groove), and the bottom of the powder chamber has thicker walls because of rounded lower powder space walls... This is a LOT of brass that expands! To further complicate things, top down dies can't reach the lower case bloat/swelling. If the chamber is opened up to allow for chambering a bloated case, the case fits back in the chamber. If the chamber walls are properly sized (no wobble in the chamber cutting tool) the bloated case won't want to fit into the chamber. Top down dies can't reach this area of the case. Period. The case holder has a shoulder, solid steel, that extends up above the extraction rim. This makes the rim, the extraction groove & the lower part of the powder chamber a NO-GO zone for common top down dies. The bottom of top down dies are tapered/flaired/rounded to guide the brass into the die. That flair/rounded area is larger than where the case wall needs to be bent to, so it doesn't resize the case. The fastest, but most expensive way to reshape/resize this lower case is a case roller machine (Case Pro). Specifically sized 'FLAT' die plates roll the case walls down low and push the brass of the rim, restore the groove and resize the lower case head/powder chamber. This takes tremendous pressure, so common dies wouldn't be able to do this even if you had a die that reached all the way to the headstamp surface. The 'Old School' method is to use a .30-06 die & dedicated case holder on a .308 Win case. With a repurposed .30-06 die and a 'Shaved Down' (lapped or surface ground) case holder, you can reach down the case a little farther to push more (but not all) of the lower bloat out. Removing material from the top of the case holder, or some slight removal from the bottom of the .30-06 die let's you resize the bottom of the case farther down WITHOUT moving the shoulder back at the same time... Forcing the brass farther into a .308 die to reduce the bloat WILL move the shoulder further back. Period. Using a .30-06 die, the shoulder is much higher up, never contacts the shoulder on a .308 Win brass. Since both the case holder & .30-06 dies are 'Cheap', they sure beat the cost of a case roller! Depending on which version of case drawing you see, The case just above the extraction groove, .308 Win, 0.470x" .30-06 Springfield, 0.469x" At less than 0.0005" difference, you can see why a .30-06 die allows you to size, or slightly undersized YOUR brass to specifically fit YOUR chamber. *Slightly* undersized dies might just be the 'Bump' you are looking for to properly size the lower part of the case before you set the shoulder back with a .308 Win die. Last edited by JeepHammer; June 2, 2018 at 01:19 PM. |
|
|
|
June 2, 2018, 01:54 PM
|
#24 |
|
Junior member
Join Date: February 27, 2015
Posts: 1,768
|
3. I see significant 'Issues' with the pictures above showing headspace 'Go/NoGo' gauges and the Datum line adapter shown.
The first, and biggest issue is the Datum line adapter itself. This is a 'comparator' adapter, not an absloute measurement adapter. The hole MUST BE EXACTLY 0.400". Zero tolerance here. The face of the adapter MUST he square to the hole. If the hole is drilled even slightly at an angle to the face,you can't get an absloute reading. There can't be any champfer, radius etc. Going into the hole. This will allow the case to sink farther into the adapter, screwing up any chance of an absloute reading. And, with a radius/champfer on the adapter, the name of the caliper CAN NOT reach the 0.400" portion of the adapter, so no way to zero the caliper. Using a 'Go/NoGo' gauge ASSUMES you have a chamber shoulder that is cut at EXACTLY the same angle, AND, again, this is a headspace gauge, no way to tell when you reach EXACTLY 0.400" diameter part of the shoulder taper, so again, no way to zero exactly to compensate for taper/radius/champfer of the adapter. The ONLY way to get an accurate adapter is to have one turned at a local jobber machine shop. It MUST be lathe turned, both to get a flat face,and by drilling on a lathe you will get a perfectly square bore to the face. Lathe turning also allows for an EXACT 0.400" bore (by precise reaming or honing). A jobber machine shop will have the measuring tools necessary for measuring an exact 0.400" +/- nothing bore. With this adapter, square face to bore, exactly 0.400" bore, NO TAPER/RADIUS/CHAMPFER, you can get a direct read & absloute measurement. Now, with the method shown above, you are paying for the adapter, a set of 'Go/NoGo' gauges. This is roughly what you would pay for a jobber shop built adapter, maybe less... With the adapter shown above, the best you can hope for is a 'Relative' measurement, a 'comparator' at best. This is basically allowing you to compare one brass to another (of the 'Go/NoGo' gauge). If you aren't worried about 0.005"-0.010" off in the reading when you average in the usual resolution/slop in most cheap calipers, the above shown gadget will work. Just don't confuse a 'comparator' with an absloute read tool. ..... Now, the Datum Length is from head stamp surface of the case to the 0.400" Datum Line on the case shoulder. This length MUST be less than the closed bolt face to Datum line on the shoulder of the CHAMBER (closed bolt to Datum line on CHAMBER shoulder being defined as 'Headspace' since only the chamber has 'Headspace') With a comparator and a fired brass, you CAN roughly figure out where the shoulder needs to be on the case. After elminates rim or lower case bloat, you can start on Datum length issues to ensure your shoulder is in the correct location. Without removing rim/case bloat FIRST, you can't tell what's causing the drag when the bolt is closed. This separates the two issues, allowing you to scientifically and systematically remove issues one at a time, in order, to find exactly the issue, and to make brass that fits the chamber YOU have. |
|
|
|
June 2, 2018, 02:10 PM
|
#25 |
|
Junior member
Join Date: February 27, 2015
Posts: 1,768
|
5. Neck sizing issues.
Last first when figuring out 'Issues'.. Take the decapping rod/neck sizing ball out of your die, size a few brass with the neck crunched down. You can even trim them a little short to eliminate both length & diameter issues. Try chambering the cases, see if the bolt gives excessive resistance. If you still have resistance, the neck size/length wasn't the issue. These cases will be used to find the issue... They are not wasted. ..... Before you go much farther, review your crimp! Over crimping is the #1 issue with chamberings generally. Excessive roll crimp will buckle the shoulder outwards, and this will cause your complaint. If you don't crimp, this obviously isn't the issue... There is about zero reason to crimp a bolt rifle round. Virtually 100% of bullet movement can be eliminated in bolt rifles simply by reducing the diameter of the sizer ball in the decap/resize rod. Simply remove rod from die, use lapping compound on a piece of leather, chuck the rod up in a drill motor and lap the ball down SLIGHTLY, check for reduction and load a few test round. When you reduce the neck diameter, you INCREASE the grip the case gets on the bullet. It's that simple... ...... Once necks are reduced in size, and shortened, these cases will be perfect for checking case diameter first, then getting your Datum length correct for your headspace. |
|
|
 |
|
|


