
|
|
|||||||
| Forum Rules | Firearms Safety | Firearms Photos | Links | Library | Lost Password | Email Changes |
| Register | FAQ | Calendar | Today's Posts | Search |
 |
|
|
Thread Tools | Search this Thread |
 July 25, 2015, 12:48 PM
|
#26 |
|
Senior Member
Join Date: September 2, 2010
Location: Plainview , Long Island NY
Posts: 3,863
|
KBurn, does your base have a builtin 20moa. Metal god I would agree with, zero your scope settings. windage & elevation, does your rings mount to a base. How high are your rounds hitting. I would set my targets one over the other, 8.5 x 22 put a bull no the lower target, your rifle should start out clean. after cleaning & you run a oiled patch down the barrel, remember to run two dry patches through the barrel to remove the oil before you shoot. I think your problem is in the base, some shim the base & rings. For long range 20 moa bases with scopes with 60 moa of adjustments, yours is half that. Zeroing at 100 yards you should be able to zero with mid ranges settings on your scope adjustments. Hate to ask ,if your scope has a 20moa are you sure its not on backwards. You may just have a bad scope.Just remembered, you changed your stock, are your action screws tight & how far off the barrel is the scope.
Last edited by cw308; July 25, 2015 at 01:52 PM. |

|
|
July 25, 2015, 01:01 PM
|
#27 | |
|
Member
Join Date: July 20, 2015
Posts: 62
|
Quote:
1. Get new Talley base/ring 1 piece combo 2. Mount scope and get mechanical zero 3. Clean rifle top to bottom to get a clean start 4. Sight in at 50, then 100 yards, with the federal. 308 I have. 5. Get rid of the rest of the steel case Tulammo. 6. Try reloads once more and see what happens. |
|
|
|
|
July 25, 2015, 02:22 PM
|
#28 |
|
Senior Member
Join Date: September 2, 2010
Location: Plainview , Long Island NY
Posts: 3,863
|
What rings do you now have mounted on your rifle, low medium or high. How far off the barrel is the scope & is there a built in moa on the mount. Before buying anything can you switch the scope from another rifle before you change anything. let's try one change at a time. Make sure all your screws are tight, Even with the way the rifle is set up now with it shooting high, how is it grouping.
|
|
|
|
July 25, 2015, 03:24 PM
|
#29 |
|
Senior Member
Join Date: August 1, 2010
Posts: 641
|
Looked at your older posts. Marlin bolt action with a 1-piece base? What kind of rings are you using?
Assuming you're using good rings, my recommendation would be Mechanically center the scope, take the scope out of the rings, take the rings off the base, take the base off the rifle. Put it all back together, carefully. Don't boresight. Start with factory loads, no steel cases, and a large target at 20 or 25 yards. |
|
|
|
July 25, 2015, 08:11 PM
|
#30 | |
|
Member
Join Date: July 20, 2015
Posts: 62
|
Quote:
 These are the Rings I have. Unfortunately that was all I could find at this shop... They don't seem too horrible, but I think I'd still be more comfortable with the Talley one piece or similar. |
|
|
|
|
July 25, 2015, 08:43 PM
|
#31 |
|
Senior Member
Join Date: August 1, 2010
Posts: 641
|
Your choice on the rings, but there is no reason to think that anything else will work better than those Weavers. I used them on a 44 magnum revolver with no problems.
|
|
|
|
July 25, 2015, 09:20 PM
|
#32 |
|
Senior Member
Join Date: March 23, 2008
Location: Jefferson State
Posts: 1,197
|
Those rings aren't my favorites, but I've used them a lot over the years, and for a long time they were probably the most used rings in the country. They often have a tendency to cant the scope towards the side where the screws tighten, sometimes making it necessary to pre-load the cross hair a little off level so that it ends up level after tightening.
Bottom line though is that they will hold a scope rock solid if assembled correctly with either the proper bases or picitiny rail. By the way, have you trimmed your cases to proper length? Or at least kept them under maximum length. jd
__________________
"We're all dummies, just in different ways." Old Okie Philosopher |
|
|
|
July 26, 2015, 11:51 AM
|
#33 | |
|
Member
Join Date: July 20, 2015
Posts: 62
|
Quote:
|
|
|
|
|
July 26, 2015, 01:56 PM
|
#34 |
|
Staff
Join Date: March 4, 2005
Location: Ohio
Posts: 21,063
|
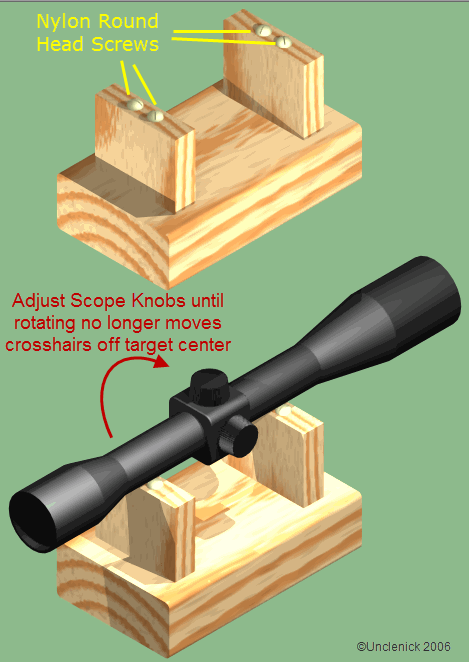
First, for zeroing your scope mechanically, here's a simple fixture you can build for yourself from some scrap two-by-fours and four round-head Nylon bolts. The last time I made one of these for somebody, I drilled the bolt holes to full diameter and used hot melt glue to set the bolts into the wood so the screwdriver slots were kept parallel to the scope tube, unlike in the illustration, and wouldn't be part of the bearing surface:
 Once you have the scope mechanical zero, the advice of the others holds. I use a laser bore sighter, but once the crosshairs are on the dot, I rotate the sighter in the bore 180 degrees, then look to see how far off it is. I then adjust the scope half way between the starting point and the second laser position. That's usually very close to correct. Bore sighting works, too, but it takes a bit more getting used to. Use a very large target backer to shoot the square Nathan suggested to see if the scope comes back. That, or, just leave it at the mechanical zero and shoot at 50 yards and see if the ammo plays nicely with you. The Winchester brass I have has about a grain and a half less water overflow capacity than the Federal brass I have. This means I need about 0.8-0.9 grains more powder in the Winchester case to reach the same pressure and barrel time range using the same bullet and primer. However, that case overflow capacity ratio has changed over time with brass lots, so you need to measure it for your own case lots as fired in your own chamber. This must be done before you resize them, as the expanded volume is what determines peak pressure, not the resized volume. Then figure about 0.6 to 0.7 grains of powder charge increase for for each grain additional case water overflow capacity a case has. I have an old Excel file you can download here that includes instructions and will assist with making this measurement. It works with the free Open Office Suite's spreadsheet program (Calc) as well as with Excel. It should go without saying that if your gun needs bedding to stop uneven or biased or irregular contact between the wood and the barrel, or if it needs its muzzle recrowned, or needs its action and bolt face trued to reduce heat walking, or needs its bolt lugs lapped, you are not likely to get it to shoot up to its potential until these things are taken care of.
__________________
Gunsite Orange Hat Family Member CMP Certified GSM Master Instructor NRA Certified Rifle Instructor NRA Benefactor Member and Golden Eagle Last edited by Unclenick; July 28, 2015 at 03:15 PM. Reason: fixed link to Excel file |
|
|
|
July 26, 2015, 03:20 PM
|
#35 |
|
Senior Member
Join Date: April 10, 2012
Location: San Diego CA
Posts: 6,876
|
Unclenick . Nice scope concentricity gauge
 . Never thought of doing it like that . That seems to be the way to be sure the crosshairs are centered in the tube . Correct me if I'm wrong but that method does not give you a mechanical zero ? It centers the reticle in the tube but is not a mechanical zero correct . A mechanical zero is having the mechanics of the turrets zeroed , yes no ? . Never thought of doing it like that . That seems to be the way to be sure the crosshairs are centered in the tube . Correct me if I'm wrong but that method does not give you a mechanical zero ? It centers the reticle in the tube but is not a mechanical zero correct . A mechanical zero is having the mechanics of the turrets zeroed , yes no ?
__________________
If Jesus had a gun , he'd probably still be alive ! I almost always write my posts regardless of content in a jovial manor and intent . If that's not how you took it , please try again .  
|
|
|
|
July 26, 2015, 03:43 PM
|
#36 |
|
Staff
Join Date: March 4, 2005
Location: Ohio
Posts: 21,063
|
It will be mechanical zero for the scope itself if the the knobs have equal reticule adjustment in both directions from dead center, but not if they don't. Also, if you have long range rings on your gun that add to the elevation of the scope to buy you some extra moa, then this approach throws you off and you'll impact high. But for a standard rifle setup with equal height rings that are parallel to the bore, it puts your sight line parallel to the bore line. Then a perfectly rigid gun and barrel, aimed at 100 yards, would give you a point of impact below the point of aim by the amount of the scope height above the bore line, plus the total drop for the load at that range. Around 4 moa low for a typical .308 setup.
__________________
Gunsite Orange Hat Family Member CMP Certified GSM Master Instructor NRA Certified Rifle Instructor NRA Benefactor Member and Golden Eagle |
|
|
|
July 26, 2015, 04:42 PM
|
#37 | ||
|
Senior Member
Join Date: April 10, 2012
Location: San Diego CA
Posts: 6,876
|
MECHANICAL
Quote:
Quote:
My original point about Mechanical zeroing his scope was assuming he was using the same set up and not removing the scope . My thought was that the OP had turned his turrets so much during the first test that It would be best to reset the turrets back to there mechanical zero .
__________________
If Jesus had a gun , he'd probably still be alive ! I almost always write my posts regardless of content in a jovial manor and intent . If that's not how you took it , please try again .
|
||
|
|
|
July 26, 2015, 06:47 PM
|
#38 |
|
Member
Join Date: July 20, 2015
Posts: 62
|
Well, I boresighted, but with the edition of new rings I'm thinking I'll get the mechanical zero set as a starting point. I'll probably just count clicks, since I'm not super concerned about that at this point. I'll probably still sight in at 50, and go from there. Rings should be here thus week sometime.
|
|
|
|
July 27, 2015, 01:01 PM
|
#39 |
|
Senior Member
Join Date: September 2, 2010
Location: Plainview , Long Island NY
Posts: 3,863
|
I didn't know you were using 2 screw Weaver rings, for any serious accuracy you are better off with 4 screws on each ring 2 on each side, better hold & easier to adjust torque. When installing base rings, clean action threads with a Q-tip an alcohol also screws, mount in position with pressure foward towards the muzzle, don't fully tighten at this time. When both bottom mounts are in position lay scope in lower halfs,with bolt removed hang a drop line indoors, center it in your bore, look from the back of your stock,then look where your verticle line is in your scope, position lower halfs to align with vertical line in the bore. When positioned as close as possible, tighten base, remember to zero scope settings first. the drop ling will correct any scope cant. that will also give you a good starting point for windage. Were not finished, once lower bases are tight & in position, scope is laying centered in lower half. remove scope remove one screw put a drop of locktite Blue 242 on thread retighten then go to the next screw doing the same thing. Set the top rings in place snug them in place, make sure your not canting the scope when tighting top rings, when in position & torqued, remove one screw at a time a drop of blue on screw thread retighten & go to the next screw. seems like alot of work to just mount a scope but once it's perfect & your zeroed. All up to you to get those tight groups. Hope I helped Chris
|
|
|
|
July 28, 2015, 07:40 AM
|
#40 | |
|
Senior Member
Join Date: July 18, 2008
Posts: 7,249
|
Quote:
builds because of high pressure the case head is driven back against the bolt face. Keeping up: When the case stretches between the case head and case body the primer seats. But your primers were protruding meaning your case did not stretch, and that means you do not have high pressure. Then there is that other thing, there is a remote possibility your extractor held the case off of the bolt face. I know, sounds strange, I always want to know what action, it always helps to know if we are talking about a push feed or a control feed. Again, one of my older brothers went to the river bank to test some loads, he was shooting 10 feet high. He received a visit. F. Guffey |
|
|
|
|
July 28, 2015, 03:02 PM
|
#41 |
|
Senior Member
Join Date: March 15, 2005
Location: Colorado
Posts: 110
|
KBrun
Please take a look at Unclenick's post where he talks about the case volume being different between Federal(And LC Lake City) and winchester. Same load in those two different cases can give very different results. Also, if you have fired steel cased ammo in your 308, I would make real sure you have cleaned the chamber very well, as the lacquer on the outside of those things can transfer to your chamber. Personally I would only use steel case ammo in two rifles, an AK or SKS. I would definitely not shoot steel case AND brass case in same shooting session. Good luck ! |
|
|
|
July 28, 2015, 04:28 PM
|
#42 |
|
Staff
Join Date: March 4, 2005
Location: Ohio
Posts: 21,063
|
As JD 500 suggests, varnish could be responsible for pressure and stickiness. Try shining a flashlight into the chamber to see if you can find any. Try applying Berryman B-12 Chemtool (auto parts store) to the chamber to see if it dissolves anything that comes out on a patch.
No book I have thinks your loads should be at maximum except old Sierra data, but it tends to be very conservative. It's always possible you have a "fast" barrel, but they are uncommon. Without your barrel length and some velocity measurements, that's about all I can figure out about the matter other than the earlier suggestion to be sure all copper is removed from the barrel.
__________________
Gunsite Orange Hat Family Member CMP Certified GSM Master Instructor NRA Certified Rifle Instructor NRA Benefactor Member and Golden Eagle |
|
|
|
July 28, 2015, 05:55 PM
|
#43 | |
|
Member
Join Date: July 20, 2015
Posts: 62
|
Quote:
|
|
|
|
|
July 29, 2015, 10:35 AM
|
#44 |
|
Senior Member
Join Date: July 18, 2008
Posts: 7,249
|
Pressure: First signs, an increase in the diameter of the flash hole, an increase in the diameter of the primer pocket, then there is the case head, the case head can shorten from the cup above the web to the case head.
Measure before and again after. If measurements were not made before, forget measuring after. Then there are 'more tools'. F. Guffey |
|
|
|
|
|


