
|
 September 9, 2015, 03:23 AM
|
#1 |
|
Senior Member
Join Date: April 12, 2009
Posts: 741
|
annealing
Do you anneal after case inspection and before resizing?
|

|
|
September 9, 2015, 05:16 AM
|
#2 |
|
Senior Member
Join Date: August 1, 2007
Location: Tabor City , NC.
Posts: 1,969
|
anneal first , then follow your regular steps for case prep.
if you haven't annealed any cases before try a few before running a big batch. most first timers over anneal cases at first makin em way to soft. it doesn't take very much to relieve the tension in the neck/shoulder area.& anneal same batch brass as mixed brass has small differences that`ll drive ya crazy to get consistentcy. GP
__________________
GP100man 
|
|
|
|
September 9, 2015, 07:46 AM
|
#3 |
|
Senior Member
Join Date: June 17, 2010
Location: Virginia
Posts: 6,896
|
1. Inspect (neck & paperclip if/as req'd)
2. Toss if req'd 3. Clean/tumble to taste 4. Anneal if/as req'd 5. Then size/deprime/reload as normal |
|
|
|
September 9, 2015, 08:18 AM
|
#4 |
|
Senior Member
Join Date: February 7, 2015
Posts: 160
|
mehavey, order of operation
Since 1966 I have been using corn cob media to clean my cases. If I clean before sizing it takes much more effort and oil to prevent cases from sticking in the die. So most of the time I simple wipe them down for cleaning and then resize, polishing is the last thing I do to the cases.
|
|
|
|
September 9, 2015, 08:21 AM
|
#5 |
|
Staff
Join Date: March 4, 2005
Location: Ohio
Posts: 21,063
|
Polishing makes the annealing color change much easier to see develop, though. Dirt and carbon can make the flame "flare" (become orange-yellow), making the annealing progress hard to see.
__________________
Gunsite Orange Hat Family Member CMP Certified GSM Master Instructor NRA Certified Rifle Instructor NRA Benefactor Member and Golden Eagle |
|
|
|
September 9, 2015, 03:00 PM
|
#6 |
|
Senior Member
Join Date: April 12, 2009
Posts: 741
|
I did a couple junk cases first then 5 good cases.
|
|
|
|
September 9, 2015, 03:24 PM
|
#7 |
|
Senior Member
Join Date: April 10, 2012
Location: San Diego CA
Posts: 6,876
|
Oh how I want to jump in here but I'll wait for the questions to be asked first .

__________________
If Jesus had a gun , he'd probably still be alive ! I almost always write my posts regardless of content in a jovial manor and intent . If that's not how you took it , please try again .  
|
|
|
|
September 9, 2015, 04:20 PM
|
#8 |
|
Senior Member
Join Date: April 12, 2009
Posts: 741
|
Jump in.
:
|
|
|
|
September 9, 2015, 05:38 PM
|
#9 |
|
Senior Member
Join Date: April 10, 2012
Location: San Diego CA
Posts: 6,876
|
To answer your question . You anneal before sizing .
May I ask how you plan to anneal and what cases these would be ? How much do you know about anneal cartridge brass ? What's your final goal . Just to add case life or are you going to shoot competition and you want the most consistent bullet hold/release ? Here's an old thread that is quite detailed with lots of info , links , pic and facts . It is how ever 4 pages long but worth the time . it should answer any questions if you have any . http://thefiringline.com/forums/show...ight=annealing
__________________
If Jesus had a gun , he'd probably still be alive ! I almost always write my posts regardless of content in a jovial manor and intent . If that's not how you took it , please try again .
Last edited by Metal god; September 9, 2015 at 05:45 PM. |
|
|
|
September 9, 2015, 08:02 PM
|
#10 |
|
Senior Member
Join Date: April 12, 2009
Posts: 741
|
It's just to add case life. Don't know much about annealing. I did 5 cases with a propane torch and a socket in a cordless drill. It will be 222,22-250,243,25-06,270, 30-06,35 Remington,300 win mag brass.
Last edited by sako2; September 9, 2015 at 08:09 PM. |
|
|
|
September 9, 2015, 08:28 PM
|
#11 |
|
Senior Member
Join Date: April 12, 2009
Posts: 741
|
The 5 cases I did looked exactly like the picture you posted.
|
|
|
|
September 9, 2015, 09:44 PM
|
#12 |
|
Senior Member
Join Date: April 10, 2012
Location: San Diego CA
Posts: 6,876
|
That's cool and if you are only looking to extend case life you're likely GTG .
I'm not sure If I specifically pointed out in that thread the fact what your cases look like has little meaning unless you had a control sample first to indicate what your method looks like when the case hits the correct temp .  The above cases were all heated to the same temp . The difference is where I held the flame to the case . If you plan to never really use a temp indicator and just wing it . I'm a strong believer that you should at least have a control sample to know what your looking for as far as flame color or anneal marks on the case . If not you really have no idea how hot you ever got the case .
__________________
If Jesus had a gun , he'd probably still be alive ! I almost always write my posts regardless of content in a jovial manor and intent . If that's not how you took it , please try again .
|
|
|
|
September 10, 2015, 03:10 AM
|
#13 |
|
Senior Member
Join Date: June 17, 2010
Location: Virginia
Posts: 6,896
|
As MG indicated in each and every one of his posts in the
referenced e-mail strings, use a [Tempilaq] temperature indicator. For ease of use on bottleneck cases, I recom- mend the 450-475 Tempilaq painted a 1/4" below the shoulder (YMMV). You are apparently already using a socket spinner/handdrill, so you're GTG.
Last edited by mehavey; September 10, 2015 at 03:16 AM. |
|
|
|
September 10, 2015, 03:53 AM
|
#14 |
|
Senior Member
Join Date: April 12, 2009
Posts: 741
|
The 5 I did look like the middle one in that picture. I never got them glowing. I had the flame hit where the neck meets the shoulder just till the brass changed color.
|
|
|
|
September 10, 2015, 10:15 AM
|
#15 |
|
Senior Member
Join Date: July 18, 2008
Posts: 7,249
|
Annealing: I anneal brass, I test brass, I can test brass before and after annealing. While others are talking about it, I do it. Years ago I decided there are a few simple rules to follow when annealing brass. I applied the simple rules to the equipment I use.
I noticed a link to 'building a case annealer' I was not surprised the designer was from Australia. F. Guffey |
|
|
|
September 10, 2015, 10:49 AM
|
#16 | |
|
Senior Member
Join Date: September 27, 2004
Posts: 4,811
|
Quote:
__________________
Allan Quatermain: “Automatic rifles. Who in God's name has automatic rifles”? Elderly Hunter: “That's dashed unsporting. Probably Belgium.” 
|
|
|
|
|
September 14, 2015, 03:28 AM
|
#17 | |
|
Member
Join Date: April 17, 2015
Posts: 83
|
Quote:
Those of us in search of precision realize that uniformity is an important part of performance. That means buying good bullets and careful case preparation. It is well known that every time you shoot, the case gets "worked" and it gets worked again when you resize it for the next time. This "work hardening" process makes the brass harder and that means that each time you resize, the brass undergoes more spring back. Annealing returns the brass to a softer state and this reduces the amount of spring-back during the sizing operation. In other words, a four-times fired case won't resize the same as a freshly annealed case. Since neck tension is an important component of precision, we want it to be as uniform as possible. And that's why many of us anneal each and every time the brass is fired. To that end, it's important to anneal the brass the same way each time and that's why many of us use machines as opposed to the drill and torch method. I made my machine using the "Skip" design. It's cheap, fast, easy, and accurate. 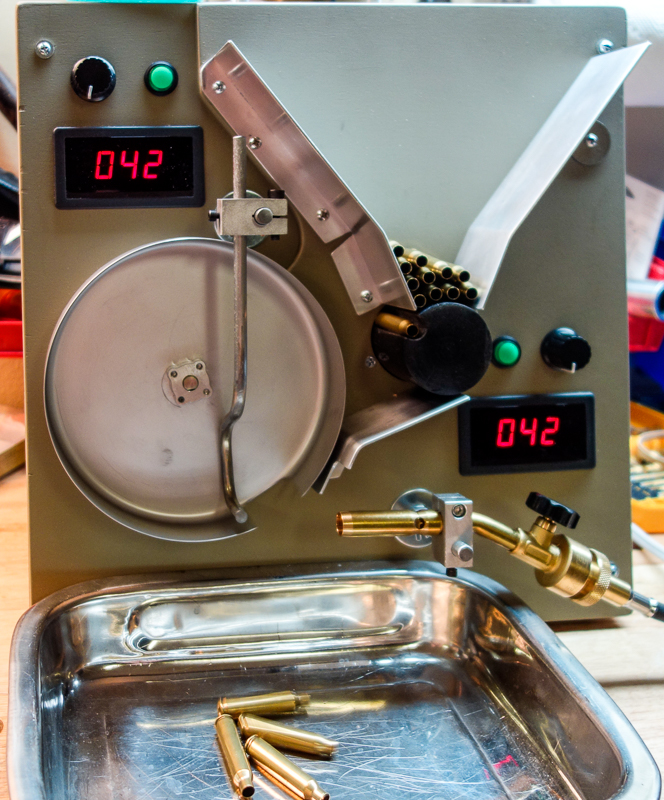 _DSC3271 _DSC3271
|
|
|
|
 |
|
|


