|
|
|||||||
| Forum Rules | Firearms Safety | Firearms Photos | Links | Library | Lost Password | Email Changes |
| Register | FAQ | Calendar | Today's Posts | Search |
 |
|
|
Thread Tools | Search this Thread |
 February 9, 2021, 08:57 AM
|
#26 |
|
Senior Member
Join Date: March 2, 2014
Posts: 11,789
|
I'm not positive, and this obviously doesn't apply to the OP's receiver, but Savage I believe does in fact make single-shot target receivers that do have 3 receiver screws since there is no machined magazine slot.
__________________
"Everyone speaks gun."--Robert O'Neill I am NOT an expert--I do not have any formal experience or certification in firearms use or testing; use any information I post at your own risk! |

|
|
February 9, 2021, 08:57 AM
|
#27 | |
|
Senior Member
Join Date: November 15, 2019
Location: Conifer, CO
Posts: 632
|
Quote:
I called the smith yesterday and he confirmed what you said, that it was probably the trigger being adjusted too light (from the symptoms). I am waiting for a torque wrench to show up from Amazon and I will tackle the project then.
__________________
Life is simply an inter-temporal problem of constrained optimization. |
|
|
|
|
February 9, 2021, 08:59 AM
|
#28 | ||
|
Senior Member
Join Date: November 15, 2019
Location: Conifer, CO
Posts: 632
|
Quote:
Quote:
I will come back to this thread when I the torque wrenches get here and I get started with the project. Maybe I'll make a video to show how the safety is locking up so we can have it for reference in the forum. Is there a way to post video here btw? Its a little antiquated that it only allows us to post pictures.
__________________
Life is simply an inter-temporal problem of constrained optimization. Last edited by Pistoler0; February 9, 2021 at 09:05 AM. |
||
|
|
|
February 9, 2021, 09:08 AM
|
#29 | |
|
Senior Member
Join Date: November 15, 2019
Location: Conifer, CO
Posts: 632
|
Quote:
Although he recommended 22 to 25 for the front screw and up to 20 for the one in the back.
__________________
Life is simply an inter-temporal problem of constrained optimization. |
|
|
|
|
February 9, 2021, 11:23 AM
|
#30 |
|
Senior Member
Join Date: March 2, 2014
Posts: 11,789
|
So pistoler--did your smith essentially say you personally adjust the trigger that he worked on rather than send the rifle back to him? Nothing wrong with that--as long as you are pretty familiar with all the adjustments and how to test for complete and proper functioning--which should be easy to follow in your owner's manual. I would verify from your smith if there was anything he did to the trigger assembly beyond simply turning down the triggerpull weight.
I still say the best way to check the functioning is to first pull the action from the stock and test it. You're not risking anything by doing so.
__________________
"Everyone speaks gun."--Robert O'Neill I am NOT an expert--I do not have any formal experience or certification in firearms use or testing; use any information I post at your own risk! Last edited by stagpanther; February 9, 2021 at 11:30 AM. |
|
|
|
February 9, 2021, 11:31 AM
|
#31 |
|
Senior Member
Join Date: April 4, 2011
Location: LA (Greater Los Angeles Area)
Posts: 2,598
|
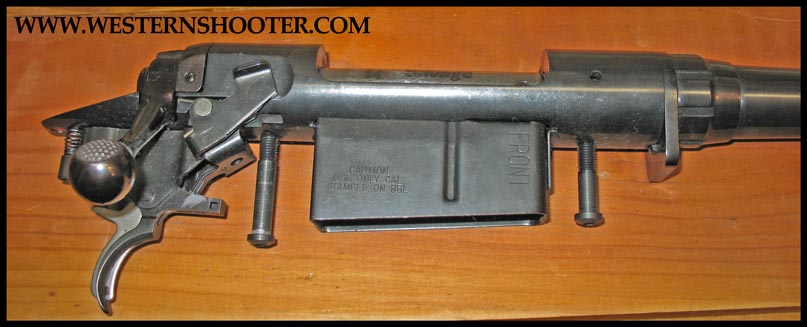
The picture above shows the Accutrigger, two bolts through the stock. The back third wood screw, into the stock, is to hold the rear of the trigger guard
__________________
............ |
|
|
|
February 9, 2021, 11:49 AM
|
#32 | |
|
Senior Member
Join Date: November 15, 2019
Location: Conifer, CO
Posts: 632
|
Quote:
He didn't do anything to the trigger assembly.
__________________
Life is simply an inter-temporal problem of constrained optimization. |
|
|
|
|
February 9, 2021, 12:07 PM
|
#33 | |
|
Senior Member
Join Date: March 2, 2014
Posts: 11,789
|
Quote:

__________________
"Everyone speaks gun."--Robert O'Neill I am NOT an expert--I do not have any formal experience or certification in firearms use or testing; use any information I post at your own risk! |
|
|
|
|
February 9, 2021, 09:15 PM
|
#34 |
|
Senior Member
Join Date: February 13, 2006
Location: Washington state
Posts: 15,248
|
A few tips-
* There are two screws at the back of the trigger. One is for over travel and the other is for the safety. * You set the safety with the rifle cocked so that the trigger does not move, but not too tight or the safety will not go on either. Work the safety several times to make sure it engages and disengages. * Overtravel is set so that the sear releases AND clears the trigger nose.. If you set it too tight the sear will hang up on the front screw when you pull the trigger. * The screw at the front of the trigger is for sear engagement. If you are running a Savage factory trigger, set plenty of engagement as the trigger bar is a casting and will wear rapidly, giving you the issue described above, the sear will release when the rifle is cocked by just jarring the rifle. * The other screw on the side at the front is for weight of pull, set it above 3 lbs for a Savage because the sear spring is heavier than 2-1/2 lbs and will push the trigger off if it is set too low. All these are a good reason to go to a Timney or Rifle Basix.
__________________
Never try to educate someone who resists knowledge at all costs. But what do I know? Summit Arms Services |
|
|
|
February 10, 2021, 06:00 AM
|
#35 |
|
Senior Member
Join Date: March 2, 2014
Posts: 11,789
|
Excellent points Scorch--easy, succinct bullets (as opposed to my ramblings ; ) ). I looked around on the net for a diagram of the trigger so the OP could visually match up those points but couldn't find one with all of them.
__________________
"Everyone speaks gun."--Robert O'Neill I am NOT an expert--I do not have any formal experience or certification in firearms use or testing; use any information I post at your own risk! |
|
|
|
February 11, 2021, 02:49 PM
|
#36 |
|
Senior Member
Join Date: November 15, 2019
Location: Conifer, CO
Posts: 632
|
Finally reporting back, problem solved!:
Hello all, I finally got my wheeler set of torque wrenches and went to work on my Savage. The smith that serviced it told me that of the three screws visible in the OP, I only needed to bother with the two forward most ones; the rearmost just holds the trigger guard in place. So I disassembled the action which was straight forward and went to work on the trigger. I do not have a Savage accutrigger tool, but a very small screw driver bit (the size used for small computer or smarphone screws) did the job. I turned the screw clock-wise 1-1/2 full turn and tested the trigger pull with a trigger scale: A little over 2 lbs. I retested trigger pull about 10 times and the trigger pull is consistent at around 2lbs. But most importantly: no problems with the safety binding or the trigger firing upon closing the action. So the trigger had been set too light and it was definitely what caused the original problem. Increasing the accutrigger weight completely solved the issue. To reassemble the rifle, I found conflicting instructions as to how much to torque the two action screws: Savage recommends 25 to 35 inch-lbs for laminate stocks. Most advice suggests that it is the tension in the back action screw (would be the center screw in the OP photo) that affects accuracy. But also that this screw is the one who has a tendency to get untightened with rifle use. so following instruction I proceeded as follows: - tightened both action screws by hand so they hold the action. - rest rifle vertically on its butt and gently tap it on the floor so the action and recoil lug gets seated. - tighten the front most screw to 20 inch-lbs, then tighten the back action screw to 12 inch-lbs. - un-tighten the front screw slightly, then tighten the back action screw to 20 inch-lbs, and bring the front screw up to 25 inch lbs. - Lastly tighten the back screw to 25 inch-lbs and bring the front screw up to 30 inch lbs. Thats where I left the screws: Front action screw tightened to 30 inch-lbs. Back action screw tightened to 25 inch-lbs. Both are in spec with Savage's recommendations of 25-35 inch lbs. Some including my smith suggested to leave the back screw at around 20 inch-lbs then maybe play up with its tension little by little to see how the rifle groups its shots, but I resolved to follow the manufacturer's indications and leave the back action screw at 25 inch - lbs which is the lowest they recommend. I have not shot the rifle but I have been dry-firing it and the trigger and safety work as they are supposed to, cleanly firing at 2 lbs of finger pressure. Thank you everyone for your replies, they really helped.
__________________
Life is simply an inter-temporal problem of constrained optimization. Last edited by Pistoler0; February 11, 2021 at 02:54 PM. |
|
|
|
February 11, 2021, 04:05 PM
|
#37 |
|
Senior Member
Join Date: March 2, 2014
Posts: 11,789
|
Yay! Now all you need to do is find a carrier for your AR 47.

__________________
"Everyone speaks gun."--Robert O'Neill I am NOT an expert--I do not have any formal experience or certification in firearms use or testing; use any information I post at your own risk! |
|
|
|
February 11, 2021, 09:04 PM
|
#38 | |
|
Senior Member
Join Date: November 15, 2019
Location: Conifer, CO
Posts: 632
|
Quote:
and I went through an ordeal installing an extra power extractor spring and an enhanced firing pin. It was really really difficult getting the retaining pins in. I am posting another thread about it. Now I have to go shoot them both, probably tomorrow Friday : )
__________________
Life is simply an inter-temporal problem of constrained optimization. |
|
|
|
|
February 11, 2021, 10:33 PM
|
#39 |
|
Senior Member
Join Date: April 4, 2011
Location: LA (Greater Los Angeles Area)
Posts: 2,598
|
Savage Accutrigger Tool
The adjustment tool comes with the rifle. 1" long with a yellow knob. Its in the box in a packet with the manual and cable lock.
I have changed stocks back and forth on Savage rifles, and unscrewed and then tightened when reassembling. I never used a torque wrench. I also never had any problem. Boyds says to hold the barrel in the center of the channel. I just tighten by feel, just past serious resistance. You could also use Lok-tite. Glad everything is OK.
__________________
............ Last edited by Marco Califo; February 11, 2021 at 11:17 PM. Reason: Savage Accutrigger Tool |
|
|
|
|
|