
|
 October 8, 2007, 05:40 PM
|
#1 |
|
Senior Member
Join Date: March 18, 2005
Location: The Great State of Texas
Posts: 1,032
|
Grip Stippling
Good Afternoon,
Some time ago I became very interested in grip stippling as an option to checkering or nothing at all. I have seen several guns done this way especially a methid called texturing on a Browning High Power reworked by Mr. Yost. It is without a shadow of a doubt the best I have ever seen. I decided to do a little experimentation on one of my other guns, before tackling the BHP. I had an old metal scribe, used when I was doing my layout, in a machine shop. You know, the ones with the carbide tip. Well I sharpened the tip and took it and a small ball peen hammer to the back of my stainless CZ75B, since it too has slick front and rear grip straps. 3 hours and about 50,000 whacks later, here is what I have to show for my efforts. It feels great in my hand and with a little cleaning up will be about as perfect as I need. Next... the front grip strap. It is about twice as wide and will take about twice as long.....I think I am going to look for some of the stippling punches, with the multi point faces. One strike will yeild 6-8 stipples instead of only one. tex 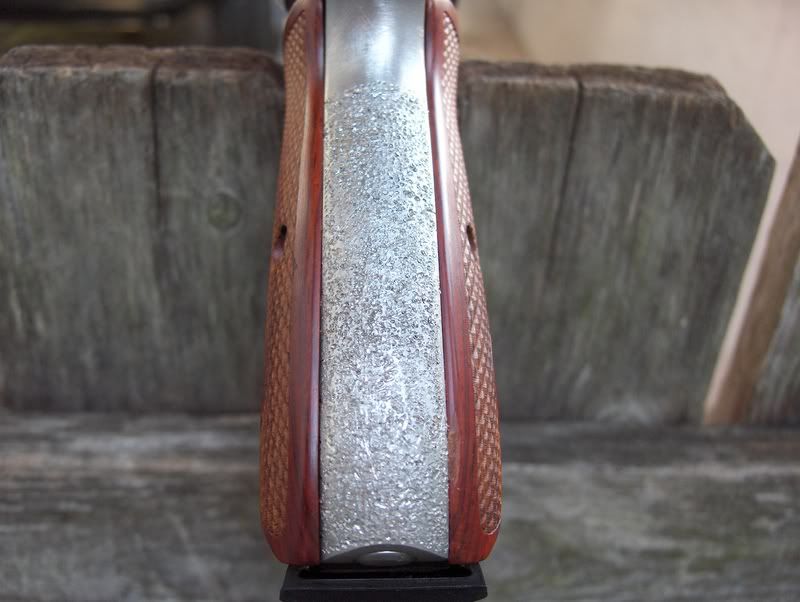
__________________
“All that is required for evil to triumph is for good men to do nothing.“ |

|
|
October 8, 2007, 05:54 PM
|
#2 |
|
Senior Member
Join Date: April 7, 2006
Posts: 10,979
|
If your gun has a plated finish, you are going to have serious rust problems. If it's stainless you should be OK.
I prefer an electric engraving pencil. With some practice you can do very effective and attractive stippling. |
|
|
|
October 8, 2007, 06:54 PM
|
#3 |
|
Senior Member
Join Date: December 5, 2004
Location: In the Vincent, Ohio general area.
Posts: 1,804
|
stipling?
Sir:
That's a good job of stipling but I can save you time and effort and do an very even and pretty job. I use a large (12") wood file and strike the front of the frame with it at a fixed angle (tape the end of file - not the tang!) You want your strikes fairly strong and continue half-way out on your trigger guard and then radius at the end. For the slide use the same type file but as fine as you can fine, Go carefully down each side and then "fill-in". Now, mount the slide in your mill and use a 1/16 thisk cutter and at the junction of the matting cut a .010 deep border! You're done. Harry B. Does a beautiful job! |
|
|
|
October 8, 2007, 06:56 PM
|
#4 |
|
Senior Member
Join Date: December 5, 2004
Location: In the Vincent, Ohio general area.
Posts: 1,804
|
stipling?
Sir:
That's a good job of stipling but I can save you time and effort and do an very even and pretty job. I use a large (12") wood file and strike the front of the frame with it at a fixed angle (tape the end of file - not the tang!) You want your strikes fairly strong and continue half-way out on your trigger guard and then radius at the end. For the slide use the same type file but as fine as you can find, Go carefully down each side and then "fill-in". Now, mount the slide in your mill and use a 1/16 thick cutter and at the junction of the matting cut a .010 deep border! You're done. Harry B. Does a beautiful job! |
|
|
|
October 9, 2007, 05:57 AM
|
#5 |
|
Senior Member
Join Date: March 18, 2005
Location: The Great State of Texas
Posts: 1,032
|
Bill,
The gun is a stainless CZ75B. There should be no problems. Thanks for the information. I tried an electric engraving pencil and it was a nogo on the stainless. It must have a much harder Rockwell reading that standard carbon gun frames. Harry, Where were you some 50,000 strikes ago. That is a great idea. I never thought of using a file. I will definately give it a try. tex
__________________
“All that is required for evil to triumph is for good men to do nothing.“ |
|
|
|
October 9, 2007, 01:03 PM
|
#6 |
|
Senior Member
Join Date: April 7, 2006
Posts: 10,979
|
Tex
Apparently, you weren't using it correctly. Electric engravers have a carbide tip that is harder than any stainless. Using the electric engraver (110 volt, vibrating type) does take some practice to get the finish you want. I use one often for stippling. |
|
|
|
October 9, 2007, 01:54 PM
|
#7 |
|
Senior Member
Join Date: July 25, 2007
Location: Clt, NC
Posts: 285
|
Keep it going
tex45acp: Sir; good job
 Now that you're done with that I need some help building a barn Now that you're done with that I need some help building a barn Your stroke should be down perfect.LOL Your stroke should be down perfect.LOLgood job
__________________
Craig By the standards of most |
|
|
|
October 11, 2007, 07:19 AM
|
#8 |
|
Senior Member
Join Date: March 18, 2005
Location: The Great State of Texas
Posts: 1,032
|
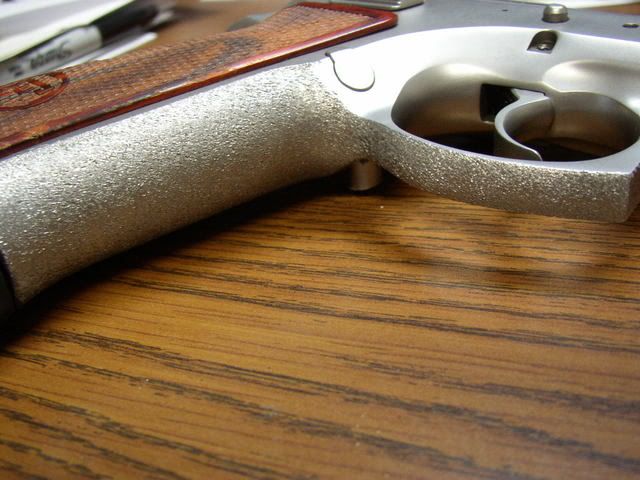
Well I finished the front grip strap and decided to also stipple the lower part of the trigger guard. I took the advice of another poster who uses a file to make the stippling. I have a 12" round bastard and half round bastard. Every time I strike the surface with them they cover about a 1/8" square patch with stipples. Instead of 3 hours and 50,000 hammer strikes, this took about an hour with about 5,000 strikes....and this surface is wider and I also did the lower part of the trigger guard. I even went back to the rear grip strap and went over it a couple of hundred times to get it to match the front. It really turned out great. Feels like skateboard tape, without the problems of the tape wearing or coming off.
__________________
“All that is required for evil to triumph is for good men to do nothing.“ |
|
|
|
October 12, 2007, 02:11 PM
|
#9 |
|
Member
Join Date: May 14, 2000
Location: Montgomery, AL, US
Posts: 57
|
Very nice. That's about as close as I've seen to this . . .
 . . . which is what I'm trying to figure out how to do. I have only been able to find out that it's done with either a mill b or a round file and a hammer, and despite having experimented with scrap metal, I haven't been able to figure out how to duplicate the pattern yet. Still trying. Best, Jon |
|
|
|
October 12, 2007, 02:20 PM
|
#10 |
|
Senior Member
Join Date: August 24, 2007
Posts: 541
|
Wow that looks really good!
great job! I like it!
__________________
$49.99 |
|
|
|
October 12, 2007, 07:34 PM
|
#11 |
|
Senior Member
Join Date: April 7, 2006
Posts: 10,979
|
Big Jon
I believe that was done with an electric engraving pencil. |
|
|
|
October 16, 2007, 10:52 AM
|
#12 |
|
Member
Join Date: May 14, 2000
Location: Montgomery, AL, US
Posts: 57
|
Ahhhhh . . . lights are begining to dawn. Hmmmm. . . . oooookay. THANKS BILL! SUPERB!
Best, Jon |
|
|
|
October 16, 2007, 04:10 PM
|
#13 |
|
Senior Member
Join Date: December 5, 2004
Location: In the Vincent, Ohio general area.
Posts: 1,804
|
matting
Sirs:
Great job on both of them - I use a coarse half round on the frame and a fine one on the slide top and then mill a border at the juncture - they both look great! Harry B. |
|
|
|
October 17, 2007, 09:41 AM
|
#14 |
|
Member
Join Date: May 14, 2000
Location: Montgomery, AL, US
Posts: 57
|
Bill - If I may pick your brain a bit further, what make and model of engraver do you use?
Best, Jon |
|
|
|
November 2, 2007, 12:52 PM
|
#15 |
|
Senior Member
Join Date: March 18, 2005
Location: The Great State of Texas
Posts: 1,032
|
Well I finally got around to stippling/texturing my BHP. For me to take a file and whack the frame of a blued gun was very difficult, but I finally did, and it turned out very well.
tex45acp  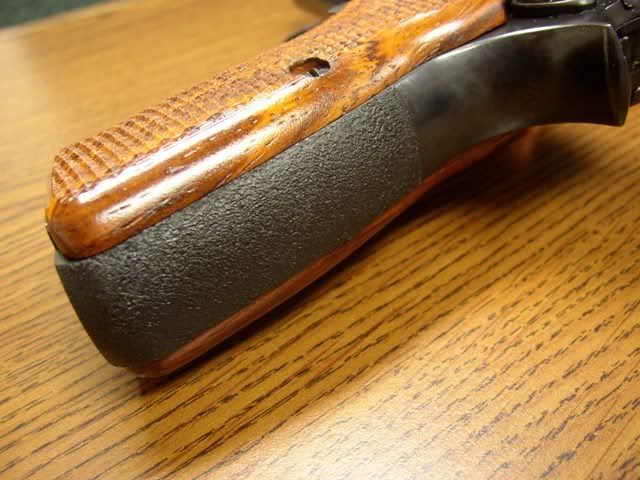
__________________
“All that is required for evil to triumph is for good men to do nothing.“ |
|
|
|
November 2, 2007, 01:30 PM
|
#16 |
|
Senior Member
Join Date: April 7, 2006
Posts: 10,979
|
The "file whacking" looks pretty nice!
I use both Wen and Dremel vibratory engravers. They have an "intensity" setting. If you let the tool "bounce", while controlling this bounce-you can get a very even pattern. I generally turn the engraver up high and hold it lightly. The firmer you hold it, the less bounce you get, but the deeper it cuts. Going over the same area several times can get you very coarse stippling. |
|
|
 |
| Thread Tools | Search this Thread |
|
|


