
|
 September 27, 2014, 01:59 PM
|
#1 |
|
Senior Member
Join Date: February 22, 2014
Posts: 868
|
cracking necks
I loaded up some old Hornet cases for my K Hornet and was surprised to find 43 of 44 cases cracked when I fired them for load development. I can only guess how many times I have loaded them I suspect it has been 10-12 times as hornet and K Hornet. Now the cases have only been neck sized since fire forming. Although I tried my hand in annealing before the last loading. I would not be surprised if the cases received too much heat. All the cracked cases were cracked in the area of the neck sizing. All cracks were vertical. That is suggesting to me that the necks were brittle. I thought the annealing would release tension on the necks and make them more flexible. So what do you think happened?
|

|
|
September 27, 2014, 02:17 PM
|
#2 |
|
Senior Member
Join Date: June 14, 2004
Location: NY State
Posts: 6,575
|
How close is the loaded case neck diameter to the chamber neck diameter.?
If you annealed the necks that should do for a number of reloadings .Each time you fire and size that work hardens the brass a bit .
__________________
And Watson , bring your revolver ! |
|
|
|
September 27, 2014, 03:12 PM
|
#3 | |
|
Senior Member
Join Date: December 24, 2008
Location: Loveland, CO
Posts: 1,476
|
Quote:
__________________
NRA Benefactor Life member |
|
|
|
|
September 27, 2014, 03:18 PM
|
#4 |
|
Senior Member
Join Date: February 13, 2002
Location: Canada
Posts: 12,453
|
Too much heat won't make the necks brittle. Makes 'em too soft. Red hot is too hot. Heat 'em in a pan of water up to just below the shoulder until the brass changes colour then tip 'em.
Mind you, 10 or 12 times may just be too many for the cases. What brand?
__________________
Spelling and grammar count! |
|
|
|
September 27, 2014, 05:18 PM
|
#5 |
|
Senior Member
Join Date: April 10, 2008
Location: Alaska
Posts: 7,014
|
If you use the water, You don't need to tip.
Try to solder a joint with water in it, its impossible as the heat dissipates too fast. Longer cases do not require the water, 22 H-K may need it. You may very well have waited too long. As noted too hot just means too soft and not right characteristics but not crack. do the next batch after 5-8 and it should extend a ways. too little heat means they still crack, maybe a bit latter. Annealing is a tough act to do right. |
|
|
|
September 27, 2014, 06:21 PM
|
#6 |
|
Senior Member
Join Date: February 12, 2013
Posts: 669
|
A lot of older books say "cherry red", which, depending on your local brand of cherries, can be a very dark red, barely enough to see it as red at all. They also used to stand the cases up in water 1/3 to 1/2 the way up to guard against over-softening the case heads (very, very bad), and tip the cases over to quench as soon as they were heated.
One of these days, I intend to buy a hand-held propane torch and have a go at some of my old .303 cases with the above method. Controversy rages, and has previously done so, about all this but I agree that if it's towards the bright red-orange end of red, that's too much. |
|
|
|
September 27, 2014, 07:12 PM
|
#7 |
|
Senior Member
Join Date: January 27, 2010
Location: AR
Posts: 1,401
|
Concur
Not annealing or not annealing correctly. |
|
|
|
September 28, 2014, 04:16 PM
|
#8 |
|
Senior Member
Join Date: February 22, 2014
Posts: 868
|
Correction it isn't 43 of 44 the correct number is 22 of 23. [email protected], [email protected], [email protected], [email protected], [email protected] and 4@ 13.3. All but one from 12.9gr. received cracks. I had been loosing a few cases do to cracks and that is what got me to anneal in the first place. I might not of annealed this group of cases do to them having primers in them when I was annealing. Although I don't have a record of witch Dies I used to size these particular loads. I have been neck sizing the K Hornet cases for many years with my RCBS Hornet FL dies. I recently purchased new Redding B FL 3V, NK P7 and ST P7 B set . I was looking at the remaining 21 of the 44 cases of that group of R-P cases that I didn't load yet and they show witness marks near the lower portion of the body of the cases that may suggest that I may of neck sized with the Redding B FL dies. I don't know for sure. Perhaps switching dies after so many loadings may of stressed out what was left of the cases.
|
|
|
|
September 28, 2014, 04:46 PM
|
#9 |
|
Senior Member
Join Date: February 12, 2013
Posts: 669
|
I may be missing a clever trick here, but how does one neck size with a full length die?
|
|
|
|
September 28, 2014, 08:43 PM
|
#10 |
|
Senior Member
Join Date: April 10, 2008
Location: Alaska
Posts: 7,014
|
And any red is bad. thats the hard part is a colour change but not any red.
|
|
|
|
September 29, 2014, 10:22 AM
|
#11 |
|
Senior Member
Join Date: February 22, 2014
Posts: 868
|
To neck size a K Hornet in a Hornet FL die run the case up to just size 1/3-1/2 the neck.
|
|
|
|
September 29, 2014, 06:35 PM
|
#12 |
|
Senior Member
Join Date: February 22, 2014
Posts: 868
|
Pathdoc: I take that back about the Hornet necking K Hornet. I checked and it won't work. It works for neck sizing a 222 with a 223 die. Since I have not kept complete records on what exactly went on with the K Hornet I simply cant say. The R-P cases must of just ran out of life. I went to the range today and shot some old WW cases that were FL sized with the new Redding FL dies and had no problems with necks cracking so I believe the R-P cases just had wore out. I will try to be more careful on the information I post. Thanks for your observation Pathdoc.
|
|
|
|
September 30, 2014, 07:10 AM
|
#13 |
|
Senior Member
Join Date: October 13, 2009
Location: nw wyoming
Posts: 1,061
|
"Any red is bad."
Any red is NOT bad, its just a little softer than needed. Some people think that you should never attempt it without Templac whatever that garbage is. But handloaders have been doing for YEARS with excellent results. You can spend the money on it if you want, but its not necessary. You cant actually neck size with a FL sizing die. Its called partial sizing. I put 2-5 thin washers I made from roofing metal under the sizing dies and that raises it up enough to not really touch the case except the neck. You will only size about half the neck doing this, but thats plenty to hold the bullet. Really improves accuracy and case life. Make sure you write down how many washers in each caliber you use so you can do the same next time. |
|
|
|
September 30, 2014, 08:58 AM
|
#14 |
|
Senior Member
Join Date: February 22, 2014
Posts: 868
|
reloader28: It would be partial neck sizing. I have used a friends 223 dies to prep my 222 cases they may of been a neck size die set that would make sense. In fact we were shooting baby aspirins at 100yds. My best friend and competitor was shooting his Ruger single shot 223. He sold that rifle the next day. He now shoots a 700 Remington just like mine. I was also able to seat the bullets with his 223 die set.
|
|
|
|
September 30, 2014, 09:15 AM
|
#15 | |
|
Senior Member
Join Date: July 18, 2008
Posts: 7,249
|
Quote:
I do all of this with a feeler gage that I did not discover, invent, nor did 'it' come to me in an apathy. I am the fan of transfers, standards and verifying. F. Guffey |
|
|
|
|
September 30, 2014, 09:16 AM
|
#16 |
|
Staff
Join Date: March 11, 2006
Location: Upper US
Posts: 28,832
|
The "rule of thumb" on neck sizing is that to hold the bullet properly, the sized portion of the neck should be at least 1/2 the caliber of the bullet. More doesn't seem to hurt anything, and may give more consistent results. Each gun seems to be a individual, and what gives you best performance in one, might be totally ignored by the next.
10-12 firings (annealed or not) is not bad performance, and Hornet brass is thin to begin with. Neck cracks mean the brass has been worked too much, and proper annealing can extend the life. Head cracks mean too much brass has flowed forward, and the case life (all cases in that batch) is essentially over. Annealing will not help. One method I know of, used by some friends who cast bullets is to dip the case necks in the lead pot. Holding the base in your fingers means you won't get too much heat reaching the case head. The people I know who use this method do it with rifle (2"+ case length) brass, and report satisfactory results. Might not be a good idea to do it with the short Hornet brass. I think it likely your brass has just simply reached the end of its useful life... (but I've been wrong before,..  ) )Good Luck.
__________________
All else being equal (and it almost never is) bigger bullets tend to work better. |
|
|
|
September 30, 2014, 09:40 AM
|
#17 |
|
Senior Member
Join Date: October 25, 2001
Location: Alabama
Posts: 18,541
|
I think if I had gotten 10-12 cycles out of such a flimsy case as a Hornet, I would think its service life was over.
I don't know if you can salvage the unsplit ones by annealing but it won't take much to find out. |
|
|
|
September 30, 2014, 10:11 AM
|
#18 |
|
Senior Member
Join Date: April 10, 2012
Location: San Diego CA
Posts: 6,876
|
I've done a fare amount of annealing and a good amount of testing how to get a consistent result . I'll add I never tested heating the case till I could see it turn any shade of red . My reloading area is very well lit and there's no way I could see it .
That all being said as some of you have stated . If the neck gets to hot it will be softer then if it hits the perfect temp and if it does not get hot enough your just waisting your time . In all three of those situations It's likely you would have a different bullet hold/neck tension with each . Here is my issue with visual and tactile methods . When using your fingers to hold the case sure that could work but you would need at least one control sample with a temp indicator in order to know how hot it should feel to you . all hands and fingers are different do to how they are calloused and that will change from person to person what they feel . Then there,s the visual , maybe many of you can see the perfect color that will give you the exact tempo each time but again I'd think you would still need a control sample to tell you what color indicates 750* inside the neck . Here are some picks that show cases being heated to the exact same temp using temp indicator while rotating in a drill about 80rpm . These test were to figure out what would give the most consistent results by hand . Meaning heating each and every case to the same temp . By doing so keeping bullet hold and neck tension consistent . If your looking to just extend case life you can likely just wing it and be just fine . If you are not turning the cases while heating . You will need two torches with the flames pointed at opposite side of the case . If you only heat one side of the neck the other side will never reach the same temp as the side with the flame on it . Cases before test with temp indicator of 750* inside the necks and 450* just below the shoulder .All cases used in test were 308 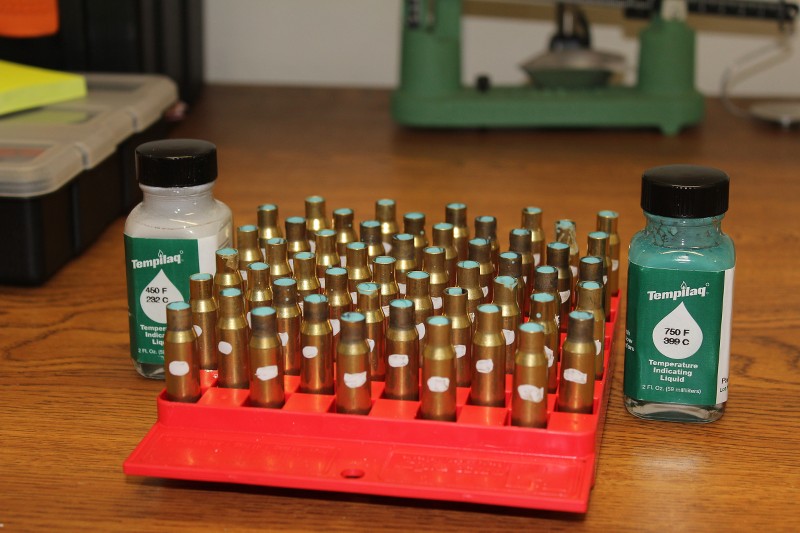 These are what the flame looks like from a propane torch and a MAPP gas torch just as the the indicators melted PROPANE 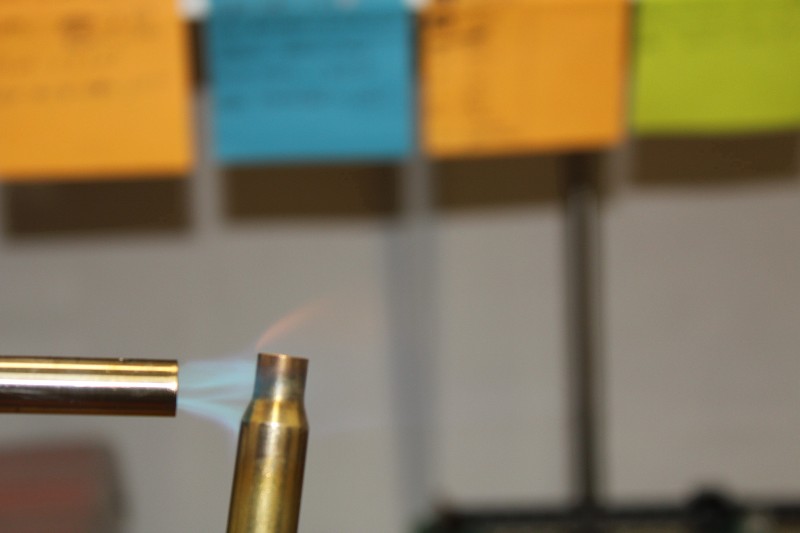 MAPP gas 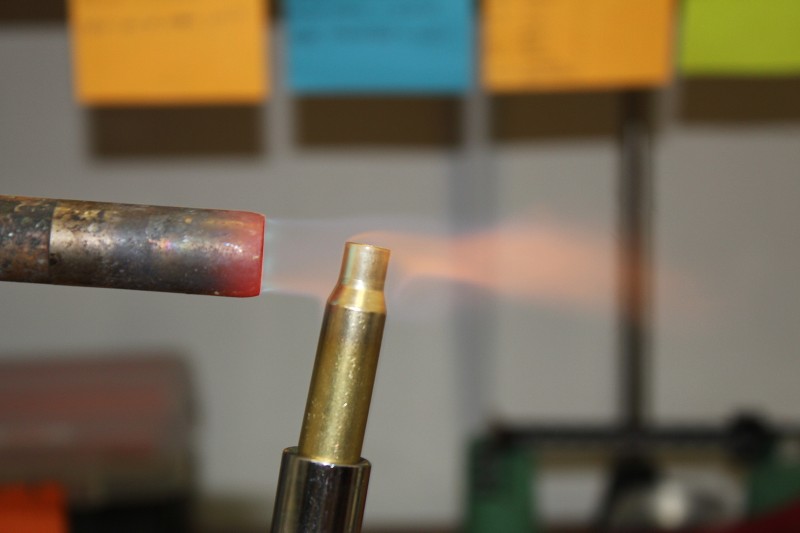 Here is another propane heated case heated to the same temp as above and there is no orange/yellow flame because I adjusted the flame so it would not burn as hot . This shows just because you see or not see something . That does not mean your are at the temp needed . 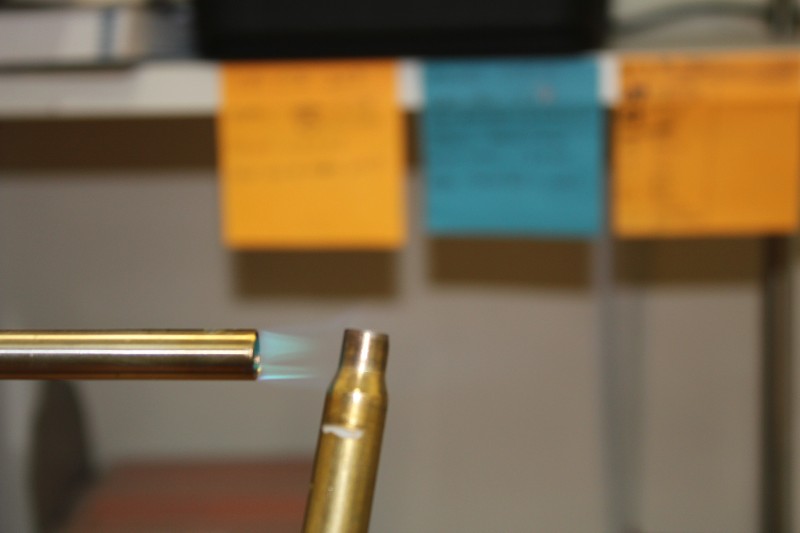 If using the lower heat flame and heating the case till the flame turned orange/yellow the neck would have been over annealed . This is not to say visual annealing does not work because it does and is in fact how I do most of mine . I just start each session with a few control samples to get my timing and visual down . How about this picture of three cases annealed to the same temp of 750* inside the neck . Only difference is where I held the flame on the case . As you can see the anneal marks are quite different from case to case even though they were heated to the same temp .  My point is just because you think know what your seeing does not mean your seeing what you think .
__________________
If Jesus had a gun , he'd probably still be alive ! I almost always write my posts regardless of content in a jovial manor and intent . If that's not how you took it , please try again .  
Last edited by Metal god; September 30, 2014 at 10:35 PM. |
|
|
|
September 30, 2014, 02:02 PM
|
#19 | |
|
Senior Member
Join Date: July 18, 2008
Posts: 7,249
|
Quote:
F. Guffey |
|
|
|
|
September 30, 2014, 02:41 PM
|
#20 |
|
Senior Member
Join Date: February 22, 2014
Posts: 868
|
This past summer I tried for the first time to anneal all of my unloaded 222 and 22 K Hornet cases. It was the first time for me I did my home work and grabbed the materials that I had to try it. I used no temp indicator since I did not have any on hand. I can show the results of the process with cracked Hornet cases. So far the 222 cases seem to be in good form. My Grand Dauter shot a 5/8" 5 shot group with them last week. Yes Hornet are quite thin even compared to 222s. They also heat up very quick compared to the 222s. I used a cool burner with propane, case in a deep well socket, variable drill motor and a tray of water to drop cases into when I was satisfied with the color. No notes taken. That was it. F.Guffy I admire your ability to stick to physical details. Mr. Metal You show some fine details also.
|
|
|
|
September 30, 2014, 03:07 PM
|
#21 |
|
Senior Member
Join Date: February 22, 2014
Posts: 868
|
Well I'm back to correct more of what seams to be a run of bad statements.
Yesterday I shot more of another batch of WW K Hornet loads that were also annealed and FL sized after years of neck sizing. I put my foot in my mouth on thread #12. At first glance I noticed no problems. Now I just came up from case prepping and found that of 42 cases 12 had very small single cracks on the neck sizing aria. So now I defiantly have a fairly solid pattern to be noticed. I am now asking my self if I did not anneal the cases would they of cracked? Or If I just neck sized as in the past instead of FL sized would they of cracked? That is all that has changed from norm other than number of shots that surly would have taken its toll. But why so many at the same time. Is there any one that has had cases drop out so suddenly. 
|
|
|
|
September 30, 2014, 03:51 PM
|
#22 |
|
Senior Member
Join Date: September 2, 2010
Location: Plainview , Long Island NY
Posts: 3,863
|
The first post by mete I feel is right on. OD of fired neck size to Sized neck OD. You might have a loose chamber, over sizeing the neck in one step. May have to go with bushing dies to size the necks down in to steps, no more than .005 with each step. Could also be do to very hot loads or a bad lot of brass. What is the measurement of the OD fired neck to the sized neck
|
|
|
|
September 30, 2014, 05:10 PM
|
#23 |
|
Staff
Join Date: March 4, 2005
Location: Ohio
Posts: 21,061
|
That's a possibility. You could clean and anneal, size down in steps and anneal again. However, it's often the case that if you select the right bushing to leave the case neck just a thousandth or so tighter than bullet diameter without the use of an expander, you've already greatly reduced the neck working. Another way to do that is to open the neck of a conventional sizing die up enough that the expander isn't needed. You can do this yourself with small hole Flex-Hones.
Annealing by color is subject to an optical illusion that is also a problem with heat treating steel. It's how at least some of the early Springfield '03 receivers were overheated and embrittled by excess grain growth. The problem is, red and orange look significantly different depending on the brightness and color of ambient light. For receiver steel, the difference turned out to be about 300°F between orange that looked the same in the evening and in daylight, IIRC. The same will apply to looking at the glow of brass. It's a significant difference, and unless you can control the ambient light conditions, you almost certainly won't hit the same temperature every session when annealing by eye. Another problem is speed of heating. If you get the torch flame hot enough, it will heat the outside of the neck and the edge of the mouth (where splits often start) faster than heat can travel to the inside of the neck. When Metal God and I discussed this in another thread, I suggested partially blocking the air intake on the propane torch to run the flame cooler, as shown below. I don't recall if that's the solution he ultimately adopted to cool his flame, but it's one that works. The most basic kind of Bunsen Burner is also adjustable to achieve the desired flame. The idea is to control heating and let the heat soak through without overheating the outside of the brass locally.  The problem with overheating the brass is it doesn't just get soft it gets weak. In Fred Barker's old article on the subject in Precision Shooting in the mid-90's, he pointed out that because of the weakening, you wind up needing to anneal every two or three firing cycles to prevent splitting when you overheat the brass, where a properly annealed case can, as in the original Hornet cases, go a dozen times before splitting. I don't like to let them go that long between annealing cycles because of changing bullet pull. If you have the time, annealing every load cycle is something more and more people do to maintain consistent bullet pull. That, in turn, should keep start pressure consistent, which should minimize velocity variation. It's why you see a number of annealing machines out there to automate the process. And that's a fine practice, but you don't want to be over-annealing that often. I'm going to guess that at a dozen or so load cycles, there likely is incipient cracking or severely scored places. In that situation, over-annealing, especially right at the case mouth, may have simply made the cases weak enough to finish breaking. If they'd been less aggressively annealed or if annealing had been applied at, say, a half-dozen load cycles and applied properly, these guys might still be shooting. On last thing you can try is tooling the edge of the case mouth. Anneal, then trim, and then burnish the chamfer and the mouth edges. Bart B. suggested the use of an easy-out in a drill press for chamfer burnishing, and that works well. The mouth can be burnished by turning it against a spinning steel rod, like the shank of a drill bit. Even better is an outside neck turning tool mandrel, which has a shoulder to push the case mouth up against while it spins slowly in a drill press. It just takes a couple of seconds of rubbing to get the sharp edges rubbed down and eliminate the stress risers associated with them.
__________________
Gunsite Orange Hat Family Member CMP Certified GSM Master Instructor NRA Certified Rifle Instructor NRA Benefactor Member and Golden Eagle |
|
|
|
September 30, 2014, 08:04 PM
|
#24 |
|
Senior Member
Join Date: February 22, 2014
Posts: 868
|
cw308 thread 22 recalling thread 2 by mete: I am catching up just give me a little more time. You bring up a interesting point that sent me down to take some measurements with my caliper. The fired case O.D. .245, neck sized O.D. .240, The new FL die sized case O.D. .236 . So when I received the new Redding FL die. I resized all of my annealed cases with the FL to .236 then fired to .245 then neck sized to .240 no wonder the necks cracked. The FL sized .009 from the fired case of .245 then necked back to the old .240 .
This all came about because the cases were getting tight in the chamber. What do you think? |
|
|
|
September 30, 2014, 09:06 PM
|
#25 |
|
Senior Member
Join Date: February 22, 2014
Posts: 868
|
I understand that the interference fit should start at .002 to .003 under the loaded round O.D. I just found out that my not so sharp eyes were not reading the calipers sharp enough. The loaded round neck O.D. is closer to .241 and the neck sized case is at or close to .239 That would be .002 of interference just right. It's about time I purchase a electronic micrometer to get those fine measurements. But why the cracks? Was it the chamber sized case of .245 or .246 when sized down to the neck sizing of .239 witch is .006 or.007 that would be a over sized chamber?
Last edited by Longshot4; September 30, 2014 at 09:11 PM. |
|
|
 |
|
|


