AREA, LINE AND POINT POSITION
In my previous post I marked my point position and the point position of the quads on the map with the help of the GPS and the UTM grid on the map.
That pin point of location is called point position, and should be the goal of every traveler in the wilderness to know about his point position; after all you could be lying down with a broken leg unable to move and in need of rescue.
Line position is when you know that you are on a feature on the map but cannot pin point your exact location, let’s say you know you are somewhere along the river, road, ridge, trail or compass bearing, but you don’t know exactly where.
Area position is when you know you are in a general area on the map; your goal should be to know at all times where you are on the map, and if you can tell your point position the better, you never know when you may need to summons help (over your cell phone or radio) and need to tell them exactly where you are.
Now we are going to try to mark our point position with the help of our compass and map alone, no GPS this time to help us out.
To accomplish this you need a map with an UTM grid. Since 1989 all new maps are printed with the UTM grid. If your map doesn’t have it you can trace it by the ticks’ marks on the edges of map using a yard stick and a pencil.
For compass and map work I recommend you spend a few dollars more and buy one with the adjustable declination scale, I use the Suunto M-5SK (smoke killer) but there are others in the market that have this convenient feature.
That way, when you are taking or plotting readings from the compass the values will be in geographic North and you will not have to be doing mathematics factoring the declination on your calculations.
Also forget about using lensatic or prismatic compasses, its readings are in magnetic and don’t have a base plate that can be used as a protractor like in the Silva system. To use lensatic and prismatic compasses with maps you will also need to carry a protractor to measure the angles and convert the magnetic readings to true North by adding or subtracting the declination, something that you don’t want to do when you are under pressure or confused by cold or stress.
The Silva system is a compass, protractor, measuring device, ruler, straight- edge and even (as in the case of the M-5SK and others) a magnifying glass.
If you rather use the compass that you already have, and it is a base plate compass or one with transparent base, you can mark your declination with a piece of white label like the one in this picture.
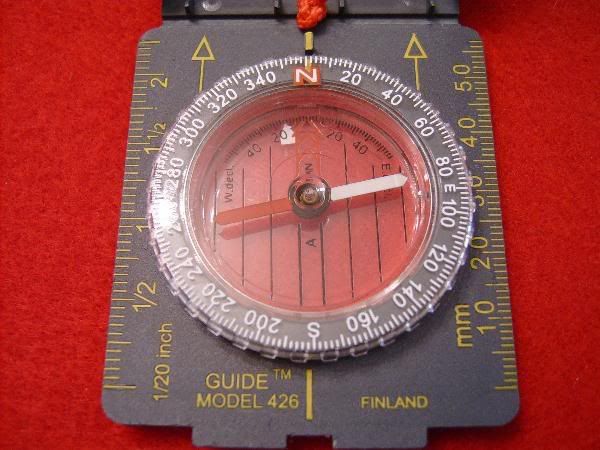
Just remember to place the compass magnetic needle in top of that mark to compensate for the declination.
It will be good if before entering the woods you can count with a base line; the base line could be the road where you left your car, a river, a power line or any other feature that is marked on the map and goes for a long way, that way you always have the option of trying to reach your base line if you are running out of daylight.
USE HANDRAILS IF YOU CAN
A handrail is a feature that is marked on the map. A trail, river, or other geographic feature that goes in the direction you want to go. When you are in a handrail, you are in a line of position. If you know you are on the trail or next to the creek, to find your point position you just need another feature that is on the map from where you can take a compass back bearing in the field.
Let’s say you see a hill in the distance that is also marked on the map. Take a back bearing with your compass to that hill, you know how to do that, you point the compass direction of travel arrow to the hill and rotate the capsule until the SOUTH END of the magnetic needle is “boxed” in the declination arrow.
Yes, for a back bearing use the SOUTH end of the magnetic needle, not the NORTH end.
Read the degrees at the junction of the bezel and line of travel arrow, and plot that in your map.
HOW TO PLOT
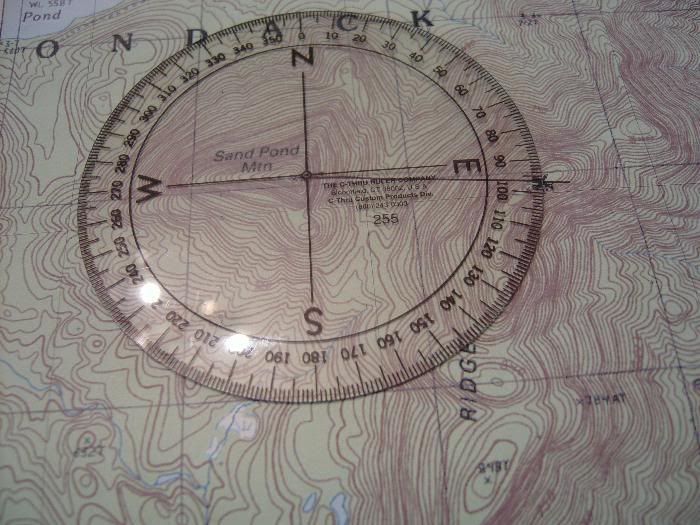
Let’s say that the back bearing you took to the hill is 80 degrees, don’t move the compass capsule to change that reading, place the long edge of the base plate of the compass on the hill that is on the map, and the direction of travel arrow toward your position (the river in this case), make sure the NORTH on the compass is toward the top of the map and then rotate the entire compass (not the capsule) until the North lines scribed in the base plate are parallel with the NORTH lines on the grid of the map.
For map work, always disregard the magnetic needle, you are using your compass as a protractor and measuring angles.
A line traced at the edge of the compass from the hill toward the river, will cross the river at the exact point where you are located, this is your point position. And now you can even read the coordinates of that position from the UTM grid, and tell any rescue party the UTM values of where you are.
TRIANGULATION
This you will have to do when you know only that you are in a general area of your map, your area position.
To get your point position you need two features that are shown in the map from where you can take back bearing in the field. Let’s say you are lucky and you see two hills that are also in the map and at more or less right angles. Take a back bearing on one and plot it in the map, now you are in a line of position, you are somewhere along that line. Take a back bearing on the other hill and plot it in the map, where the two lines cross, there is your point position.
Triangulation works even better when you use three features to take back bearings.
AREA POSITION
If you are in a featureless area with no hills, radio towers, power lines or other help for your triangulation, at least you should have been smart enough to look at your map often and noticed the changes in the topography.
You must know if you passed the hills that are in your map and how long ago, you must know if you are in a flat area and nearing an elevation change in the terrain or if the terrain starts to slope downhill. Based on these clues you will have an idea of what your area position is. With luck the chopper will look for you only in a reduced area of one kilometer based on the coordinates from the UTM grid that you will transmit over the phone or radio.
POINT POSITION AGAIN
Let’s give here one example of point position using a real map, and a figured scenario so you understand how important point position is even if you are not interested in marking your tree stand on the map.
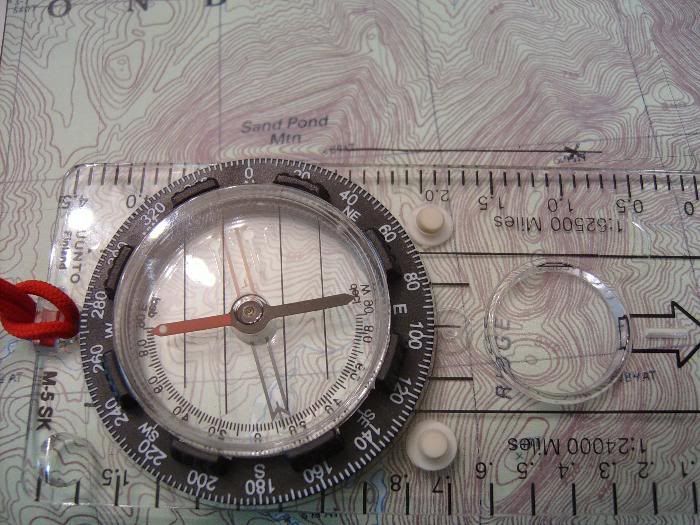
Let’s say I am exploring the top of B-----g Ridge in the Adirondacks, this is a ridge that encompasses many miles and even knowing I was there, I didn’t know where I was exactly.
To the West I can see the peak of S--d Pont Mountain, one of the tallest in the area.
Presently, I spotted in the forest floor something flashing in the sunshine and in picking that up; I held in my hands a pair of prescription eye glasses.
In further looking around I discovered a human skeleton dressed in the remains of orange hunting clothes. A rusty rifle near by confirmed my assessment that the unfortunate bones belonged to a hunter.
Looking at the back of his jacket remains I found a license tag protected by a transparent license holder, as the tags are made of weather and tear resistant material they have survived quite well the estimate three or four years of exposure to the elements.
In my pack I had some orange surveyor tape and I marked the area with it, then I took out my compass and took a back bearing to the top of S--d Pond Mountain, the back bearing is taken with the SOUTH part of the needle because you want the bearing FROM the mountain to your position. You can also take a direct bearing but then when plotting it in the map the direction of travel arrow should be pointing to the MOUNTAIN instead of from the Mountain to your position.
I like to do the back bearing, because if I were using a regular protractor the numbers to my position will be the back bearing numbers.
The back bearing indicates a 95 degrees direction from the top of the mountain, so I placed the compass with one long edge on the peak of the Mountain, and the direction of travel arrow toward the B----g Ridge, making sure that the NORTH part of the compass points toward the NORTH part of the map.
I rotated the whole compass by the base plate (I don’t touch the capsule or change the setting in the bezel) until the lines inscribed in the base of the capsule are parallel to the North lines on the map.
Now the edge of the base-plate is passing over my exact position on the Ridge. I traced a pen line to connect the two points, and placed an X in the map to mark my discovery.
As I had to be back in New York City next morning for a court hearing, it is no way I was going to be bringing a party here to the top of the ridge, or getting further involved in this matter, so late that afternoon on my way back to New York I dropped an envelope in the police headquarters with a note of explanation, the marked map and the hunting tags of the corpse.
By the UTM grid they can get the exact location in Easterns and Northings and transfer that to a GPS equipped chopper and effectuate the recovery as well, or better, that if I were there to direct them.
Best regards
Black Bear