
|
|
|||||||
| Forum Rules | Firearms Safety | Firearms Photos | Links | Library | Lost Password | Email Changes |
| Register | FAQ | Calendar | Today's Posts | Search |
 |
|
|
Thread Tools | Search this Thread |
 April 14, 2013, 09:50 AM
|
#1 |
|
Senior Member
Join Date: March 11, 2013
Location: Near Heart of Texas
Posts: 870
|
Problem with Win Mod 70 safety…
I have a Win Mod 70 that is having a problem moving the safety from off-safety to on-safety. It takes considerable thumb pressure to move it but it works. The reverse, going from safe to fire & in-between is smooth & normal. I’ve been searching forums & Googling but the advice is always to oil it, which hasn’t worked. Apparently there is a ball & spring in the bolt head that rides across indents on the safety, but I have yet to find a diagram. I have also noticed that thumb pressure on the safety actually pulls the whole firing pin/cocking piece back to fully disengage the trigger & sear. My safety moves the cocking piece back .066”. Is that normal? Do I have an adjustment problem or do the safety parts (lever/ball/spring/?) ever wear out? Any advice is appreciated.
BTW: My trigger is the style with 1 threaded stem & 3 nuts with a spring. Despite its simplicity, the trigger pulls & breaks great! TIA... ...bug |

|
|
April 16, 2013, 10:06 PM
|
#2 |
|
Member In Memoriam
Join Date: March 17, 1999
Posts: 24,383
|
I don't know the exact distance, but the safety is supposed to move the cocking piece back off the sear. Yes, there is a safety spring and plunger (not a ball) that holds the safety in position. You don't say if you have the pre-64 or post-64 but they are basically the same, though the layout is a bit different.
The parts can wear with the result you describe. If you are not familiar with the way that safety works and takes down, I suggest taking the rifle to a gunsmith. Most parts, even for the old model are still available. Jim |
|
|
|
April 16, 2013, 10:51 PM
|
#3 |
|
Senior Member
Join Date: March 11, 2013
Location: Near Heart of Texas
Posts: 870
|
Thanks for your help James K.!
It's a post 64 model. I live rural & taking it to a good gunsmith is a problem because I don't know any & there would be some distance involved. I believe that if I shipped it to a gunsmith, he'd probably want more than just the bolt. Is there a diagram for this level of model 70 take-down available? Would Brownell have replacement parts if I need them?
TIA... ...bug |
|
|
|
April 17, 2013, 07:20 AM
|
#4 |
|
Senior Member
Join Date: November 21, 2011
Location: Southern Louisiana
Posts: 1,399
|
Most problems I see with M70 safeties are caused by people trying to force the bolt open with the safety on.
With the safety on (full rear position only), the safety plunger (part 23) locks the bolt closed by protruding into the cocking handle about 1/8". Trying to force the bolt open burrs the end of the safety plunger. Then the burred up end makes the safety sloppy loose, or difficult to apply or remove because the plunger can't slide back and forth in it's hole. Take the bolt out of your rifle and try the safety. If the safety still acts the same, it's all in the bolt sleeve and safety parts. Check Youtube for Model 70 bolt dis-assembly (compress the spring and slide #15 off the firing pin). Remove the firing pin and spring, then the breech bolt sleeve (part 25) with the safety in it. It's easy, but they won't go into how to take the safety apart. The safety is simple, it's only 4 parts. Most people file a finishing nail to a flat point to tap the little roll pin out. 1) Tap roll pin 26 into the center of the bolt. Place it somewhere you won't lose it! 2) Now you can wiggle the safety lever (part 21) out of the top of the bolt sleeve. Be careful, the safety plunger (part 23) and spring (part 24) are going to pop to the back. Some people do this inside a plastic bag so they can't lose the little parts. 3) If 23 and 24 don't pop out, use your little finishing nail and tap them out towards the safety lever hole (the rear) of the bolt sleeve. 4) Most likely your safety plunger (23) is burred up, or rusty, etc. Clean it up until it slides freely in it's hole. 5) Put it all back together and be happy. 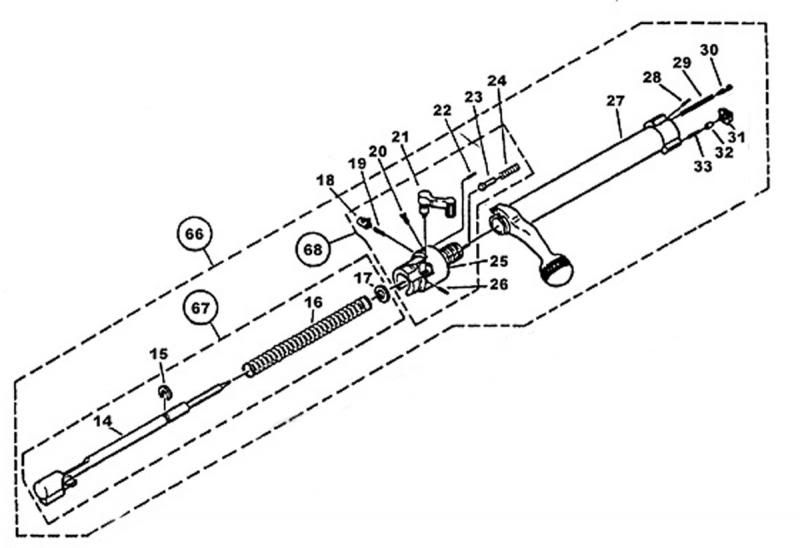
Last edited by 45_auto; April 17, 2013 at 07:36 AM. |
|
|
|
April 17, 2013, 08:07 AM
|
#5 |
|
Senior Member
Join Date: March 11, 2013
Location: Near Heart of Texas
Posts: 870
|
Thank you & thank you again 45_auto!
That's what I needed & I appreciate the step-by-step!
I originally bought this gun just for the action, as it had obviously been abused. It's now a beautiful good shooting rifle except for the safety issue. ...bug |
|
|
|
April 17, 2013, 09:59 AM
|
#6 |
|
Senior Member
Join Date: November 21, 2011
Location: Southern Louisiana
Posts: 1,399
|
Hope it helps. Let us know how it turns out.
|
|
|
|
April 17, 2013, 09:23 PM
|
#7 |
|
Member In Memoriam
Join Date: March 17, 1999
Posts: 24,383
|
Another common problem is the safety shaft (the vertical part that actually cams the cocking piece back) becomes burred and/or the cocking piece itself becomes burred. Usually, those will clean up with a bit of careful stoning.
Jim |
|
|
|
|
|


