
|
|
|||||||
| Forum Rules | Firearms Safety | Firearms Photos | Links | Library | Lost Password | Email Changes |
| Register | FAQ | Calendar | Search | Today's Posts | Mark Forums Read |
 |
|
|
Thread Tools | Search this Thread |
 December 27, 2012, 12:16 AM
|
#1 |
|
Senior Member
Join Date: February 14, 1999
Location: Pittsburg, CA, USA
Posts: 7,417
|
FrankenRuger project update - DW-type barrel, 9mm!
Folks,
I have successfully rebuilt my NewVaq357 into a true 9mmPara using a Bowen cylinder black and a 3.25" section of Douglas Premium .355" barrel leftover from somebody's 9mm carbine project  . Initial shooting tests show it's a winner. Throats on the cylinder are .3555" via a chucking reamer, following along after a Manson finish reamer did the chambers smooth as a baby's hind end. Barrel is Taylor Throated. . Initial shooting tests show it's a winner. Throats on the cylinder are .3555" via a chucking reamer, following along after a Manson finish reamer did the chambers smooth as a baby's hind end. Barrel is Taylor Throated.First test out, total crap UMC 115gr ball ammo from Walmart dropped into 3" at 15 yards offhand without even trying, while just doing initial function testing. Getting the barrel off was a stone-cold-female-doggie. I had read horror stories of bent/damaged frames, and ended up building a hilariously elaborate frame wrench out of hardwood, multiple wood clamps and half a tube of putty epoxy (using layers of cellophane each side to avoid glue on the frame/barrel). It worked. The new barrel assembly is in four pieces: * Core barrel is threaded 11/16th-24tpi for the Ruger frame at the rear, 9/16ths-18 at the muzzle. Barrel diameter along the main shaft is narrow - as in "looks like it came off a Glock" narrow. * There's a thick stainless high-polish "shroud tube" around the core barrel (section of handlebar from a 1980 Honda 900!), not touching the core rifled barrel at all, that is under compression from... * ...a "muzzle nut" of 9/16ths-18 that pulls the barrel forward, compressing the outer shroud against the frame. * Surrounding the muzzle nut is a combination front sight base and gas trap used to trigger the gas-powered auto-shell-ejector system - a copper line that goes straight back into the frame to punch out empties as I shoot. This front base and gas trap holds to the muzzle nut by four set screws which ride in a channel carved into the muzzle nut, so that the base/trap piece can be spun for windage adjustments without reducing the barrel tension. On assembly the barrel/cylinder gap can be finger-adjusted before it's all tightened down, just like a Dan Wesson. This was far, FAR easier to home-brew than a traditional "screwed in tight" Ruger barrel assembly. 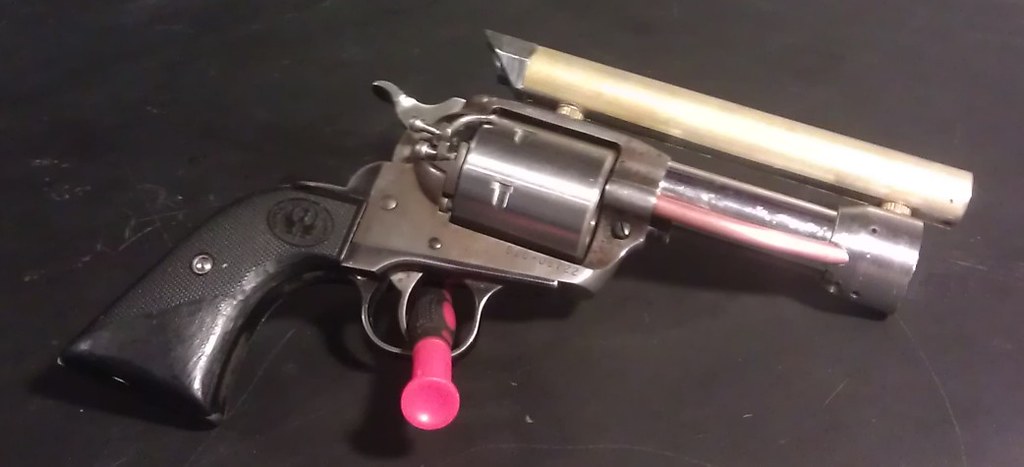 Next up: I'm going to seriously improve the looks of the two-stage loading gate needed for gas-ejecting empties, and the big mod next is magazine feeding . By the time I'm done, I'll be able to hold the cylinder's worth of rounds (possibly just five-up) plus have a short one-round magazine for holster carry. On my belt will be one foot long 9rd tube mags that can be swapped in at any time, injecting rounds into the frame at the left of the hammer from the shooter's view the moment an empty chamber passes in front of the mag. This means up to 14rd capacity without reloading if I have time to swap mags and prep.Or put another way, the six to start combined with a pair of nines means doing a whole Steel Challenge stage with only two reloads instead of three, making it competitive head-to-head with GP100s or the like . And the rulebook doesn't ban it - yet  . .Plus...SASS has been joking around about a "Steampunk class" for some time...wait'll they get a load of Maurice here... The 9mm conversion was a prerequisite to magazine feeding. It's still going to be very hairy. I'm going to have to gently shave the left side of the pawl to allow enough clearance for the rounds to slip by it. I think it can still work but this would be a lot easier (not to mention cheaper!) had I started with a large-frame Ruger Blackhawk in 357/9mm convertible.
__________________
Jim March |

|
|
December 27, 2012, 12:28 AM
|
#2 |
|
Senior Member
Join Date: November 6, 2011
Location: Burien,WA
Posts: 897
|
neat looking "steampunk" ruger NV, but is that a fixed laser site?
__________________
Rugers:SR1911 CMD,MK 3 .22lr 6",Sec. Six '76 liberty .357 4",SRH .480 Ruger 7.5",Mini-14 188 5.56/.233 18.5", Marlins: 795 .22lr 16.5",30aw 30-30 20",Mossberg:Mav. 88 Tact. 12 ga, 18.5",ATR 100 .270 Win. 22",S&W:SW9VE 9mm 4",Springfield:XD .357sig 4", AKs:CAI PSL-54C, WASR 10/63, WW74,SLR-106c |
|
|
|
December 27, 2012, 12:40 AM
|
#3 |
|
Senior Member
Join Date: February 14, 1999
Location: Pittsburg, CA, USA
Posts: 7,417
|
The sight is a variant of a Goshen Enterprises Hexsite:
http://www.goshen-hexsite.com/index2.php Tim Sheehan is letting me home-brew my own copies of his stuff, but I can't show a "down the tube" shot with this version ("Goshdarn Hacksite Mk6") - that would reveal some pre-production concepts.
__________________
Jim March |
|
|
|
December 27, 2012, 12:54 AM
|
#4 |
|
Senior Member
Join Date: October 4, 2008
Location: WI
Posts: 3,656
|
Love it. Been waiting along time to see this finished!
__________________
E-Shock rounds are engineered to expend maximum energy into soft targets, turning the density mass into an expanding rotational cone of NyTrilium matrix particles, causing neurological collapse to the central nervous system.- Yeah I can do that.  I guarantee you will know it if a bicyclist hits your house going 1000 mph. -Smaug |
|
|
|
December 27, 2012, 01:20 AM
|
#5 |
|
Senior Member
Join Date: November 6, 2011
Location: Burien,WA
Posts: 897
|
thanks for the link Jim.
__________________
Rugers:SR1911 CMD,MK 3 .22lr 6",Sec. Six '76 liberty .357 4",SRH .480 Ruger 7.5",Mini-14 188 5.56/.233 18.5", Marlins: 795 .22lr 16.5",30aw 30-30 20",Mossberg:Mav. 88 Tact. 12 ga, 18.5",ATR 100 .270 Win. 22",S&W:SW9VE 9mm 4",Springfield:XD .357sig 4", AKs:CAI PSL-54C, WASR 10/63, WW74,SLR-106c |
|
|
|
December 27, 2012, 01:29 AM
|
#6 |
|
Senior Member
Join Date: February 14, 1999
Location: Pittsburg, CA, USA
Posts: 7,417
|
Not even finished, but the end is in sight.
I found out one thing in the initial test-firing. I need that hammer-mounted shell deflector ASAP. Because the combination of tapered shells and what I suspect is a higher-efficiency gas system is driving those bad boys out FAST AS HELL. Instead of gently bouncing off my goatee (full-house 357!) they're now slamming me in the cheek. That's OK - with the short shells there's a ton of room to build the deflector. BIG shout-out to Xerocraft in Tucson - basically a "rent a complete mad scientist's lair" Hackerspace with machine shop: http://www.xerocraft.org Best $40/mo you can spend. I was able to turn that whole gas-trap/front sight base from scratch on a 1953 Logan lathe from cold-rolled steel, and then mill the channels I needed on an actual mill. The barrel nut is carved from a section of 7/8ths bolt as that needs to be harder.
__________________
Jim March |
|
|
|
December 27, 2012, 03:44 AM
|
#7 |
|
Senior Member
Join Date: July 3, 2012
Location: San Antonio, TX
Posts: 449
|
I think I have read all your posts about this project its great to see it is still moving along! I almost forgot about it, looking great!
|
|
|
|
December 28, 2012, 12:46 AM
|
#8 |
|
Senior Member
Join Date: February 14, 1999
Location: Pittsburg, CA, USA
Posts: 7,417
|
K. More comedy from what was the craziest part of this process.
Getting the old barrel off. "The book" says you can't do it on a home-brew basis. Not on a Ruger SA. It's on there way too tight - if you do the old classic Colt SA trick of shaping a 2x4 for the area where the cylinder normally goes you'll just bend or crack the Ruger frame. The pros use something called a "frame wrench" to support the entire frame of the gun from top to bottom, so that you're putting twist on the whole thing at once. No warping that way. They also have to use a hydraulic press to squeeze the barrel tight enough - a basic bench vice won't cut it. Sigh. What to do? Well the first decision was easy: go ahead and destroy the factory barrel getting it off. Sounds ghastly but really, it had been heavily modded in previous alterations to the sights and then again with the fairly crude test version of the gas-eject system. In good shape it was worth only about $30 tops and it was in far from good shape. OK, so stick it in the mill, drill right through it sideways, put a bolt through that new hole, NOW the stinker will stay put in the vice. But I couldn't risk damage to the frame - at all. So I had to build a frame wrench. Like so: http://farm9.staticflickr.com/8355/8...9de93914_c.jpg Note the hilarious "clamp on clamp" setup .At the area below the barrel you have a narrow point in the frame. That had to be filled in. I used putty epoxy. Here's two shots of one side of the successful frame wrench - I used layers of cellophane to isolate the glue from the actual frame metal: http://farm9.staticflickr.com/8211/8...e5deb8be_c.jpg Here's a close-up side view of the support structure for the frame on one side: http://farm9.staticflickr.com/8076/8...98cd543d_c.jpg Ditto the other side, with the added complication of a protrusion from the side of the frame where the ejector rod housing (and now the gas line) goes - for that I had to chisel a special recess in the scrap lumber on that side. Good thing Xerocraft also has carpentry stuff around .And that's how I got the original barrel off. There's a bunch more stories like this, I'll put them all together in a build journal soon.
__________________
Jim March |
|
|
|
December 29, 2012, 09:52 PM
|
#9 |
|
Senior Member
Join Date: May 17, 2012
Posts: 1,085
|
Better and better! It's looking less Mad Max Improvised and more Wild Wild West Steampunk these days. Very nice work so far. Are you planning on adding a stock to support the magazine tube, or it gonna be removable (i.e. stick it in place, and spin the cylinder until rounds stop dropping in
)?Given any thought to an auto-cocking mod, yet? TCB
__________________
"I don't believe that the men of the distant past were any wiser than we are today. But it does seem that their science and technology were able to accomplish much grander things." -- Alex Rosewater |
|
|
|
December 29, 2012, 10:59 PM
|
#10 |
|
Senior Member
Join Date: December 30, 2010
Posts: 1,581
|
Sweet!
__________________
Stay Groovy |
|
|
|
December 29, 2012, 11:01 PM
|
#11 |
|
Senior Member
Join Date: October 25, 2001
Location: Alabama
Posts: 18,534
|
I think I saw something like that in Girl Genius.
|
|
|
|
December 30, 2012, 02:07 AM
|
#12 |
|
Senior Member
Join Date: August 25, 2008
Location: In the valley above the plain
Posts: 13,423
|
Assault Pistol!!
 Great stuff, Jim. Your previous drawings and sketches didn't really provide a good base for me to see your vision. But, now it's very clear. I like. 
__________________
Don't even try it. It's even worse than the internet would lead you to believe. |
|
|
|
December 30, 2012, 11:20 PM
|
#13 |
|
Senior Member
Join Date: April 3, 2011
Location: to close to other houses
Posts: 1,176
|
I DESPERATELY want to see this thing in action.
|
|
|
|
January 1, 2013, 06:48 PM
|
#14 |
|
Junior member
Join Date: May 16, 2008
Posts: 9,995
|
I too love to see your updates. Great work. As far as getting it finished, I think we all know this is a project that never ends.
|
|
|
|
January 1, 2013, 06:55 PM
|
#15 |
|
Senior Member
Join Date: April 18, 2011
Location: The Woods
Posts: 1,197
|
it's already about the coolest thing I've ever seen. I can't wait to see the finished product.
You should look into getting a patent on the ejection system. I'm sure I"m not the only person who'd buy one if they were commercially available. At the very least every gun toting mechanical engineer would want one.
__________________
si vis pacem para bellum |
|
|
|
January 2, 2013, 02:54 AM
|
#16 |
|
Senior Member
Join Date: February 14, 1999
Location: Pittsburg, CA, USA
Posts: 7,417
|
UPDATES
I have now built and test-fired a "Mk1" magazine feed system. In range testing, feed reliability was about 90%, extraction 100% until I got a few failures to extract as she got dirty. I have revised the design of the mag well to be bigger and fully supported, and have boosted the eject gas pressure by at least double. There were NO problems whatsoever with timing or carry-up, which considering the minor mods to the pawl was very gratifying .I have two magazines built and tested: a 2-round for carry and a foot-long 9-round as a spare. I plan to build another 9rd mag as soon as I test the latest mods. Pics and videos coming .This should give me 7rd capacity on draw, 9rd on tap, and at any time after shot #6 or #7 I would be able to swap to the 9rd mag. The gun's capacity plus a pair of 9s would be enough to run an entire SASS stage. A note on the split hinged loading gate: The remaining "stub" of a loading gate serves two purposes: 1) It allows the cylinder to be free-wheeled by fully opening it, to allow access to all the chambers while not touching the hammer. The Ruger New Model loading/unloading drill is a safety feature that is still fully functional. 2) By closing the upper half of the loading gate while it's in the holster, I can made sure the live round under the auto-eject port stays in. On draw I cock it, advancing an empty chamber to the auto-eject position for the first shot - that way I don't spit out a live round. Upshot: both halves of the split loading gate (literally hinged in the middle) have functional uses.
__________________
Jim March |
|
|
|
January 2, 2013, 12:09 PM
|
#17 |
|
Senior Member
Join Date: July 3, 2012
Location: San Antonio, TX
Posts: 449
|
Is this the same revolver you had the first gas eject system on? I guess not much is left though. Having seen the video of your carry rig this doesn't look at cumbersome as I was thinking it would be. Keep the updates coming as always this thing looks awesome!
|
|
|
|
January 2, 2013, 01:51 PM
|
#18 |
|
Senior Member
Join Date: September 27, 2012
Posts: 397
|
A blowback pistol with revolver type frame and tube magazine was built many years ago. Not a sucessful design so only few exist.
Instead of a regular cylinder this pistol used a two chamber flat slab that rotated 180 degrees at each firing. The tube magazine was curved and fitted inside the revolver type grip. When fired a breechblock in the upper rear of the frame blew back and the fired cartridge case was ejected, the chambers then switched position. The lower chamber being empty a cartridge was fed into it automatically , when the upper chamber was fired the process repeated till the magazine was empty. PS Not sure but I think this system was later adapted to a light automatic cannon. |
|
|
|
January 2, 2013, 03:53 PM
|
#19 |
|
Senior Member
Join Date: July 31, 2000
Location: Middle Peninsula, VA
Posts: 1,588
|
I love it. A high capacity, magazine fed, gas operated single action revolver. Holy oxymoron Batman!
|
|
|
|
January 2, 2013, 06:20 PM
|
#20 |
|
Senior Member
Join Date: February 14, 1999
Location: Pittsburg, CA, USA
Posts: 7,417
|
Rainbow Demon is talking about the Dardic "tround" system:
http://en.wikipedia.org/wiki/Dardick_tround It used the shell as part of the chamber. My setup uses factory 9mm ammo and feeds shells in from the rear, not the side. The closest thing to my setup is an experimental Nazi 20mm cannon captured late in WW2 and never put into service, the Mauser MG 213:  As you can see, it did mechanical insertion (in two stages) and mechanical extraction (one stage). In my case I'm doing spring-loaded insertion, gas-powered extraction...and of course mine spins the other way . The German design was belt-fed, electrically spun and fired full-auto. Mine...well, IF I were to rig another gas line for cocking it would indeed go full-auto! I suspect that with 9mm+P+ ammo there might be enough gas pressure available to power a cocking stroke.Variants of this were later used by various allied countries in 20mm and 30mm flavors. In the US we used the design in the F86 Saberjet of the Korean War era. http://en.wikipedia.org/wiki/M39_cannon At least some are still in use. So far as I know this feed cycle or anything remotely like it has never been used in a handgun, shotgun or personal rifle before now. It was certainly possible as early as around 1896: John Browning was already doing experimental gas-cocked leverguns, and the rimless ammo that makes this practical in something the size of my gun has existed at least since the Broomhandle Mauser of 1896.
__________________
Jim March |
|
|
|
January 2, 2013, 08:24 PM
|
#21 |
|
Senior Member
Join Date: February 14, 1999
Location: Pittsburg, CA, USA
Posts: 7,417
|
I haven't been able to get to the range today to test the latest mods. But here's pics...
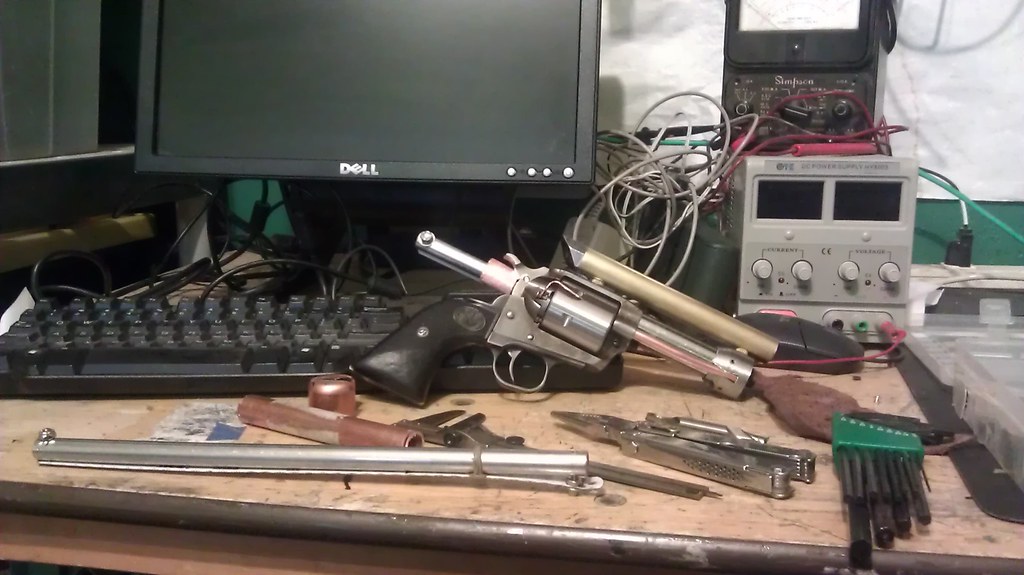 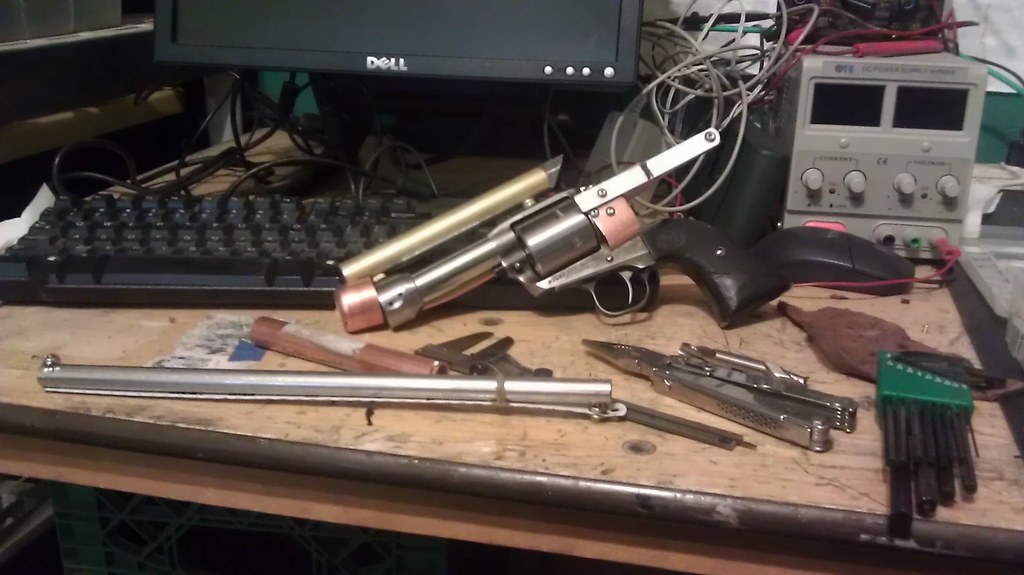 There's a 2rd mag inserted into the mag well, for carry (plus the 5rd contents of the cylinder!). The mag feeds only once an empty chamber rotates in front of the mag. Once that mag is dry one of the 9rd foot-long mags can be swapped in, feeding from that immediately. You can see one of the long mags at the lower left. The mags clip in via a flat-spring driving a wedge into the side of the mag well; in the long mags, the wedge also doubles as a round stopper. On insertion you peel the flat-spring outwards, drive the mag in, release the wedge into the mag well's retaining hole. The flat springs are hacksaw blades with the teeth ground off and smoothed. Surprisingly, the 2rd mag doesn't get in the way at all for carry.
__________________
Jim March |
|
|
|
January 2, 2013, 09:10 PM
|
#22 |
|
Senior Member
Join Date: February 15, 2012
Location: Texas
Posts: 160
|
Wow. That is awesome, does it really work? How about a video of it?
|
|
|
|
January 2, 2013, 09:26 PM
|
#23 |
|
Senior Member
Join Date: February 14, 1999
Location: Pittsburg, CA, USA
Posts: 7,417
|
Video will be posted tomorrow.
__________________
Jim March |
|
|
|
January 2, 2013, 09:29 PM
|
#24 |
|
Senior Member
Join Date: February 14, 1999
Location: Pittsburg, CA, USA
Posts: 7,417
|
As an aside: I may be the first person ever to be able to see the pawl and ratchet star from the rear of a working gun
. "OK, so that's exactly how timing works!"
__________________
Jim March |
|
|
|
January 2, 2013, 11:08 PM
|
#25 |
|
Senior Member
Join Date: November 7, 2011
Location: Earth
Posts: 446
|
Steampunk comes to life!!!!! That is AWSOME!!!
__________________
...They have the internet on computers now....-Homer Simpson- |
|
|
|
| Thread Tools | Search this Thread |
|
|


