 |
|
|||||||
| Forum Rules | Firearms Safety | Firearms Photos | Links | Library | Lost Password | Email Changes |
| Register | FAQ | Calendar | Today's Posts | Search |
 |
|
|
Thread Tools | Search this Thread |
|
|
#1 |
|
Junior Member
Join Date: April 27, 2009
Posts: 9
|
Identify a rusty old revolver
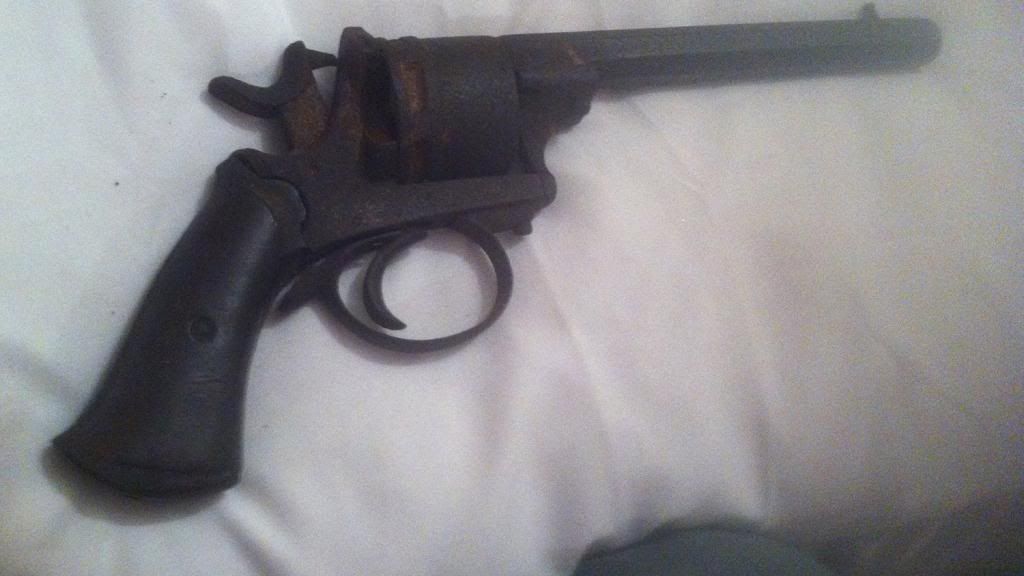
Hi Guys, I'm trying to identify an old revolver which has many features similar to a Lefaucheux Pinfire - but it's made for centre-fire cartridges[IMG]
 [/IMG] [/IMG]Please forgive the poor quality picture - and the dreadful current state of the pistol! Unlike the 'standard' Lefaucheux , the cylinder has CUT indexing-grooves - rather than the external notches on the Pinfire variants. The hammer has a conical firing-pin - which SHOULD, but does NOT - align with the conical-hole in the frame. It seems to have a sleeve for an ejector-rod - but there is no rod now. Frame, trigger-guard and hexagonal barrel are ALL identical to Lefaucheux 7mm pinfire revolvers. Can anyone offer an identification - and or advice on restoration, please? |
|
|
|
|
#2 |
|
Senior Member
Join Date: January 20, 2009
Location: Amity Oregon
Posts: 791
|
Do a search for "gasser revolver" or "rast and gasser" to see some
in the style of yours. 90%+ chance that yours is Belgian, and not high end Belgian. Unless you just want to practice your metal working and re-finishing skills, it's not worth messing with. If you DO want to practice, it's a great candidate--if you screw it up it's no great loss. Put it in a shadow box, hang it on the wall---it's OK as a conversation piece. |
|
|
|
|
#3 |
|
Senior Member
Join Date: January 23, 2001
Location: People's Republic of Kanada
Posts: 1,652
|
This is probably a version of the Perrin revolver, which was just coming into use as the Lefaucheux pinfire was going out; the revolvers were essentially identical, except that the Perrin used a very thick-rimmed centrefire cartridge.
__________________
Gun control in Canada: making the streets safer for rapists, muggers, and other violent criminals since 1936. |
|
|
|
|
#4 |
|
Member In Memoriam
Join Date: March 17, 1999
Posts: 24,383
|
I suspect the basic gun is (or was) Belgian. Ir may have chambered a Perrin cartridge; a glance in the chambers should be proof one way or the other,
Regardless of the type, I agree with BillM; it is not worth bothering with except as a "project gun" with the understanding that no matter how much time or money you may spend on it, it will still have almost zero value. Jim |
|
|
|
|
#5 |
|
Junior Member
Join Date: April 27, 2009
Posts: 9
|
Lefaucheux revolver converted to fire the Perrin & Galland cartridges?
Thanks for the input. There's almost NO resemblance to any of the Perrin revolvers I've seen - all have very different trigger-guard and hand-grip shapes from this poor sad beast. I'm inclined to think it must be a Lefaucheux revolver converted to fire the Perrin & Galland cartridges - around 1872-3...? That might even explain why the hammer fits so badly!
Clearly, I have to agree that it's worth NOTHING - except for its probable Irish Republican heritage. My intention is to try to remove most of the rust and try to restore basic functionality - right now, even the cylinder is stuck fast!. Can anyone recommend a formula to re-convert most of the rust back to steel? I'd like to preserve any markings it may have - though I can't SEE any at this time! If I were to use a rust-converter - what kind of SURFACE would be left? |
|
|
|
|
#6 |
|
Senior Member
Join Date: September 8, 2007
Location: Mississippi
Posts: 16,189
|
You can't convert rust back to good steel. If it was me I'd remove the rust by electrolysis.
|
|
|
|
|
#7 |
|
Junior Member
Join Date: April 27, 2009
Posts: 9
|
You can't convert rust back to good steel
"You can't convert rust back to good steel" I hate it - but I know you're RIGHT!!
OK - so how do I go about it? What electrolyte should I use? What current, voltage? Do I need some special metal as the other electrode? Should the gun parts be attached to the ANODE or the CATHODE? I'm sorry for such BASIC questions - but I've never tackled anything in such an awful condition before! |
|
|
|
|
#8 |
|
Senior Member
Join Date: October 25, 2001
Location: Alabama
Posts: 18,541
|
Google, man, google. On "electrolytic rust removal."
The electrolyte is sodium carbonate (washing soda) NOT sodium bicarbonate (baking soda.) The rusty part is the cathode, a piece of scrap iron or rebar is the anode. I have read of both 6 and 12v battery chargers or big batteries being used. If you want cold chemistry, Evaporust works; just don't expect it to work in the few minutes claimed on the label. |
|
|
|
|
#9 |
|
Junior Member
Join Date: April 27, 2009
Posts: 9
|
Progress at Rust-Removal
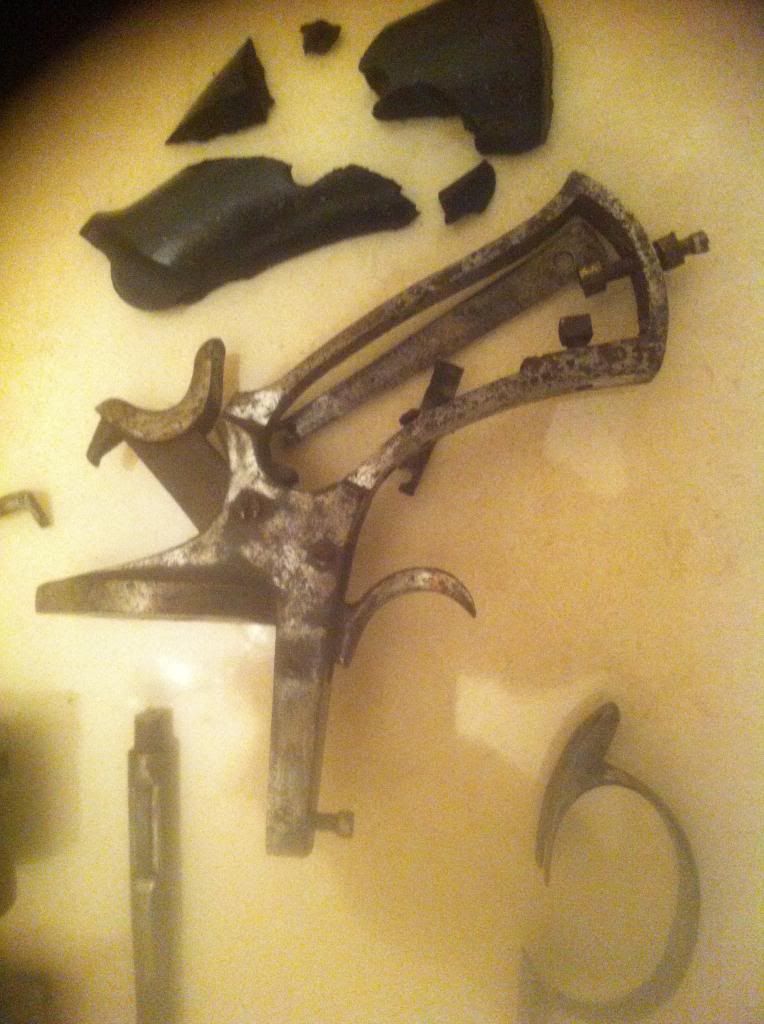
Thanks, Guys. I've spent the afternoon lightly sanding the parts - though some screws remain stuck. [IMG]
 [/IMG] [/IMG]Sadly, one half of the Pistol-Grip just shattered when I tried to remove its screw! The wood seems very dark - maybe even Ebony...? I had hoped to finish the strip-down before trying to electrolyse the rust - anyone know the 'magic-word' for tiny rusty screws...........? |
|
|
|
|
#10 |
|
Member In Memoriam
Join Date: March 17, 1999
Posts: 24,383
|
The "wood" probably isn't wood, but a natural "plastic" called hard rubber (gutta percha) which hardens over time and becomes brittle. On guns of that type, the grips were often pressed into elaborate shapes, which served to make aged grips even more prone to breaking.
Jim |
|
|
|
|
#11 |
|
Senior Member
Join Date: September 8, 2007
Location: Mississippi
Posts: 16,189
|
|
|
|
|
|
#12 |
|
Junior Member
Join Date: April 27, 2009
Posts: 9
|
Thanks James and Hawg.
"The "wood" probably isn't wood" Actually it has clear lines of grain in the broken surfaces and the inner [unpolished] surface is pretty clearly wood. What's kinda strange is the odd SHINE on the fractured surfaces - NOT typical of, say, cracked / broken Walnut. The outer sides seem to have a million years of polish or wax on them - yet there seems to be no 'thickness' to this shiny face....? I had planned to soak the grips in Linseed Oil - hoping to reverse the shrinkage of ages of neglect. Is this still a good idea? "baking soda works but leaves a black film" I'm glad to hear it - Washing Soda is rather more difficult to find! What IS the 'black film'? Will it remove even more metal from the surface? Could it be polished-up? What about the remaining 3 screws? How will I get them out to fix the hammer and trigger...........? |
|
|
|
|
#13 |
|
Senior Member
Join Date: September 8, 2007
Location: Mississippi
Posts: 16,189
|
The black residue will not remove more metal. Its pretty easy to get off. As for the screws the electrolysis may help with that, at least it will remove the rust from them. It may take an impact driver to break them loose.
|
|
|
|
|
#14 |
|
Senior Member
Join Date: January 20, 2009
Location: Amity Oregon
Posts: 791
|
Soak the rusted screws in a good penetrating oil. Warm the part up,
let it cool down a couple of times, keep applying the penetrating oil. When you try to loosen the screws, put some tension on the screwdriver and at the same time tap the end of the screwdriver handle with a hammer. I like Kroil, but PB blaster seems to be a bit more available. Don't try WD-40, it's worthless on rusty screws. Or you could try an old school remedy---immerse it in diesel fuel for a month or so. |
|
|
|
|
#15 |
|
Senior Member
Join Date: October 25, 2001
Location: Alabama
Posts: 18,541
|
Transmission fluid and acetone has been recommended for penetration.
I just use Kroil, PB, or Liquid Wrench. |
|
|
|
|
#16 |
|
Junior Member
Join Date: April 27, 2009
Posts: 9
|
Soak stubborn screws in solvent
Between Diesel, gasoline and Acetone - these screws are going to regret their stubbornness! I'll keep at them until they 'surrender' - or the fumes kill me! I have an impact-screw-driver - but I've been reluctant to use it - 'cos it's kinda clumsy! It was actually 'tapping a screw while under tension' which shattered the LH Pistol-Grip - so it's a procedure I've tried already - with success on the other screws!
I'll post up some pictures [hopefully of better quality], when I finally get it clean and polished! Thanks again! |
|
|
|
|
#17 |
|
Senior Member
Join Date: September 8, 2007
Location: Mississippi
Posts: 16,189
|
|
|
|
|
|
#18 |
|
Senior Member
Join Date: February 25, 2013
Posts: 249
|
your gun is worthless, please pm me if you would like me to take it off your hands

|
|
|
|
|
#19 |
|
Senior Member
Join Date: January 4, 2014
Location: NE FL
Posts: 656
|
The pistol looks just like a Perrin I used to own.
|
|
|
|
|
#20 |
|
Senior Member
Join Date: April 7, 2006
Posts: 10,985
|
Wood doesn't break like that.
|
|
|
|
|
#21 |
|
Senior Member
Join Date: October 25, 2001
Location: Alabama
Posts: 18,541
|
Does horn?
Hard rubber? |
|
|
|
|
#22 |
|
Member In Memoriam
Join Date: March 17, 1999
Posts: 24,383
|
Some European grips were made of glued and compressed paper; when those deteriorate, they come apart in layers. AFAIK, that system was not used in the U.S. (Except in WWII, when phonograph records were made that way to save scarce Bakelite.)
Jim |
|
|
|
|
#23 |
|
Staff
Join Date: April 13, 2000
Location: Northern Virginia
Posts: 41,389
|
If you have a deep freezer, coat the parts that are stuck liberally with penetrating oil, wrap well to prevent drips, and put it in the bottom back of the freezer.
The next day, pull it out, recoat with penetrating oil, and test to see if the screws have come loose. I've had far more success over the years using cold soaking to loosen rusted in screws than I have had using heat.
__________________
"The gift which I am sending you is called a dog, and is in fact the most precious and valuable possession of mankind" -Theodorus Gaza Baby Jesus cries when the fat redneck doesn't have military-grade firepower. |
|
|
|
|
#24 |
|
Senior Member
Join Date: April 7, 2006
Posts: 10,985
|
Horn doesn't shatter. Synthetics do.
|
|
|
|
|
#25 |
|
Junior Member
Join Date: April 27, 2009
Posts: 9
|
Hi Guys, some further info and more pics.
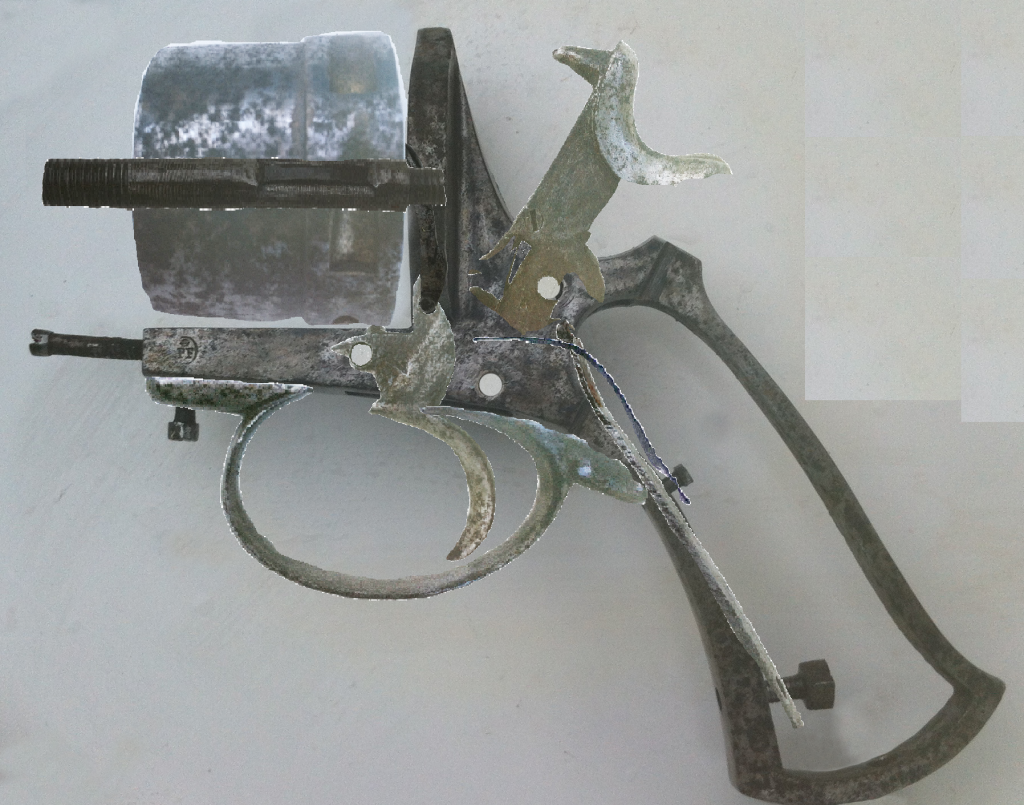
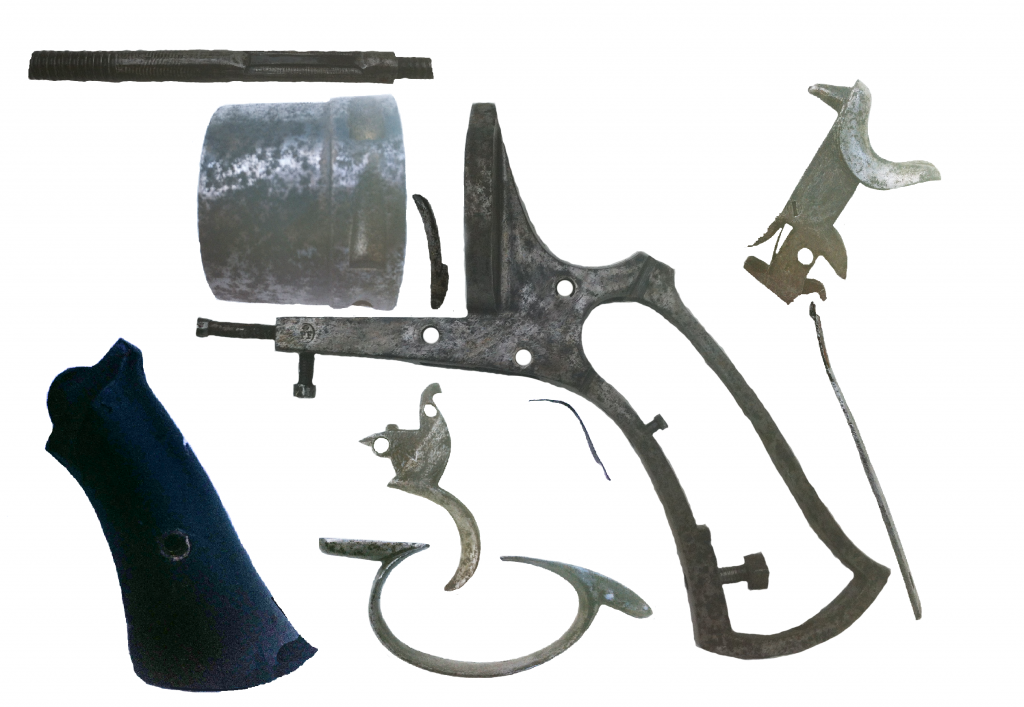
[1] The grips ARE wood - it's entirely obvious from the INSIDE surfaces. The peculiar way it broke is down to the odd fact that the wood was cut with the GRAIN running almost perpendicular to the flat inner face. [2] There are missing bits - like the rear Trigger-Guard screw, the Ejector-Rod [and its little spring-clip] and, maybe, a link-piece between the Trigger and the Hammer [for single-action....?]. [3] My attempts to remove the screws 'properly' failed - I just had to drill them out - I'm sorry! These pictures are marginally better than the earlier ones. The revolver components were photographed one at a time, then, using Photoshop, I isolated just the parts themselves and superimposed each part, individually on the picture of the frame. For the 'Revolver Stripped' I did the same thing but left the parts close to - but separated from - the Frame. In that picture, you can see the Pawl just in front of the Recoil-Shield on the Frame. In the 'assembled' picture, the Pawl is sitting ON the Trigger [covering its upper hole] and its laid on top of the Recoil-Shield. The lack of colour-contrast makes the overlaid parts hard to see - I'm sorry!  
|
|
|
 |
| Tags |
| identify revolver |
|
|