
|
|
|||||||
| Forum Rules | Firearms Safety | Firearms Photos | Links | Library | Lost Password | Email Changes |
| Register | FAQ | Calendar | Today's Posts | Search |
 |
|
|
Thread Tools | Search this Thread |
 July 10, 2013, 10:40 AM
|
#1 |
|
Senior Member
Join Date: October 28, 2006
Location: South Central Michigan...near
Posts: 6,501
|
Homemade holster process
I am going to make a full-flap holster for a Colt Police Positive Special that I bought awhile ago. Inasmuch as there have been occasional questions posted here about making one's own holster, I thought that I may as well post pictures of the process as I go.
The first thing I do when I make a holster is to decide what kind of holster I am going to make. It may help to look at pictures of holsters by the various makers to see if one of their designs jumps out at you. Do not just consider the looks of the holster, but pay attention to how the holster is going to be fastened to the belt and consider how the holster is going to be used. For instance, if you intend on using the holster for raccoon hunting with dogs (Norther style where you run after the dogs), you would not want a drop-loop holster because it would flop against your leg as you ran. In this instance, I decided on a full-flap because I envision carrying the gun into my woods in the unlikely event of seeing some predator, most likely an opossum. I will carry the gun often, but will hardly ever need to draw it fast. Also, I like the looks of a full-flap and have not made one in many years. So, full-flap it is. Secondly, I want a holster that I can change from belt to belt, including Sam Browne belts complete with braces...so I do not want to have to unfasten the braces to thread a loop belt on. Therefore I decided on a large-heavy clip. Now, a clip would not be very wise if a person was subject to bouncing on a horse, snowmobile, motorcycle, etc. But, keep in mind that I will just be taking leisurely walks in my woods and find it unlikely that I will be engaged in vigorous activity. The problem with a clip is that it threads into the holster and could contact the gun, so I will mount the clip on a sew-on leather patch instead of mounting the clip directly to the holster. If you cannot visualize that at this point, you will understand when I post pictures of it when I get to that point. After deciding on the style and mounting system I will use, I make a pattern using a thin cardboard cereal box. After cutting the pattern, it almost always has to have angles, radiuses (radii), etc. changed. The pattern will have to be adjusted as indicated when you wrap it around your gun to see how it fits. I subtract by cutting with scissors, add with pieces of cardboard held with scotch tape. The pattern need not be neat, inasmuch as it only has to survive being used once...unless you anticipate making more than one holster of that type for the same gun/frame. Once you are satisfied with your pattern, determine which side of the leather you want on the outside of your holster and draw the pattern on the leather accordingly with a lead pencil. If you are right-handing and draw the pattern on the wrong side, you will end up with a gun for a left-handed person. You should also consider the weight of the leather you will use. In this case, I am using 5/32 thick (10 oz. weight), because for a full-flap, I will not be doing much bending of the leather or wet-forming...but will do some. There are several considerations that can decide how heavy of leather to work with. Generally, the heavier, the harder it is to work with. The tracing can be cut out using a sharp blade in a standard utility knife. Lay the leather on a table, on top of some corrugated card board and follow the lines. In the photo on the left, the leather as cut, the pattern (on the right), made from a cereal box, and the gun for which it is intended. I will post again latter in the process. 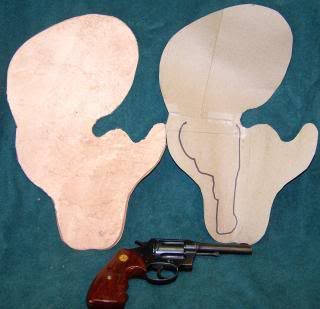
|

|
|
July 11, 2013, 09:23 AM
|
#2 |
|
Senior Member
Join Date: October 28, 2006
Location: South Central Michigan...near
Posts: 6,501
|
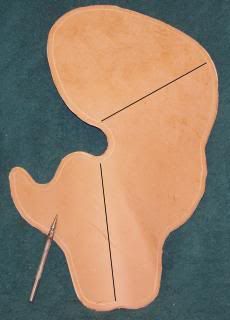
After the pattern has been transferred to the leather and the leather is cut-out, the imperfect edges are smoothed using a Dremil Tool, if you have one. And/or Emory Boards are useful for this task. Use a Dremil sanding drum with as course of grit as you can find. Dress down the curves and straight edges to have a uniform flow, making curves curved and straight edges straight.
It is important to have uniform, flowing edges not only for aesthetics, but the edge is the guide for the stitching spacer and you will find that you cannot make a straight groove for stitching if you do not have a straight edges on the leather. After the leather edges are straight, the leather will be slightly beveled, called "skiving". In the photo, is a skiver available from Tandy. 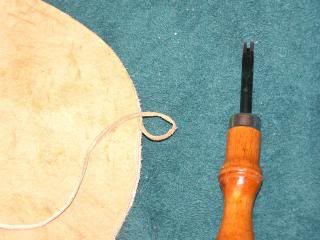 Notice the thin string of leather that is removed from top corner of the leather. This should be performed on the rough-side also for any area that is not going to be stitched closed. It gives a finished look. Notice the thin string of leather that is removed from top corner of the leather. This should be performed on the rough-side also for any area that is not going to be stitched closed. It gives a finished look. After skiving, an adjustable grooving spacer is used to cut a small groove that will guide the placement of the stitches. In this case, I also used the spacer to cut a small groove for decorative purpose and to guide the area in which I intend to use decorative stamping tools. 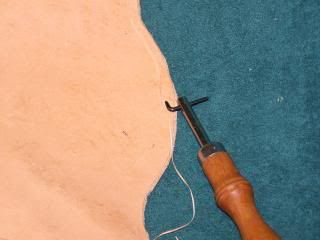 You can see in the photo how the adjustable spacing tool cuts a small string of leather from the surface. You can see in the photo how the adjustable spacing tool cuts a small string of leather from the surface.
|
|
|
|
July 11, 2013, 09:32 AM
|
#3 |
|
Senior Member
Join Date: October 28, 2006
Location: South Central Michigan...near
Posts: 6,501
|
In this photo, I am examining the holster and demonstrating how it will fit around the gun. If the holster seems too tight on the gun, I may decide to add a thick "welt" of leather inside the surfaces that will mate when sew together.
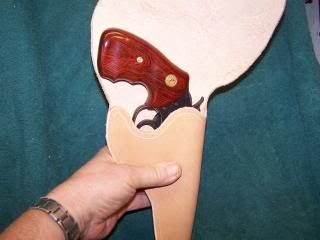 Holster with the flap held into position giving a preview of what it will look like with finished: 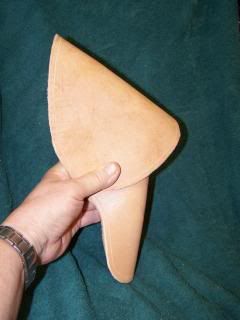 It is prudent to do a lot of testing and checking as you progress. |
|
|
|
July 11, 2013, 09:43 AM
|
#4 |
|
Senior Member
Join Date: October 28, 2006
Location: South Central Michigan...near
Posts: 6,501
|
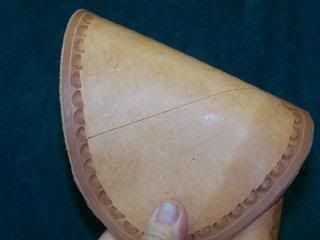
When the leather is bent around the gun, I determine which areas and how much of the holster is going to be covered with decorative stamping. The back of the holster needs not be decorated with stampings, and would serve no purpose. The place (outer edges of the pattern), where I used the stitching spacer serves to demark the location for the stamping where it was used, but for the area where the leather goes around behind and does not have a stop indicator to keep things uniform, I "draw" a groove with a straight edge and a ball-end scriber from Tandy.
 I have enhanced the drawn groove via paint program to make it more visible in the photo. My tastes run conservative, so a half-sunburst border and basket-weave stampings are used. The "Cowboy Floral", stampings and carvings are much too gaudy (and feminine), for my conservative tastes. Here are the two tools I use for stamping: 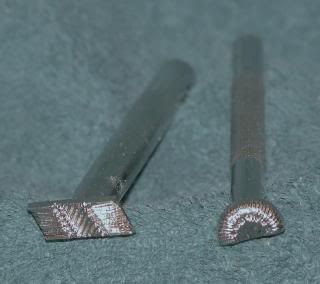
|
|
|
|
July 11, 2013, 09:59 AM
|
#5 |
|
Senior Member
Join Date: October 28, 2006
Location: South Central Michigan...near
Posts: 6,501
|
Stamping leather with stamping tools. You will need a very hard surface (so that the impact from the stamp is not absorbed the surface. The leather needs to be compressed and a hard surface will make the blows from the mallet more effective and a hard surface will result in less noise.
You will need a wooden, large plastic, or raw hide mallet. Tandy has them, but are very expensive...look around, you may find one cheaper someplace else. The leather must be dampened. I dunk into a plastic container, some whip with a large saturated sponge. Once wet, the leather will begin to dry and has a short working life. You will likely need to wet the leather again or several times before your pattern is finished, depending on how fast you work. Do not soak the leather. Too wet of leather and it will become mushy and not hold a good imprint. To dry and it will resist being imprinted. The photo shows stamping using a half-sun burst stamp for a border for the basket-weave pattern I will apply later, inside the border.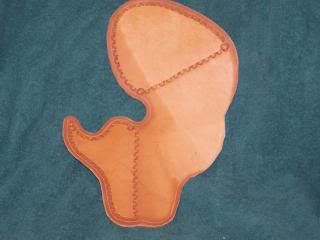
Last edited by dahermit; July 11, 2013 at 10:22 AM. |
|
|
|
July 11, 2013, 10:06 AM
|
#6 |
|
Senior Member
Join Date: October 28, 2006
Location: South Central Michigan...near
Posts: 6,501
|
I bend-over the flap to determine the angle with which I will do the basket-weave pattern. I think and angled pattern looks better than a strait vertical or horizontal patter. You will note that again I have used a straight edge and a ball-end scribe to draw a groove to follow with my stamps to keep the pattern straight.
 If you do not use such an line to keep the pattern straight, you will surly find it almost impossible to get a good result. If you do not use such an line to keep the pattern straight, you will surly find it almost impossible to get a good result.I do my first basket-weave impression well out on the line and work forward and backward, end to end, until I come to the stamped border. You may tilt the tool to get a partial imprint at the border...you do not want to over-stamp the border stamp. Getting close without over-stamping will take some care. Note that on the second line of basket stampings, I have taken care to off-set the stamp 50 percent...for basket-weave to have a basket-weave effect, that must be done. 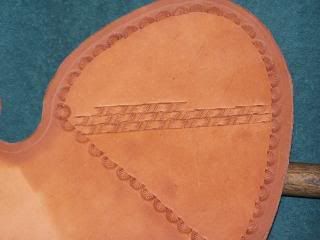 It is better to strike the stamp with the mallet five light blows rather than one hard one to set the imprint. One hard blow often causes the stamp to glance away from the blow resulting in an nonuniform imprint. Last edited by dahermit; July 11, 2013 at 10:18 AM. |
|
|
|
July 12, 2013, 12:01 PM
|
#7 |
|
Senior Member
Join Date: October 28, 2006
Location: South Central Michigan...near
Posts: 6,501
|
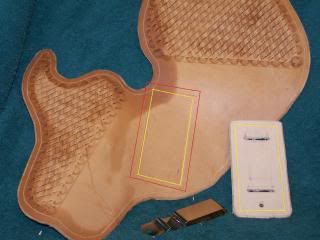 This photo shows that I have finished stamping the border and the Basket-weave pattern on the leather. You may note that the leather is still a little wet. At this point I have constructed a rectangular piece of leather into which I will install a heavy-duty belt clip. I could just cut slots in the back of the holster and punch a small hole to set the rivet, but I do not want the clip or the rivet in contact with the holstered gun. Therefore, I am going to mount the clip and the rivet on the rectangular piece of leather and then sew that onto the back of the holster. I am attaching it before I sew the man seam, other wise sewing on the clip/holder, would be problematic (although, it can be done, but it is so much work, it is best to avoid it.). The red lines indicate the position of the outside of the rectangle, the yellow indicates where to punch holes and sew it on. After I layout the position of the rectangle and press lines in the leather to position the rectangle, I dye the leather. One popular way of dying leather is to use "wool" daubers. However, for large pieces I prefer to use a bath method, using a plastic tub in which pour the dye and to dip the leather. It is faster and I think that it makes for a more even dye job. When the leather is set aside to dry, I use a funnel to pour the remaining dye back into the bottle. Dye is expensive so, a lot of leather workers dilute it with denatured alcohol (not rubbing alcohol),...which is a lot cheaper than the thinner that Tandy sells. Being alcohol based, the leather will dry fairly quick. When it is bone dry, rub the leather with a cotton rag to remove the loose pigment that has accumulated on the surface. 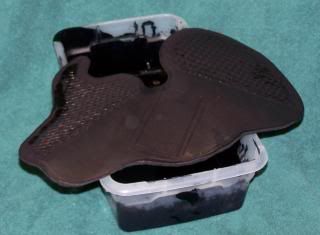 After the leather has dried and been rubbed down, I use the lacing fork to punch holes in the stitch lines on both the rectangle with the clip in it, and the stitch lines on the back of the holster. When using the lacing fork to punch holes, it will become apparent that, the thicker the leather the harder it is to do. In regard to physical work, punching holes with the fork and then getting it out of the leather again is the hardest thing about leather work...the forks do not actually remove any leather, they just push it out of the way, like driving a nail. I use two such forks (both 3mm spacing), one with five points and one with only two. The two pointer is used to follow curved lines, the five (also available in six), is used for following straighter lines. To keep your spacing with the forks, use one point inserted into the last hole, so in effect, you are advancing one-hole less than the fork has points. An alternative would be to use a spacing wheel, roll it along inside the spacing groove while pressing down. But, I find using the fork to space and punch holes at the same time, easier. Also note that the punched holes will begin to close-up after awhile, making it harder to sew (lace). you will need a soft-wood board under the leather when you punch the holes. 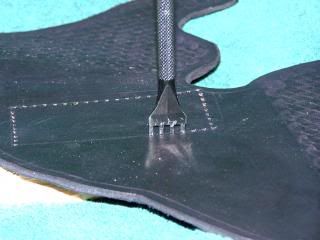
Last edited by dahermit; July 12, 2013 at 01:55 PM. |
|
|
|
July 14, 2013, 05:37 AM
|
#8 |
|
Senior Member
Join Date: October 28, 2006
Location: South Central Michigan...near
Posts: 6,501
|
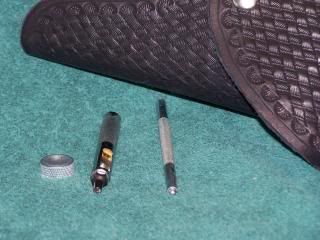
At this stage, I am going to assemble the belt clip device, the rectangular leather with two slots cut into it to slide the clip in behind the leather and a "relief" slot to hold the bend in the clip. I also will punch a small hole in the leather that will align with the hole in the clip and secure it with a rivet. The Slot Punch, hole punches and the Quick Rivets are available from Tandy.
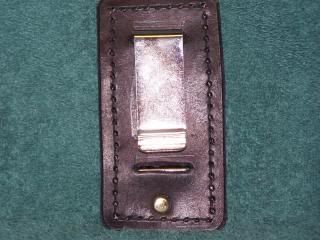 This is the front of the belt clip assembly. 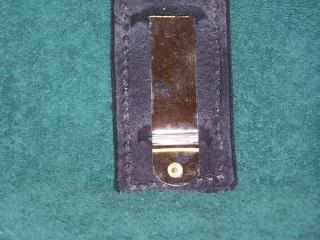 This is the back of the assembly that will butt-up against the back of the holster. 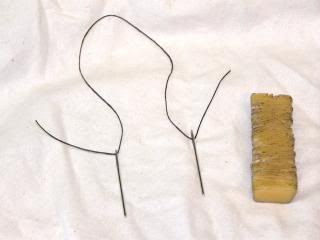 Preparing to sew the Belt Clip Assembly to the the back of the holster. To "Saddle Stitch" you will need at least two special, large and blunt needles (Buy a pack of 10 minimum, you will lose some, break a few). Also, you will need some very strong thread/cord which is available from Tandy (and other cheaper suppliers) in several colors and weights. A small bar of Bee's Wax is very handy even though the tread can be obtained pre-waxed. For Saddle Stitching, a long piece (a short piece is show for illustrative purpose), of thread is assembled as shown, with a needle at each end and the ends doubled-back against the thread. That is where the Bee's Wax comes in...it acts as a "glue" to help keep the ends of the tread from slipping out of the eyes of the needles. The pieces of leather that are going to be sewn together are aligned with their pre-punched holes (you punched the holes with those "pickle-fork", lacing punches), and one of the threaded needles is pushed through the two corresponding holes to half-way the length of the thread. Then one of the needles is threaded through the next hole until the slack is pulled from the thread. Then the other threaded needle is pushed from the opposite side and the slack pulled through. At this point, you will have one threaded needle hanging out one side and the other needle hanging out the other. Continue sewing/lacing the consecutive holes. If you do not understand this verbal explanation, you can find videos and still illustrations (a picture is worth a thousand words), of what Saddle Stitching is on the Tandy web site. 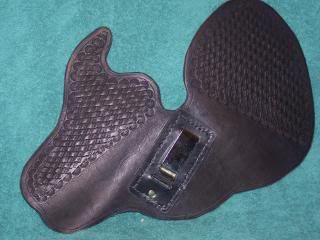 The photo shows the holster with the belt clip assembly sewn on. When adding objects and devices (belt loops, clips, snaps, rivets, etc.) you must pre-plan the sequence least you "paint yourself into a corner". Consider how I would have sewn-on the belt clip assembly if I had sewn the main seam first. It could be done, with modified needles and the use of a medical hemostat, but trust me, you do not want to be in that position. Last edited by dahermit; July 14, 2013 at 06:05 AM. |
|
|
|
July 14, 2013, 07:07 AM
|
#9 |
|
Senior Member
Join Date: October 28, 2006
Location: South Central Michigan...near
Posts: 6,501
|
On this holster, I am going to use a snap for the closure on the cover flap. Again, it is easier to attach the snap before sewing the main seam.
 Snaps are available from Tandy as are to tools for applying them. Shown here are the snap tools and a hole punch that comes as a kit with several different size punches. Snaps are available from Tandy as are to tools for applying them. Shown here are the snap tools and a hole punch that comes as a kit with several different size punches.Once the snap is attached, I will make and punch holes in a Welt that will go between the sides of the main seam to give the holster stiffness, and a more aesthetically pleasing shape. 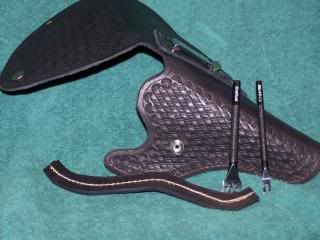 I have used an adjustable groove spacer, set a little wider than the setting I used to lay out the main seam on the holster, so that when the main seam is sewn, the welt will stand a little proud of the seam, allowing it to be trimmed flush. I punch holes in the welt and place it between the sides of the holster and saddle stitch the three thickness together. Noting that holes punched with those "pickle-forks" do not remove leather like hole punches do...they displace it and it has a tendency to go back where it came from and the holes will partially close. So, an awl is used to enlarge the holes again. The awl also does not remove any leather, just spreads it out to temporarily allowing the needles to pass through easier. The awl has a triangular shape in cross-section and is used by pushing thorough the hole and twisting in a circular motion to spread the leather out of the way. An awl is a very valuable tool for leather work. Again, Tandy has them, but instead of the changeable blade type as they sell, I wanted a more secure bladed one (had a changeable-blade one before, did not like it), so I made one out of a wooden handle and a small triangular file which I epoxied into place. 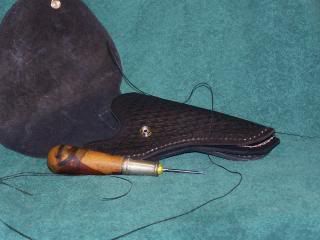 This photo shows the home made awl and the saddle stitched main seam almost finished. 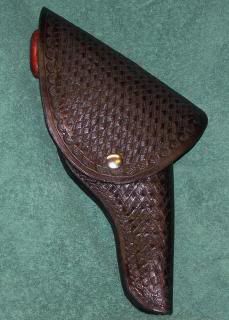 After the main seam has been finished, I trim off the welt flush with the holster using a utility knife, carefully! After trimming, I use the sanding drum on the Dremil Tool to sand the welt flush and smooth with the edges of the seam. For areas that the drum is not appropriate, use Emory Boards. It is notable that the smoother the leather is sanded, the better the effect of Burnishing will be. So, go over all the edges (including the flap edge), with successively finer grits of sandpaper. When you are satisfied with the sanding, touch-up the sanded edges with dye on a Q-tip. When the dye dries, apply shoe polish very liberally over the entire holster including the inside of the flap. Pay special attention to the edges you have sanded and re-dyed. When the polish has dried as per the instructions on the shoe polish can, buff the holster surface with a soft cotton cloth. Also, buff the leather edges. At this point, you will burnish the edges. For the one-thickness of leather of the flap and the other areas where the leather is a single-thickness, you may use a round Tandy burnishing tool to slide back and forth rapidly to produce a shinny, finished edge. The Welt and seam area being too thick for the Tandy round burnisher, a smooth plastic tooth brush handle will produce the desired burnished finish. Note, there are alternative burnishing procedures. Some use egg whites as a burnishing compound, others buy commercial burnishing compounds. 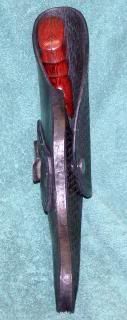 This photo shows the welted, burnished main seam. This photo shows the welted, burnished main seam.
Last edited by dahermit; July 14, 2013 at 07:47 AM. |
|
|
|
July 14, 2013, 07:42 AM
|
#10 |
|
Senior Member
Join Date: May 27, 2011
Location: Ohio-Kentucky - florida
Posts: 1,221
|
Homemade holster process
Thanks for the post and pics. VERY nice work! In the future post some other types being made if possible
|
|
|
|
July 14, 2013, 07:51 AM
|
#11 |
|
Senior Member
Join Date: October 28, 2006
Location: South Central Michigan...near
Posts: 6,501
|
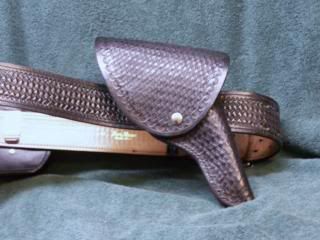
Here are a few pictures of the finished Full-flap holster as produced in this thread.
|
|
|
|
July 14, 2013, 07:57 AM
|
#12 | |
|
Senior Member
Join Date: October 28, 2006
Location: South Central Michigan...near
Posts: 6,501
|
Quote:
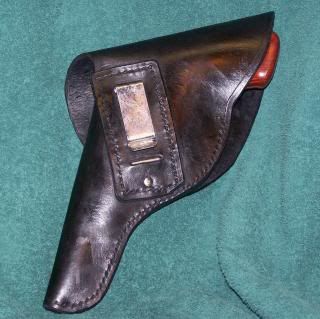
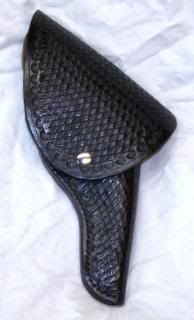
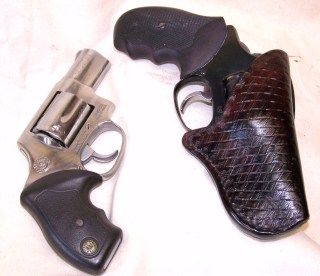 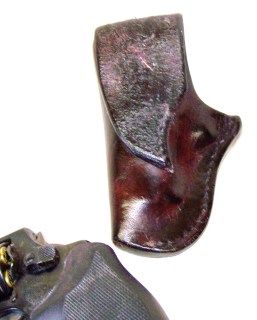 This is an open-top, integral sewn-on drop-loop, belt holster, no retention strap, holster for a S&W 13 Snubbie. 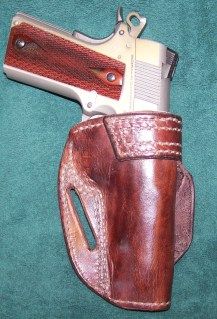 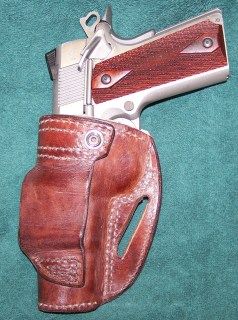 This is a copy of an "Askin's Avenger", wet molded to the gun, complete with a snap to receive the removable retention strap (not shown). This is a copy of an "Askin's Avenger", wet molded to the gun, complete with a snap to receive the removable retention strap (not shown).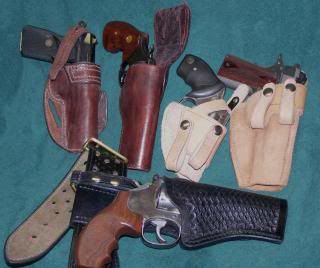 A collage of several of the holsters I have made. Note the "rough-out" for the Snubbie; it has a thumb-break retention snap. If I had to use a retention strap, thumb-break (in my opinion), is the best way to go...hit it with your thumb, and the gun pops free. A collage of several of the holsters I have made. Note the "rough-out" for the Snubbie; it has a thumb-break retention snap. If I had to use a retention strap, thumb-break (in my opinion), is the best way to go...hit it with your thumb, and the gun pops free. This is another open-top, integral sewn-on drop-loop, belt holster, no retention strap, holster for a S&W 36 Snubbie... the one on the left has a Kangaroo lining. This is another open-top, integral sewn-on drop-loop, belt holster, no retention strap, holster for a S&W 36 Snubbie... the one on the left has a Kangaroo lining.
Last edited by dahermit; July 14, 2013 at 04:50 PM. |
|
|
|
|
July 14, 2013, 01:06 PM
|
#13 |
|
Senior Member
Join Date: June 14, 2007
Location: Louisiana
Posts: 797
|
Great craftsmanship in leather. Thanks for posting not only the flap holster process but your other holster projects.
|
|
|
|
July 14, 2013, 04:48 PM
|
#14 | |
|
Senior Member
Join Date: October 28, 2006
Location: South Central Michigan...near
Posts: 6,501
|
Quote:
 Mine are mostly for my own guns, and given away as gifts. I have sold a few on Ebay at nominal prices (less than cost), but even when someone shows enough interest to request a custom made holster, they do not want to pay any more than what they saw them go for when I listed them to gage interest. In short, a lot of interest, but not much willing cash. Mine are mostly for my own guns, and given away as gifts. I have sold a few on Ebay at nominal prices (less than cost), but even when someone shows enough interest to request a custom made holster, they do not want to pay any more than what they saw them go for when I listed them to gage interest. In short, a lot of interest, but not much willing cash.
|
|
|
|
|
July 14, 2013, 05:18 PM
|
#15 |
|
Senior Member
Join Date: October 2, 2007
Posts: 641
|
dh, 7/15/13
Great pictures and tutorial. I've made seven or eight holsters but they don't show the fine work like yours. If you were going to bone/shape your holster to a particular gun where would you do it in your tutorial (ie- before dying but after sewing?)? Thanks. best wishes - oldandslow |
|
|
|
July 14, 2013, 07:04 PM
|
#16 | |
|
Senior Member
Join Date: October 28, 2006
Location: South Central Michigan...near
Posts: 6,501
|
Quote:
The rounded rectangular pads on the clamps are handy for forming the leather around the curves of the trigger guard area...but you have to be careful how much pressure you use, to avoid leaving marks in the leather from the clamp-pads. I will sometimes use layers of scrap leather cut to the contours of the underside of the gun to form the holster to the shape of the gun and keep the clamps from leaving indentations. A couple of observations: When developing a cardboard pattern and fitting it around a gun, the actual leather as cut, will usually come up short in that while the pattern wraps around the gun well, the actual leather fit will be variable in that very thick leathers will not wrap as far around as thinner leathers cut from the same pattern. And, the thinest leathers are still thicker than the cardboard pattern. If one finds one's self in that predicament (cut leather is not fitting far enough), sometimes added a thick welt of leather or two to the seam will not only add to the aesthetics of the holster, but salvage the leather. Also, if a basket or otherwise stamped pattern is applied to the holster, you are more likely to be able to form the leather around the holster carefully using your fingers, than using a toothbrush handle or boning tool...the tools will be detrimental to the stampings. Wet forming the holster with your fingers will also result in stampings losing some definition. Sometimes you will have to make a choice between a neat looking basket-weave holster, or an unstamped but boned, form-fitting one. For concealed carry, it makes more sense to for go stamping for form-fitting pragmatism. If you sew the seam before dying, it will be observed that the wax on the thread will get onto the un-dyed leather and inhibit the dye from coloring the leather uniformly. That is why I prefer to dye the leather before sewing. But I have done it both ways. Making a holster has one thing in common with playing chess...you must think several moves ahead. Another note: When making the pattern on cereal-box cardboard, a set of Draftsman French Curves are very handy for drawing smooth, irregular curves. Last edited by dahermit; July 14, 2013 at 07:30 PM. |
|
|
|
|
July 27, 2013, 01:29 PM
|
#17 | ||
|
Junior member
Join Date: February 23, 2012
Posts: 921
|
This is overall a good how-to. I would only offer a couple of alternative suggestions.
I would suggest manila file folders for making patterns. The existing fold can be used for your centerline. Most holster patterns are at least partly symmetrical, some fully. Folding and cutting both sides at once helps in keeping both sides the same. Most professionals will glue the mainseam before stitching. This is easy to do and results in a stronger seam with a more finished looking edge that will often look like one single piece of leather. You can certainly dye after the main seam has been glued/stitched and sanded. It's a good idea to clean the surfaces with alcohol to remove any contaminates like wax and skin oils. If you use a stitching pony to do your stitching, wax is not really an issue. One advantage of dying after stitching the main seam is that the holster can be wet formed while the dye is drying. I do this by inserting the handgun in a heavy ziplock bag and then into the holster while it dries overnight. Dampening the leather for tooling, called "casing" should be done a little differently. You do not have to soak it but dampen it well. Allow it to dry until the surface is turning to its original color. It should still feel cool and slightly damp. This may be best done overnight in a plastic bag. Properly cased, you should not have to re-dampen the leather before your stamping is done unless you're doing extensive tooling of a big gunbelt. The leather shouldn't look damp like it does in this pic: You should not have to strike the stamp more than once or twice to make a good impression. Professional grade stamps will have a very sharp end that your mallet or maul should grab and avoid glancing off. Stamps from Tandy will need to be filed flat. Quote:
Quote:
|
||
|
|
|
July 27, 2013, 01:38 PM
|
#18 | ||
|
Senior Member
Join Date: October 28, 2006
Location: South Central Michigan...near
Posts: 6,501
|
Quote:
Quote:
|
||
|
|
|
July 27, 2013, 01:49 PM
|
#19 | |
|
Senior Member
Join Date: October 28, 2006
Location: South Central Michigan...near
Posts: 6,501
|
Quote:
As for "...should be done a little differently...", there are several ways of doing something, the important thing is the result and no one is the ultimate expert...not even you. Feel free to do your own "How to make a holster", and post the pictures of the your results. Or, just keep posting your criticisms here...it is a free country after all. 
|
|
|
|
|
July 27, 2013, 02:01 PM
|
#20 | |
|
Senior Member
Join Date: October 28, 2006
Location: South Central Michigan...near
Posts: 6,501
|
Quote:
|
|
|
|
|
July 27, 2013, 02:03 PM
|
#21 | |
|
Senior Member
Join Date: October 28, 2006
Location: South Central Michigan...near
Posts: 6,501
|
Quote:
|
|
|
|
|
July 27, 2013, 03:51 PM
|
#22 | |
|
Junior member
Join Date: February 23, 2012
Posts: 921
|
There is no need for hostility here. I've done nothing to provoke such a response and went out of my way not to. I appreciate the time and effort it took to produce this how-to and do not wish to insult that effort.
However, this is posted on a public forum for all to see. If you don't want any responses or criticisms, post it to your own blog. Glue is not used to "fill in divots", whatever that means. It is no problem at all in doing a welt, full or partial. Yes, most professionals use glue for the reasons mentioned. No matter what you do, an unglued seam will separate. I don't claim to be an expert, for I am not. I also did not say you were doing anything wrong. So don't get so defensive. You're obviously not an expert either and your work could use some refinement. As I noted in your stamping and edge work. If you really want to get down to it. I might would post a tutorial but videos from Chuck Burrows or John Bianchi along with what Tandy has online tell much more than I care to. Quote:
|
|
|
|
|
July 27, 2013, 10:03 PM
|
#23 |
|
Member
Join Date: May 29, 2010
Posts: 84
|
One thing is for sure...most all of us do things differently..and that difference shows up in our work...
But to call floral carving feminine....I too take exception...such a comment usually comes from one who can't do it. |
|
|
|
July 28, 2013, 07:57 AM
|
#24 | |
|
Senior Member
Join Date: October 28, 2006
Location: South Central Michigan...near
Posts: 6,501
|
Quote:
Now, if you want to look like Hoppy, go ahead and do floral carving on your holsters. Me, just some rather plain basket-weave is as far as I go and in most cases, do not do that, inasmuch as there is no reason to adorn other than for the purpose of display...and Hoppy sure was a "display". |
|
|
|
|
July 28, 2013, 08:02 AM
|
#25 |
|
Senior Member
Join Date: October 28, 2006
Location: South Central Michigan...near
Posts: 6,501
|
edit.
|
|
|
|
|
|


