
|
|
|||||||
| Forum Rules | Firearms Safety | Firearms Photos | Links | Library | Lost Password | Email Changes |
| Register | FAQ | Calendar | Today's Posts | Search |
 |
|
|
Thread Tools | Search this Thread |
 April 28, 2013, 03:53 PM
|
#1 |
|
Senior Member
Join Date: December 21, 2010
Location: Houston
Posts: 223
|
Lartest Step on my Pietta 51 Navy - Defarb
I bought a new Pietta 1851 Navy from Dixie Gun Works last year in my return to C&B revolvers. Since then I've attempted four projects.
Encouraged by what I found on this forum, I tuned it to improve the bolt fit in the cylinder notches and de-burred the internals. Then I removed the "Pietta tail" from the grip and reshaped and refinished the wood grips for a better fit. Next I "antiqued" it to resemble a well used 150 year old handgun. Today in the next step, I've removed the the offending Pietta and black powder only stampings from the sides of the barrel. I did this by draw filing followed by sanding followed by antiquing. Turned out better than I thought it would. |

|
|
April 28, 2013, 04:38 PM
|
#2 |
|
Senior Member
Join Date: January 7, 2012
Location: Auburn, AL.
Posts: 2,332
|
Looks pretty spiffy to me. I like the color.

__________________
. . . Have a Colt and a smile. 
|
|
|
|
April 28, 2013, 04:58 PM
|
#3 |
|
Senior Member
Join Date: November 25, 2012
Location: Eaton Rapids, MI
Posts: 445
|
Looks great!
__________________
Black Powder: Not because it is easy, but because it is hard, because that goal will serve to organize and measure the best of our energies and skills, because that challenge is one that we are willing to accept, one we are unwilling to postpone, and one which we intend to win... |
|
|
|
April 28, 2013, 05:05 PM
|
#4 |
|
Senior Member
Join Date: September 8, 2007
Location: Mississippi
Posts: 16,189
|
Looks good.

|
|
|
|
April 28, 2013, 05:39 PM
|
#5 |
|
Senior Member
Join Date: October 24, 2008
Location: Naples, Fl
Posts: 5,440
|
Yes...
I like the finish on the pistol.
Give me some ideas.
__________________
Seek truth. Relax. Take a breath. |
|
|
|
April 28, 2013, 07:58 PM
|
#6 |
|
Senior Member
Join Date: March 26, 2010
Location: North Georgia
Posts: 128
|
Nice loooooking peestol Mr. Roshi!
 I did one some time ago but I do not shoot it as my fat fingers are a kinda tight fit in that small trigger guard and the gun has a "hair trigger". It was pretty well used when I bought it. I don't need any accidents  so it made a good antiquing project. so it made a good antiquing project.
__________________
"Peace is that brief glorious moment in history when everybody stands around reloading" - Thomas Jefferson .-- |
|
|
|
April 30, 2013, 08:01 AM
|
#7 |
|
Senior Member
Join Date: September 7, 2012
Location: Crockett, Texas
Posts: 363
|
yeah, that is the look I am trying to go for on the Griswold repro I'm workin on! How did you do that finish? That is exactly what I am aiming for!
__________________
"I'm your huckleberry, it's just my game" |
|
|
|
April 30, 2013, 09:30 AM
|
#8 |
|
Senior Member
Join Date: December 21, 2010
Location: Houston
Posts: 223
|
My method
I'd advise you search on this forum for various recipes.
Experiment, you can always get back to a white metal finish. I remove all the bluing using either Birchwood Casey Rust & Blue Remover or white vinager. Then I let it rust a little to discolor the metal in spots and remove it partiallly with extra fine steel wool. You may get the effect you're after with this treatment. You may have to repeat the rusting and steel wooling. You can also apply cold bluing and then remove it with diluted white vinager and rinse with water followed by light steel wooling and then finished with a light coat of oil. Please do remember to remove all rust from the cylinder chambers and the bore! If you don't like the way it turns out you can start all over again. Some vinager, steel wool, followed by rinsing and bit of metal polish (Flitz) will bring it back to a white metal finish. Many use browning solutions. When you are at the rust stage from the vinager if you drop the parts in boiling water the rust will often turn black which is actually a form of rust bluing. You can then use steel wool to get to a true blue or work with diluted vinager on a rag to get what you like. Please note that unless you rinse the parts thoroughly with water or neutralize the vinager (acetic acid) with baking soda, the vinager will continue to work on the finish. |
|
|
|
April 30, 2013, 11:09 AM
|
#9 |
|
Senior Member
Join Date: August 21, 2008
Location: Kansas City
Posts: 1,393
|
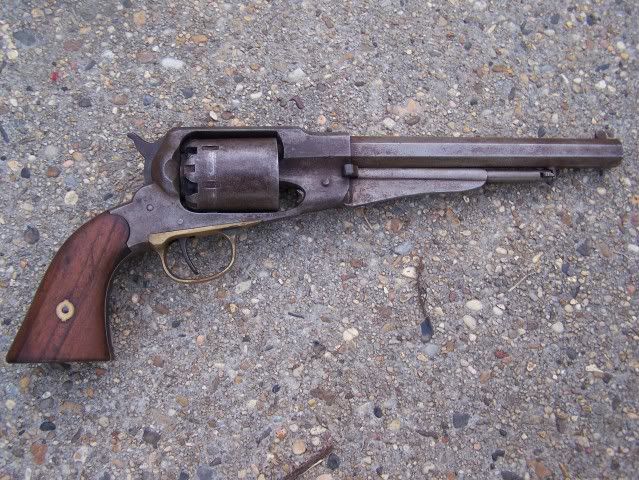
This is my pistol I use in the National "As Issue" matches. I defarbed it and
used vinegar on it followed with a coating of mustard. 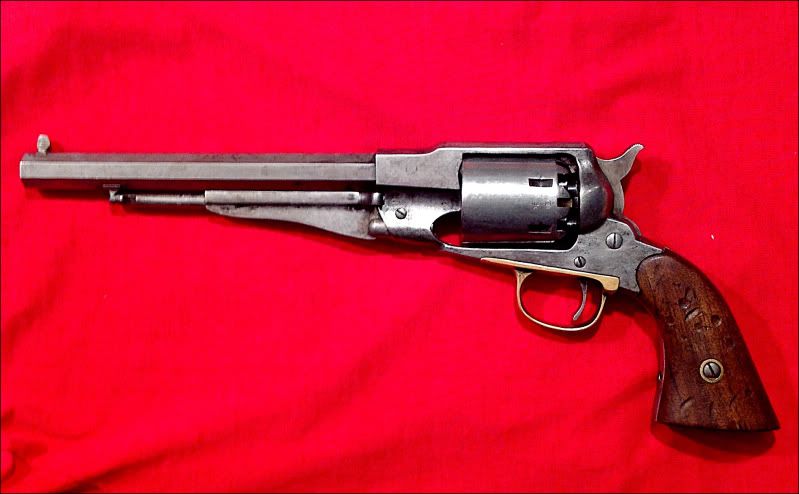
|
|
|
|
April 30, 2013, 01:20 PM
|
#10 |
|
Senior Member
Join Date: November 25, 2007
Location: Gooding, ID
Posts: 348
|
Damn fine work there!
|
|
|
|
April 30, 2013, 01:31 PM
|
#11 |
|
Senior Member
Join Date: September 7, 2012
Location: Crockett, Texas
Posts: 363
|
Sweet! I'm going to try the vinegar technique, I have some birchwood casey plum brown, but I think I'm going to give your technique a whack. I don't really want it brown, I just want it to look aged.
__________________
"I'm your huckleberry, it's just my game" |
|
|
|
April 30, 2013, 05:23 PM
|
#12 |
|
Senior Member
Join Date: September 7, 2012
Location: Crockett, Texas
Posts: 363
|
do you immerse the pieces into the vinegar, or just brush it on. Reason I ask is for the bore and the cylinders before I do something I'll regret, lol!
__________________
"I'm your huckleberry, it's just my game" |
|
|
|
April 30, 2013, 06:09 PM
|
#13 |
|
Senior Member
Join Date: November 19, 2009
Posts: 3,287
|
Roshi . . . you did a great job on that Navy! It really looks great! I'm partial to Navies and especially those that look like they have been around the block a few times. You can be proud of your work!
kwhi - Your Remmie looks like it just came out of a Cavalry trooper's holster after long use in the war. I've got a Remmie Navy that will be on the way to looking that way as soon as I can get to it. I'm in the process of making new leather for it now so it will have to wait for a while. Thanks for sharing the photos with us fellas . . . nice pics of nice guns!
__________________
If a pair of '51 Navies were good enough for Billy Hickok, then a single Navy on my right hip is good enough for me . . . besides . . . I'm probably only half as good as he was anyways. Hiram's Rangers Badge #63 |
|
|
|
April 30, 2013, 06:20 PM
|
#14 |
|
Senior Member
Join Date: December 21, 2010
Location: Houston
Posts: 223
|
Technique
You can immerse the parts for the quickest process. I never worry about the bore or chambers. I clean them later. You could however coat them with bore butter or vaseline or grease to keep the vinegar off them.
If you don't intend to remove all the bluing then hand applying the vinegar would give you more control. kwhi - that Remmie looks sweet! |
|
|
|
April 30, 2013, 06:38 PM
|
#15 |
|
Senior Member
Join Date: August 21, 2008
Location: Kansas City
Posts: 1,393
|
I wrapped the gun in vinegar soaked paper towel overnight.
|
|
|
|
April 30, 2013, 07:32 PM
|
#16 |
|
Senior Member
Join Date: September 7, 2012
Location: Crockett, Texas
Posts: 363
|
Thanks for the intel, fellas! I still have one stuck nipple in the cylinder (go figure), so after various oils, different wrenchs, etc. I went and bought a propane torch set, so I can try some heat on it. Then, I can proceed with the antiqueing process.
__________________
"I'm your huckleberry, it's just my game" |
|
|
|
May 6, 2013, 04:42 PM
|
#17 |
|
Senior Member
Join Date: February 28, 2013
Location: Detroit
Posts: 435
|
How did you do the antiquing? Did you just sand blast the bluing off and apply a chemical?
__________________
“Peace is that brief glorious moment in history when everybody stands around reloading".” ― --Thomas Jefferson |
|
|
|
May 6, 2013, 05:31 PM
|
#18 |
|
Senior Member
Join Date: September 8, 2007
Location: Mississippi
Posts: 16,189
|
I prolly went further than any of y'all would want to but I like it.
|
|
|
|
May 6, 2013, 05:37 PM
|
#19 |
|
Senior Member
Join Date: November 19, 2009
Posts: 3,287
|
I don't think you went too far Hawg . . . I think it has a lot of "character" . . . . sort of like a gal I used to date many years ago . . sort of "rode hard and put away wet".
To anyone looking at your shootin' iron . . . I can just hear their thoughts . . . "gee, if it could only talk!"
__________________
If a pair of '51 Navies were good enough for Billy Hickok, then a single Navy on my right hip is good enough for me . . . besides . . . I'm probably only half as good as he was anyways. Hiram's Rangers Badge #63 |
|
|
|
May 6, 2013, 05:38 PM
|
#20 |
|
Senior Member
Join Date: September 7, 2012
Location: Crockett, Texas
Posts: 363
|
Dang Hawg, that is beautiful work man!
__________________
"I'm your huckleberry, it's just my game" |
|
|
|
May 6, 2013, 06:02 PM
|
#21 |
|
Senior Member
Join Date: September 8, 2007
Location: Mississippi
Posts: 16,189
|
Thanks y'all.
|
|
|
|
May 6, 2013, 06:51 PM
|
#22 |
|
Senior Member
Join Date: August 21, 2008
Location: Kansas City
Posts: 1,393
|
Your grips need to be beat up some to match. I took a pair of vice grips to
Mine, beat it and squeezed them. |
|
|
|
May 6, 2013, 07:31 PM
|
#23 |
|
Senior Member
Join Date: September 8, 2007
Location: Mississippi
Posts: 16,189
|
[email protected] That gun has been through more roughness than an original that survived the CW. Its been dropped, thrown, dunked in a river a few times, gone through a flood and been rode around in the back of pickup trucks. It has a few dings in the grips but they still had maybe half of the original varnish on them. I took the rest of the varnish off is all I did. I don't think I've ever seen an original with grips as beat up as yours. They do look good tho but I think I'll leave mine as is.
|
|
|
|
May 6, 2013, 07:47 PM
|
#24 |
|
Senior Member
Join Date: December 21, 2010
Location: Houston
Posts: 223
|
One sweet revolver!
Nice work Hawg
|
|
|
|
May 6, 2013, 08:53 PM
|
#25 |
|
Senior Member
Join Date: June 6, 2012
Location: Berkshire Hills
Posts: 741
|
Some beautiful work there fellas. All very nice. I probably will never take the time to defarb any of mine, but damn, those are nice!!
__________________
NRA Patron Member SAF Life Member GOAL Member |
|
|
|
|
|


