
|
|
|||||||
| Forum Rules | Firearms Safety | Firearms Photos | Links | Library | Lost Password | Email Changes |
| Register | FAQ | Calendar | Today's Posts | Search |
 |
|
|
Thread Tools | Search this Thread |
 October 27, 2007, 06:41 PM
|
#1 |
|
Member
Join Date: June 5, 2007
Posts: 53
|
Make your BP revolver look old!!!
I bought a used 1858 Pietta replica from a gun show a couple of weeks ago and I decided to make it look old. I only paid 90 bucks for it so I figured I had nothing to loose in the venture. This revolver had a few scrapes but basically look fairly new and according to the Italian proof marks on the side it was made in 1998 and the owner said he just didn't use it at all and wanted to get rid of it. I looked around on the Internet for pictures of old revolvers and read some write ups from various sites on how to do it and proceeded. I wanted to get rid of all the Italian marks on the side of the frame and "Black powder only" and all the other markings on the barrel to make it look more authentic.
1. Detail stripped it. 2. Using a fine file I removed the markings off of the barrel and the side of the frame, long careful strokes and took my time. The only manufactures mark I left on the barrel was underneath the loading lever so you could see who made it and of course the serial number on the frame. Just removed enough of the metal to erase the markings and then started smoothing the file marks out with 180 grit sandpaper and worked my way up to 400 grit. You would never know there were any marks on it at all now. 2. Using CLR I removed the blueing from only the outside of the frame, didn't touch the inside were the trigger/springs etc go, just left it as is. I plugged the barrel with corks so the CLR wouldn't go inside. This is great stuff, almost instantly removes blueing. I removed the blueing from the heads of the screws and all parts that are visible. For the cylinder I just wiped around it and on the inside of the channels where the nipples go without it getting into the cylinder or the nipple threads. 3. I washed everything in hot soapy water and rinsed and put in the oven on a cookie sheet and turned it to 200 F to dry everything out. Using gloves I took it out and applied Birchwood Casey Plum brown to everything in long even strokes. 4. I washed everything out again with hot soapy water and into the oven to dry everything out again. 5. Now to simply remove some of the browning I just used fine steel wool and removed the browning where it was a little to dark and to the way I wanted it. 6. For the shinny brass trigger guard I simply covered it with liquid Blue and it immediately tarnishes and looks old. 7. Oiled everything and put it back together and that was it. Total time was about 2 hours from start to finish. It looked good without the browning applied and I just might remove some more off it to just have a slight tinge of a tan color and that is it but for now it was kind of fun experimenting. My camera is horrible and someday I will get a new digital one, the lighting was kind of off also but it does look cool and looks like it has seen some hard use. 
|

|
|
October 27, 2007, 07:50 PM
|
#2 |
|
Junior member
Join Date: November 28, 2001
Location: West Tennessee
Posts: 4,300
|
Great project, turned out good!
|
|
|
|
October 27, 2007, 09:27 PM
|
#3 |
|
Senior Member
Join Date: July 23, 2007
Location: Virginia
Posts: 719
|
Looks pretty good, the only thing I would have done different was not have the brass trigger guard so dark but otherwise it does look pretty authentic & old..
Good job bud.. 
|
|
|
|
October 27, 2007, 10:58 PM
|
#4 |
|
Senior Member
Join Date: September 8, 2007
Location: Mississippi
Posts: 16,189
|
Looks pretty good. Here's one I did. It was already pretty old(made in 68) and abused but it had some new parts plus I wanted to defarb it.
|
|
|
|
October 28, 2007, 12:47 AM
|
#5 |
|
Member
Join Date: June 5, 2007
Posts: 53
|
Ya know on second thought maybe I will remove some of the blacking off of the trigger guard, I like the way Haggen's looks a bit better. The nice thing with this is you can experiment as much as you want, you can have the whole revolver disassembled in under 5 minutes, change something and back again in no time at all.
|
|
|
|
October 28, 2007, 11:43 AM
|
#6 |
|
Member
Join Date: June 5, 2007
Posts: 53
|
Hawg Haggen: I was thinking about adding some surface rust and fine pitting. My grandfathers civil war colts all have pitted and rusted barrels and cylinders so I think I will try and duplicate them somehow. I was thinking of stripping it down to bare metal again (no big deal) and oiling the heck out of the internal areas, inside the cylinder cavity and plugging the barrel. Then putting it inside my down stairs shower and putting the humidifier in there and see what happens. The steam and the heat should work fairly quick and I would check it every couple of hours or so. Any thoughts?
|
|
|
|
October 28, 2007, 01:04 PM
|
#7 |
|
Senior Member
Join Date: September 8, 2007
Location: Mississippi
Posts: 16,189
|
I used vinegar and salt on mine and let it sit for a couple of days. Looked really rough afterwards but when cleaned off was only surface rust. Mine had some minor pitting already but I imagine if you let it sit long enough it would get some pits. I took all the internals out and coated the bore and chambers with a good coat of bore butter. It would look really aged if you got a fine coating of pits and buffed it down to white metal but once pitted there's no undoing it. You can see pics on the thread I started titled anybody ever antiqued a gun?
|
|
|
|
October 28, 2007, 01:33 PM
|
#8 |
|
Member
Join Date: June 5, 2007
Posts: 53
|
Hawg: So I just read your thread on the salt and vinegar mixture and I think I will give it a try and see what happens, should be fun.
|
|
|
|
October 28, 2007, 02:31 PM
|
#9 |
|
Senior Member
Join Date: September 8, 2007
Location: Mississippi
Posts: 16,189
|
I hope it gives you the look you want. I mixed salt in vinegar till it quit dissolving and put the mix in a spray bottle. Hung the gun up and sprayed it down good. I let it sit for a couple of days while I was gone and I thought I'd gone too far when I saw it but it didn't have any new pits. I haven't done anything to neutralize the salt since I did it, just clean as usual and it hasn't rusted anymore. Might take a week or so to actually start pitting but if it was me I'd clean it off some every few days to check progress.
|
|
|
|
November 20, 2007, 02:17 PM
|
#10 |
|
Senior Member
Join Date: November 16, 2007
Posts: 257
|
Hi everybody,
first post here. I have a replica 1860 Colt, Sheriff model that I have been working on. I took off all the farby lettering on the barrel w/ heavy sand paper and down to 400 grit. Then I used Tru-Brown and let it rust really deep. Still have that case hardening, not sure whether to leave that as-is or remove it and brown that too. So this is my project gun, I may do more work on it later. I tried keeping the barrel oiled up good, but a little pitting did happen near the ends especially the forcing cone area. Still shoots good though. |
|
|
|
November 20, 2007, 03:24 PM
|
#11 |
|
Senior Member
Join Date: September 8, 2007
Location: Mississippi
Posts: 16,189
|
It looks better than mine does except the case hardening looks out of place.
|
|
|
|
December 4, 2007, 08:56 PM
|
#12 |
|
Junior Member
Join Date: May 6, 2007
Location: Littleton, CO
Posts: 14
|
Haggan, that looks awsome. I just picked up an old kit for cheap and was going to do the same thing to it. I may have a couple questions for you when I get started. Thanks
|
|
|
|
December 5, 2007, 04:18 PM
|
#13 | |
|
Senior Member
Join Date: September 8, 2007
Location: Mississippi
Posts: 16,189
|
Quote:
|
|
|
|
|
December 9, 2007, 10:55 PM
|
#14 |
|
Junior Member
Join Date: May 6, 2007
Location: Littleton, CO
Posts: 14
|
Looks good, 44. I wonder if you could age the case hardening without totally losing it? You got that look with tru brown? I can't decide if I like that or the salt n' vinagar look more. Maybe the tru brown for the over all look and then use the salt n' vinagar to get some pitting. I wonder which should go on first? Might have to get another kit, now that I know where to find a steel frame 1860 Army kit.
|
|
|
|
December 10, 2007, 05:29 AM
|
#15 |
|
Senior Member
Join Date: September 8, 2007
Location: Mississippi
Posts: 16,189
|
I'd do the pitting first if it was me. Mine has a few tiny pits but they were already there. I let mine sit for two days and it didn't pit. I know it will with that treatment just don't know how long it would take. I removed the grips and all the internals plus liberally coated the bore and chambers with bore butter before doing mine. Mine was an old gun to start with and the grips already had a few small dings and a clear coat that was mostly worn away. I took some steel wool and removed the rest of the clear and that's all I did to them. As for CCH, you hardly ever see an old gun that's turned brown that still has traces of it.
|
|
|
|
December 10, 2007, 09:41 PM
|
#16 |
|
Junior Member
Join Date: May 6, 2007
Location: Littleton, CO
Posts: 14
|
I recently built an AK and wanted that battlefield pick-up look. I had to use a new handguard and rubbed in used motor oil to make it look like the old original buttstock and pistol grip. I was amazed at how well it gave the effect of aged wood. I distressed it first by beating and gouging it with different things, ended up looking pretty authentic, and quit smelling like a truck-stop in a day or two. I think you are right on the order of treatment.
|
|
|
|
December 12, 2007, 10:32 PM
|
#17 | ||
|
Senior Member
Join Date: November 16, 2007
Posts: 257
|
Quote:
HH was right, that casehardening looked out of place. So I removed it. Took a while, used some Birchwood Casey bluing & rust remover and steel wool. Then I tru-browned it. I think 4 coats did it. I let 'er rust good and thick each time in a humid room. I did the hammer too but didnt get the casehardening all off before browning. I'll try to get a pic when I can. It looks a lot better now. Quote:
 but that casehardening was a dilemma for a while. Wait till you see the new pic when I get it. |
||
|
|
|
December 12, 2007, 11:02 PM
|
#18 |
|
Senior Member
Join Date: September 8, 2007
Location: Mississippi
Posts: 16,189
|
Mine was just an old beater nobody else would want to start with but I've had it since I was 12 and didn't want to lose all it's personality. Besides salt and vinegar is cheaper than browning
I'd really like to see the pics.
|
|
|
|
December 13, 2007, 06:31 PM
|
#19 |
|
Junior Member
Join Date: May 6, 2007
Location: Littleton, CO
Posts: 14
|
Yeah, I gotta see pics. Ordered a kit for the boy from the Possibles Shop and they sent me the wrong kit. Called them, and they called me right back, late on a Saturday, and got me fixed up right. Good folks, I would do business with them again. Anyway, I'll post picks of my work when I get it done. I haven't shot BP in years, seeing you guys' stuff got me back into it. Both our kits have brass frames, but I really want a steel-framed 1860 Army or '51 Navy.
|
|
|
|
December 28, 2007, 10:39 PM
|
#20 |
|
Senior Member
Join Date: November 16, 2007
Posts: 257
|
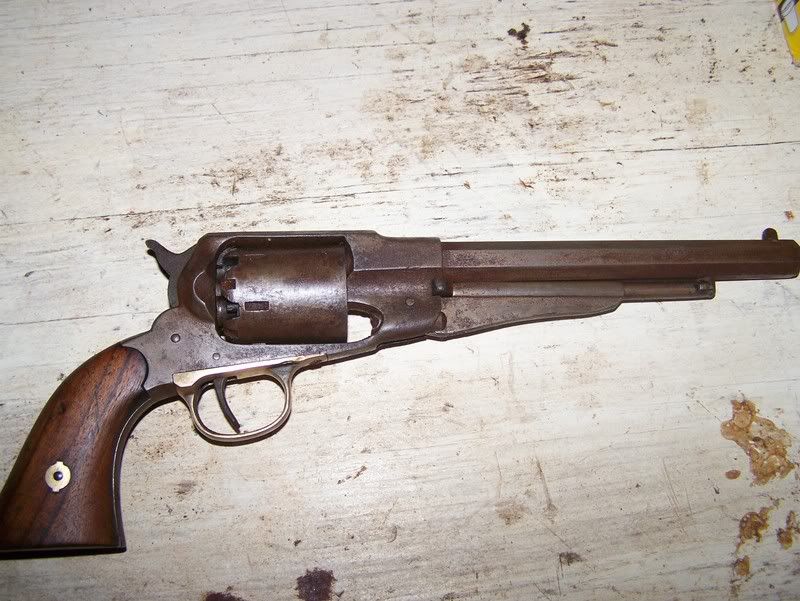
Here's that pic I promised
Here ya go.... I got rid of that case hardening and also darkened the grips. Looks more authentic now.
I don't know how to make the pic show up in the message, it's attached as a jpg file. |
|
|
|
December 28, 2007, 10:49 PM
|
#21 |
|
Senior Member
Join Date: September 17, 2005
Location: Youngtown Arizona
Posts: 1,135
|
I know a guy that rubbed down a brand new winchester with steel wool to make it look more "authentic"
 :barf: :barf: I cant get into it, if they wear from use thats one thing but I would just about cry if you scratched my gun. Is it a BP thing? |
|
|
|
December 28, 2007, 10:59 PM
|
#22 |
|
Senior Member
Join Date: November 16, 2007
Posts: 257
|
The way I figure is, new guns get scratched too easy. If you want to keep 100% bluing you might as well never fire it, just keep it in the safe.
I was going to do that with this 1860 Colt replica. Well one day I put a big gouge in the finish trying to punch out the barrel wedge. That was the end of the nice finish. From there it was, "anything goes". I might brown or blue a modern firearm too, if it got messed up that way. I guess it would depend. |
|
|
|
December 29, 2007, 12:20 AM
|
#23 |
|
Senior Member
Join Date: September 8, 2007
Location: Mississippi
Posts: 16,189
|
Looks good 44. Much better without the CCH.

|
|
|
|
December 29, 2007, 12:28 AM
|
#24 | |
|
Senior Member
Join Date: September 8, 2007
Location: Mississippi
Posts: 16,189
|
Quote:

|
|
|
|
|
December 29, 2007, 03:02 AM
|
#25 |
|
Senior Member
Join Date: April 7, 2006
Posts: 10,984
|
100 years ago the guns didn't look like that. They were new.
|
|
|
|
|
|


