
|
|
|||||||
| Forum Rules | Firearms Safety | Firearms Photos | Links | Library | Lost Password | Email Changes |
| Register | FAQ | Calendar | Today's Posts | Search |
 |
|
|
Thread Tools | Search this Thread |
 March 25, 2011, 02:11 AM
|
#1 |
|
Member
Join Date: February 15, 2007
Posts: 75
|
Choke and Bore error/ deformities pictured, Kirbythegunsmith
This is a pictured choke installation in a thin Winchester Model-12 barrel that was previously done by someone as a gunsmithing student project that went awry some years back, and recently was sent to me for a barrel change. Notice that there was no meat left to retain a bead, so no bead was installed in this cut-down barrel that was then just over minimum legal length. The one side is considerably thinner than the other (and the thick and thin areas are marked with the added arrows) and a choke wrench slipping made the indicated muzzle deformity- evidently some time in the past.
Due to the thin side present, the owner decided that the barrel might have been better scrapped rather than take a chance on the choke flying free and splitting the barrel wall. The barrel would have been too short if the offending choke had to be cut off, so in the mind of the owner, the original barrel was useless. 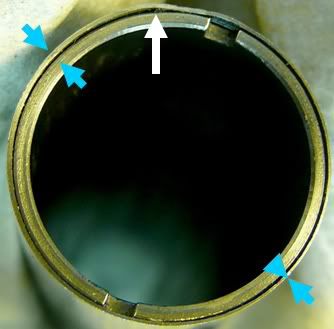 A close look into the interior shows the type of marks that have made me thoroughly detest any aftermarket choke installation done with (in my professional opinion) defectively-designed tooling that was designed to bore out the existing choke in a barrel with an extended section of the reamer front end, since that section of cutter can drift and cut heavier on one side due to piloting alignment limitations. See that the marks behind the choke tube hole are uneven and actually has one side of the barrel bore untouched past a certain point, and the opposite side is heavily scraped. That is a problem that I noticed was unavoidable when those tooling designs were first offered to the trade, and I knew I would not be able to perform a straight and precise high quality choke installation with those tools that seem to be in use in a large number of establishments. My question to those firms would be whether they had put any thought into the tooling design prior to use and realized that it was less than optimal but still all that was conveniently available, or just decided if everyone else does it, it must be good enough for the uninformed public? I say it is definitely not OK, and will never use any such type of tooling. The other main issue I have with that tooling is the fact that the pilot is attached to an extended nose shaft that is several inches long ahead of the cutting section to reach past an existing choke in a barrel, and the pilot must be attached after being inserted from the chamber end of the barrel and screwed in place with a 3 foot screwdriver. How can a cutter go straight when a pilot is mounted several inches from the cutting section? This is still the situation in a cut off barrel with no choke present- such as in the example pictured. See why I believe the tooling design has limitations? Imagine in the .410 size the amount of shaft flex that could be induced with little force. Recipe for disaster? Just because a tool is being sold to the trade, doesn't mean that it is up to doing an accurate and suitable job as a buyer would expect. If it sells, that makes it a success to the maker, but the people have been known to buy a Pet Rock, so what does that tell you? If you have an aftermarket tube installation in a shotgun barrel, check to see if you have a similar scraped section inside the bore behind the choke tube hole. If your bore was especially small, there will be a sizable counterbored section cut all around behind the choke tube hole, and I've never seen even one of those installations that had a little polishing done (even a minimal level of effort) to that horribly scraped area behind the choke. (If your barrel bore is larger than the diameter of the choke relieving section of the tool, there may be a remnant of the original fixed factory choke remaining in the barrel to affect pattern performance) I have had many shooters that I told about this problem state that their installation was exactly just as I said, with loads of fouling likely to be present in that roughened area. 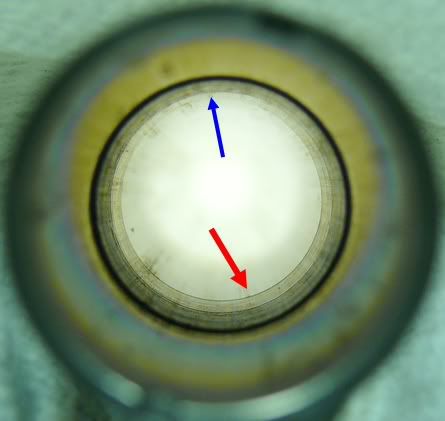 See how thin the barrel wall had become from the unfortunate choke installation and even had visibly obvious threads showing in the exterior profile.  This view is even more shocking. 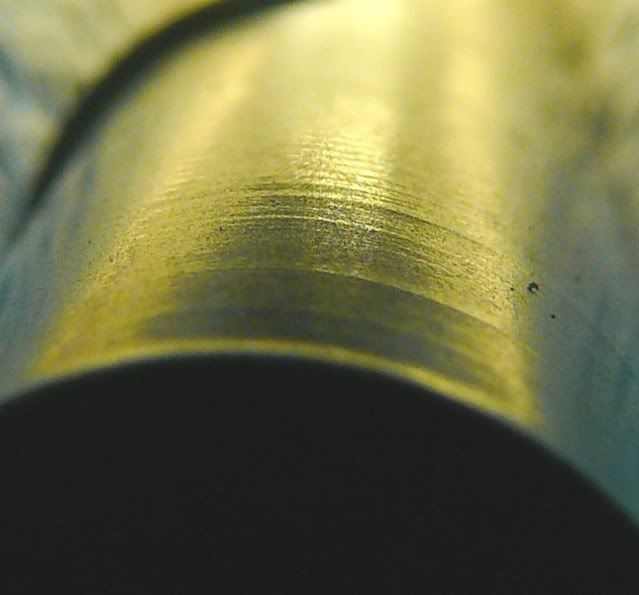 Another barrel was expected to be installed in place of the condemned original barrel, but it was found to have been bent and reworked by an inexperienced person that created bore deformities that were visibly obvious and made the replacement barrel an undesirable alternative. The distortions are visible in these next pictures. I have seen many barrels in various stages of damage- from dents/dings, warps and bends, kinks, and can say that about the worst is probably the dog-leg i.e. been bent and straightened in a spot other than the offending bend. Anything that I tell a shooter, I can explain and in almost every case, can drag out a picture from my archives. I don't need to make a brand-new picture to make a point of a relevant job that I may have pictured almost 2 years ago, such as a Winchester 101 internal parts configuration, for instance. 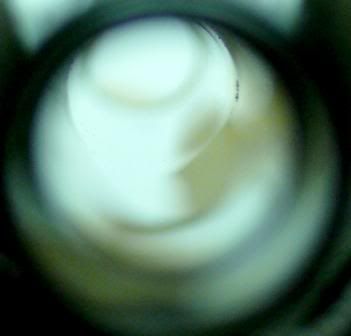  The necessary alternatives that were offered and subsequently performed for the owner will be detailed next time. The repair was actually less than anyone charges for just a barrel swap on any Model-12, by the way. Kirby I hope this information does not upset readers that were taken in by defective choke installations, but the alternative of remaining blissfully unaware is something that may not necessarily be realistic in the long term. I show the reality and hope that the maturity level is sufficient to withstand the revelations I post.
__________________
[email protected] New gunsmithing website: http://theshotgunshop.net/ Articles containing valuable information are on every page. |

|
|
March 25, 2011, 08:18 AM
|
#2 |
|
Junior member
Join Date: November 25, 2002
Location: In my own little weird world in Anchorage, Alaska
Posts: 14,172
|
Thats why we use Briley
 WildnohasslesthenAlaska ™©2002-2011 |
|
|
|
March 26, 2011, 02:39 PM
|
#3 |
|
Member
Join Date: February 15, 2007
Posts: 75
|
Choke and Bore error/ deformities pictured, Part 2, Kirbythegunsmith
Part 2
Being mindful that a barrel change was the first thought of the owner, the inspection of the old barrel vs. the barrel expected to replace the previous one ought to be a significant upgrade in some aspect, and in the initial choice, there was an already-attached variable choke. At least the cost of re-choking was already covered by another shooter. One other downside to the swap was the fact that the previous gunsmithing school project nature of the beast was the inclusion of a reblue over a bead-blasted matte non-reflective refinish of the gun to go along with the short riot barrel length alteration. The replacement barrel was of conventional Winchester blue finish and would have been a mis-match to the rest of the gun finish. That might not matter for a knockabout field hunting gun, but it is a point, nonetheless. I did spot those bore imperfections that are pictured in the previous post, but all by themselves, they might not cause rejection since some deformity reduction was a definite possibility if deemed necessary to put the barrel into service. Cutting the barrel to remove the deformities would have made the barrel less than 16". A close examination of the Herter's choke in place showed that the collet fingers that are squeezed by the threaded collar used for adjustment had been bent or kinked from shot pounding over the years and would no longer spread to an open choke. With the collar removed, the diameter was around a Modified choke, with the internal length of the (now fixed or unadjusted, at present) tapering section under 7/16". Ever see a choke that short before? When the collar was tightened down, the constricting length was a whopping .8" to an XFULL diameter of choke. See here that the unfettered diameter is 17.8 MM on the gauge. 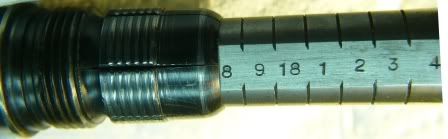 Notice that the collet fingers have little remaining gap in the slits- especially close at the front edges.  I noticed that a subtle ring can be seen in the tapering area from this rear view of the choke interior. Can you spot the inner "belled" curve distortion? 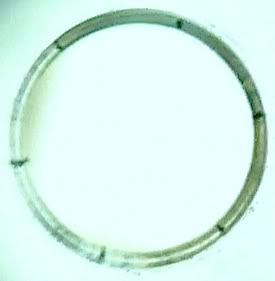 Here is an interesting twist to view the internal bore distortion. I made a "negative" to make the whited areas of the distorted bore stand out in the dark reversion. Any doubts of the presence of such a condition should be rightly now laid to rest. The bright white flecks are actually dirt particles I left in the bore to verify that the pictured area was in proper focus, and dirt that looks so clearly shaped could not be pictured otherwise. 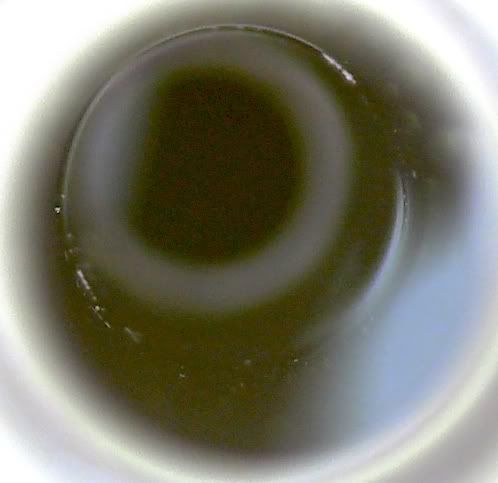 ------------------------------------------- The original barrel on that Model-12 was looking better as the candidate for repair, once the possible replacement barrel had been seen to contain many problems not spotted by the buyer- but it is not necessarily the new owner's fault to buy something represented as decent condition by a scurrilous seller. The revised job was now to improve the original barrel and eliminate the negative issues present: too-thin walls present at the muzzle area impossible to remove bore scrapes present behind the installed choke tube hole no provision for a sight bead This series of problems could theoretically all be alleviated by a long choke insert that was precisely fitted to support the thin section at the front, while reaching beyond the scraped area behind, and by being permanently affixed in the barrel- a bead could be mounted completely through the supported barrel wall and new choke in place acting as a solid unit. See that the interior view has a centered and closely fit appearance- not bad- considering the previous limitations in the area due to offset bore remnants due to bore side scrape variances. 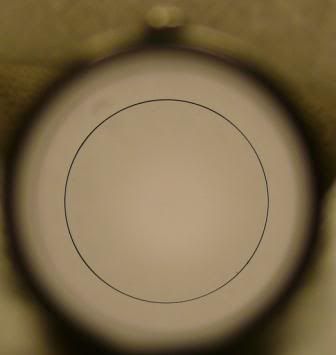 The muzzle does still show the differential wall thickness, and that can't be corrected without removing the high side from the exterior. 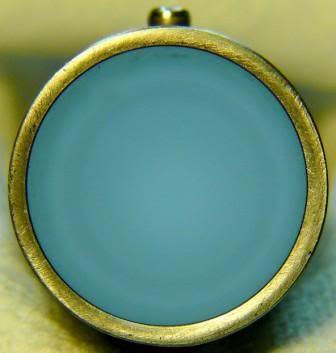 There is more to be explained concerning this repair in the next installment. Kirby
__________________
[email protected] New gunsmithing website: http://theshotgunshop.net/ Articles containing valuable information are on every page. |
|
|
|
March 26, 2011, 08:39 PM
|
#4 |
|
Senior Member
Join Date: December 22, 2010
Posts: 909
|
What a story! Glad I didn't have my SX1 fitted for Briley Thinwalls. I just dropped a Benelli Crio choke Plus on the concrete today, it's a thick choke, but it still has the slightest ding at the mouth. I expect it to not be a problem, I continued to shoot with it and it did ok.
|
|
|
|
March 26, 2011, 11:11 PM
|
#5 |
|
Senior Member
Join Date: December 4, 1999
Location: WA, the ever blue state
Posts: 4,678
|
So far I have been lucky in all the shotgun muzzles I have tapped for screw in chokes.
But Randy Ketchum, a real gunsmith, tells me he never knows what he is going to get with the shotgun barrel having a bore off center. |
|
|
|
March 27, 2011, 10:37 AM
|
#6 |
|
Senior Member
Join Date: March 12, 2000
Posts: 1,092
|
Wow.
 Talk about a picture being worth 1k words. Thanks, Kirby. Talk about a picture being worth 1k words. Thanks, Kirby.
|
|
|
|
March 27, 2011, 02:25 PM
|
#7 |
|
Senior Member
Join Date: April 12, 2009
Location: melrose, fl
Posts: 634
|
ok. you have peaked my curiousity. What would have been the right way to do that project? I assume the original choke was a constriction at the end of the origional barrel. Is that hammered in during initial construction of the barrel? If so, then it seems that either the barrel should be chucked in a lathe and reamed or bored to whatever id is necessary for the desired thread. Or would it have been better to cut back on the barrel and start with fresh steel?
__________________
Hundreds of years from now, it will not matter what my bank account was, the sort of house I lived in, or the kind of car I drove... But the world may be different because I did something so bafflingly crazy that my ruins become a tourist attraction. |
|
|
|
March 27, 2011, 04:00 PM
|
#8 | |
|
Senior Member
Join Date: December 4, 1999
Location: WA, the ever blue state
Posts: 4,678
|
Randy says that until you cut off the choke, you don't know if the bore is too far off center for the screw in choke system.
Here are my notes: Quote:
|
|
|
|
|
March 29, 2011, 05:49 PM
|
#9 |
|
Member
Join Date: December 27, 2008
Location: Western, KY
Posts: 41
|
The OD measurements posted are correct but are only the starting point. You also need to determine bore diameter and adequate wall concentricty before determining if tube installation is feasible.
You can check for eccentric bore/wall using a gauge of this type. and bore diameter with a gauge like this one.
__________________
Hardships are quickly forgotten. Intense heat, bitter cold, rain and snow, fatigue, and luckless hunting fade quickly into memories of great fellowship, thoughts of beautiful country, pleasant camps, and happy campfires. Fred Bear 1902-1988 |
|
|
|
April 1, 2011, 11:13 PM
|
#10 |
|
Member
Join Date: February 15, 2007
Posts: 75
|
Choke installer defects shown by Kirbythegunsmith
I am posting these pictures and explanations of problems related to aftermarket choke installations in order to inform shooters that may not have had the opportunity to see any of my previous material and articles that demonstrate the lack of consistency and skills prevalent in the gunsmithing trade. The errors in judgment and lack of precision in the jobs brought to my attention for remedy will undoubtedly raise the hackles of a number of shooters that see the evidence I present (perhaps even in their own shotguns). The multitude of limitations in aftermarket choke tooling were obvious to me in the first versions ever offered for sale, and realizing those conditions convinced me that I should never be involved in any way with such defect-prone installations. I will only install my custom chokes or do American pattern choke install/re-installs with a much more precise tolerance than the typical factory and prevailing aftermarket jobs offered to the public.
There were related details in a previous 2-part posting here: http://thefiringline.com/forums/showthread.php?t=445743 ––––––––––––––––––––––––––––––- A prominent clue to the excess thinning of the shotgun barrel wall by the mis-applied choke installation was the edge vulnerability to a minor bump such as wrench slippage. The remainder barrel metal wall thickness (at the thinnest point) was well below the obsolete standards first posited as the minimum wall recommendations used to generate sales of choke installation tooling. Those former standards have been revised over the years and at least are somewhat more realistic to lately reduce the statistically unsafe nature of the typical aftermarket choke tube installation. This pictured deformity is also visible in another picture in the previous thread from an alternate angle. 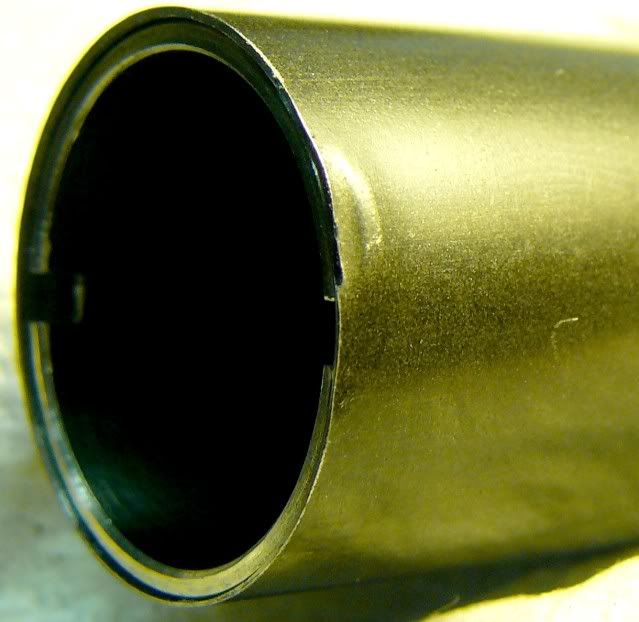 The choke removal section of the tooling that also bores out the choke tube hole has some side drag shown in these next two pictures. Notice that the scrapings shown are (designated in a previous posting with arrows in a front-on view) comparatively light in the first view vs. what is seen in the second view. the step-down from the original bore to the altered section is quite prominent in this viewing angle. That is a considerable difference that highlights the typically-seen offset of the choke installation from the barrel bore centerline. 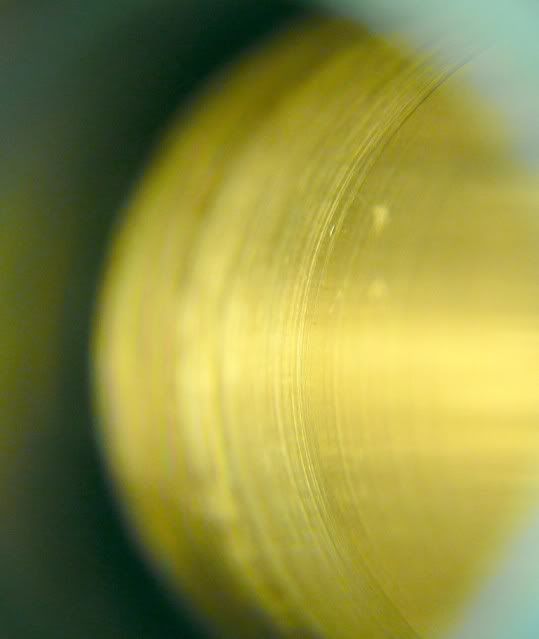 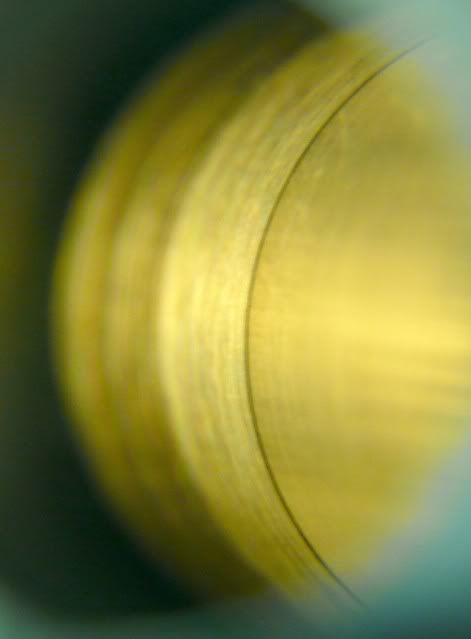 Even the threads inside one side of the barrel look shallow in the first picture section, and the cut-lines of the tap have deeper edges and consequently more reflective scatter in the right section of the composite picture. Realize that the threads may be in one centerline orientation, and the choke hole and shotgun bore may each have a different orientation. It is possible to have multiple and skewed centerlines, so now you may better understand why sometimes a barrel may not be accurate enough in the basics of alignment to even allow a choke tube to remain tight with conventional techniques (this is only one of several reasons that chokes fail to remain snug). It seems that many ideas abound of how to remedy the problem of chokes loosening, and some even post that they never saw or had the problem. Does that mean that another shooter with the problem has a personal failure- or a mechanical defect beyond their control or skills to discern? 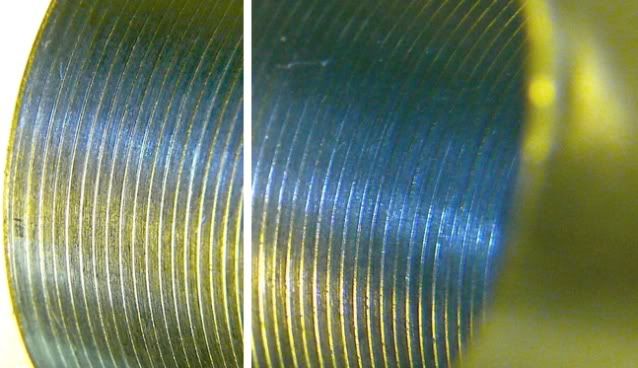 The existing offset nature of the choke hole and partial bore eccentric cut made a straight choke installation even more of a challenge than usual. The picture of the results already posted in the earlier thread showed the centered alignment of the new choke that was also designed to reinforce the ultra-thin remainder section of the previous defective choke installation. That choke needed to extend beyond the scraped bore areas behind that old choke installation and include a fairly close fit to the bore and old choke hole to be filled. Some improvement of the support was generated by opening the internal diameter of the old choke hole through the thread section to allow a larger diameter section for the "filler" area of the new choke. The threads were cut to a truncated form that removed some height and created flats across the thread tops that would improve the contact area between the hole and filler. The picture shows the flat tops of the old threads to be prominent and capable of providing excellent contact surface and support. 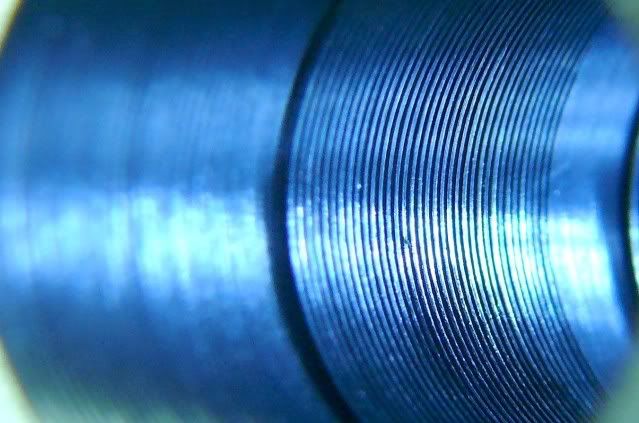 One last point that required attention was the installation of a sight bead after the permanent choke installation was completed. The remainder wall thickness was insufficient for a through-hole bead installation in the original choke hole area. The factory original type bead (seen in a previous posting picture before being swapped) was too short for the barrel length or impact, so a taller flanged base bead was used to improve visibility and lower the impact to just a couple of inches high in the 50-60 foot range. 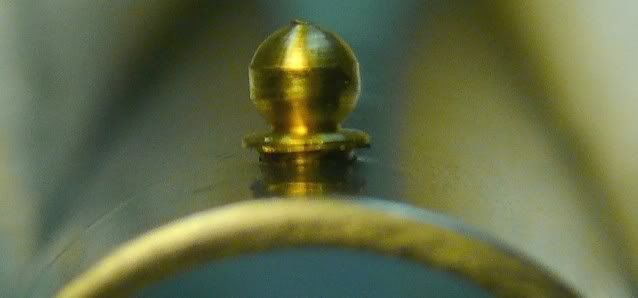 Be sure to see my website and previous postings for more articles and information unavailable elsewhere. Kirby
__________________
[email protected] New gunsmithing website: http://theshotgunshop.net/ Articles containing valuable information are on every page. |
|
|
|
|
|


