
|
|
|||||||
| Forum Rules | Firearms Safety | Firearms Photos | Links | Library | Lost Password | Email Changes |
| Register | FAQ | Calendar | Today's Posts | Search |
 |
|
|
Thread Tools | Search this Thread |
 January 9, 2015, 11:25 PM
|
#1 |
|
Member
Join Date: August 13, 2014
Posts: 66
|
Cranes AR15 Build - Assembly Begins.
A lot of folks were confused by the old thread when I decided to build instead of buy, so I just started a new one.
I was inspired by the Windham Weaponry VEX AR-15, which looked something like this:  I saw a similar one at Cabellas and figured I could probably build a better rifle for about the same price ($1239) so I started collecting parts. The first thing you will notice is it has laminate wood furniture, which was the main selling point and the basis of this rifle build. Everything else was built around this feature. I know the drawback to not having a free float barrel, but I'm not sweating that. I went with the Boyds. $175 out the door for all 3 components. http://www.boydsgunstocks.com/FindAS...=998&Action=1D Next was my upper and lower. Went with Aero Precision based on the good reviews and killer price. $145 all in all, and that includes the transfer fee. http://shop.doasales.net/AERO-PRECIS...T-AP501903.htm Don't think this bolt carrier group is anything too fancy, but it was recommended to be pretty good at the price so I went with it. $99.95 http://www.aimsurplus.com/product.as...TRIDE+.223%2f5. Chose the White Oak Armament barrel. Chambered for .223 Wylde. $278 http://www.brownells.com/rifle-parts...26-104737.aspx And lastly as far as major components go, an Elftmann trigger. $250. Perhaps overkill compared to the rest of the build, but hey, I like a good trigger. I can always yank it and put it in a higher dollar build later. http://www.elftmanntactical.com/stor...match-trigger/ Thats it for the big stuff. Following is the rest of it. I think I have everything at this point, but you never know. Most of it is being shipped, so now starts the waiting game. This will be a stellar opportunity to see who ships quickly and who does not. Scope mount, $19.97, http://www.ebay.com/itm/131370434220 Forward Assist, $11.99, http://www.ebay.com/itm/191180113432 Delta ring, spring, barrel nut combo, $19.91, http://www.ebay.com/itm/191370658903 Ejection Cover, $9.74, http://www.ebay.com/itm/201105891717 Gas block, $10.50, http://www.ebay.com/itm/271728753729 Lower parts kit, $39.38 shipped. Aim Surplus. Nice thing about this is it didn't include trigger or handle and comes in neat little bags with explanations about where everything goes. Should be helpful. Anderson brand. Bought locally: Guntec buffer tube. $49.95 - might have overpaid for this. Meh. BCM Mod 4 Charge handle. $39.99. You know...for name recognition. Gas tube rifle length, $16.99 Trigger- Elftmann. $249.99 They threw in the front furniture mount for free. Zipeee! So if any of this look incompatible please let me know. So far here is what I have in hand. Everything else has been ordered.  I am really impressed with the Elftmann trigger. I went with the curved trigger and the non skeleton version.  I even went so far to start assembly. Here is my rifle so far: 
|

|
|
January 9, 2015, 11:31 PM
|
#2 |
|
Senior Member
Join Date: July 1, 2013
Location: Douglasville, Ga
Posts: 4,615
|
man, you went all out. that should be one slick rifle. you may want to splurge a little more on your scope mount. I would recommend the Nikon p-series for about 40$. it's more vital of a part than you may think
I have had great experience with this http://www.amazon.com/Nikon-835-P-Se.../dp/B00B5F02ZW if your stuck on a one-piece, a decent one may cost you closer in the neighborhood of 100$, but this Nikon is as secure as any I have used, and I shoot extremely hot 77gr highpower ammo mostly from my AR never heard of the elfman trigger, I will have to look into those, looks as nice as any of the high end triggers also....is there any way to free float a wood handguard?
__________________
My head is bloody, but unbowed |
|
|
|
January 10, 2015, 12:18 AM
|
#3 |
|
Member
Join Date: August 13, 2014
Posts: 66
|
*edit wow this turned out a lot longer then I expected. Just my friend .02c on it, thats all!
Thanks for the compliments! To address your concerns, I know this is a cheaper scope mount. Not super convinced it will make a huge difference. After all, it is a piece of metal which attaches two other pieces of metal. It has similar dimensions as the more expensive scope mounts. It is made of the same material as the more expensive scope mounts. Basically what is important is things don't move. The recoil creates an acceleration backwards. There is a reactive force then facing forwards. Force=mass*acceleration. Problems happen when your rifle accelerates at a rate that is not exactly that of the scope. Acceleration, even for a brief moment in time, gives way to velocity which gives way to distance. Now your scope doesn't point in the exact same direction relative to your rifle as it did before. Note: This applies to just about every aspect of your rifle. ESPECIALLY the areas where components meet that are not "solid connections." So the next and more obvious question in regards to the scope mount is... "what would lead to a difference in acceleration between where the mount attaches to the rifle and where the mount attaches to the scope?" This is a very valid question. Lets list the possibilities. I will start with the least likely. First- the scope mount actually flexing. Two factors in relation to this. I won't go into the math- but the modulus of elasticity between a high grade aluminum and a lesser grade aluminum is not that much. about 10,000,000 psi vs 10,200,000. 2%. Pretty much negligible. But that assumes that there is even a difference to begin with- the other factor is dimensional properties. Stress is equal to pressure divided by area. The pressure remains a constant, so stress is determined by the cross sectional area. I'm not going to measure the exact differences, but the areas in involved are very similar, just by inspection. So one scope mount actually flexing vs. the other isn't really a factor. (Well, not a significant factor. There will be a difference between them technically speaking, but we can't just assume to more expensive of the options will win. The cheaper mount very well may have more material and win.) Here is the more important consideration: Contact area. There are to basic areas that are important: The area where the mount contacts the scope, and the area that contacts the rifle. Every force that had to due with the parts of a rifle holding itself together have to do with friction. This includes fasteners, press fits, rings, everything. Even screws stay in place because friction. Lets say the cheaper scope mount is in improper fit to the scope- which is certainly a possibility, and I would even agree more likely with the cheaper mount. If the rings are too loose you won't have enough surface area force between the surfaces, and frictional forces will suffer. This will actually be more likely where the scope mount mates with the rifle. There is less contact area here, and a mismatch between the angles in the rail and the angles in the scope mount will be much more important. Force of friction is a function of pressure and contact area, and lessening the contact area due to a misalignment would be very detrimental. So in short- we will have to see. If the milling is good and the surfaces match nicely the cheap scope mount will be every single bit as good as the more expensive one. Granted, the cheaper mount probably has a higher likely to not match. I will have to see when I get it. If it doesn't match well I send it back. Otherwise the function should be indistinguishable from the high priced unit. It is important to understand WHY we spend more money with certain components and not others. Sorry if the engineer is coming out. I have been working in non-tech stuff for the last few weeks and my urge to whip out a calculator is much greater then normal!  Another factor having nothing to do with accuracy (except in perhaps extreme cases) is fit and finish. Yes, it is nicer to have good fit and finish on a gun. Tooling marks, bad anodizing, etc just takes away from the value of a piece, but not necessarily its functions. As far as your free floating barrel claims- I am more apt to align with you here. All things being equal free floating would be better. Not personally convinced it is a huge difference, but I know it can be in some cases. Some non free floated barrels shoot worse then similar ones with a free float. There are a lot of factors. It would be nice if it was, but it's not, and as I said earlier the wood stock was primary consideration. I am not aware of any free floating wood kits right now. Maybe I should try to design one?! That would be cool! Hey, thanks for the comment! I hope I didn't come off as argumentative...just letting you know my take on where to put the big bucks.  Not that this is a high dollar build by any stretch. My geeky spreadsheet say I am a total of $1150 into this. As far as I'm aware I have everything now...but I'm sure I will be wrong about that and find I missed something. Time will tell. Not that this is a high dollar build by any stretch. My geeky spreadsheet say I am a total of $1150 into this. As far as I'm aware I have everything now...but I'm sure I will be wrong about that and find I missed something. Time will tell.
|
|
|
|
January 10, 2015, 12:28 AM
|
#4 |
|
Member
Join Date: August 13, 2014
Posts: 66
|
skizzums,
BTW, this is a pic of my Remmy 700. Notice the scope mounts. Absolutely terrible, I have been meaning to replace them for a LONG time. In fact I have no plans to even shoot this gun until I correct it. I put them on before I knew better. They move when you wiggle the scope with your hand, no matter how much you tighten them down. This design suffers from BOTH aspects I covered earlier- low cross sectional areas and poor surface contact. I doubt the new mounts will have the same issues, however! 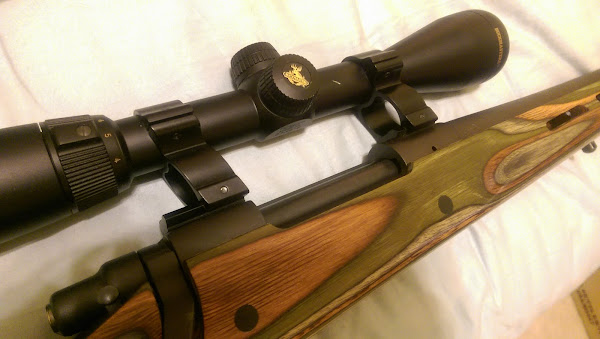
|
|
|
|
January 10, 2015, 02:40 AM
|
#5 |
|
Senior Member
Join Date: July 1, 2013
Location: Douglasville, Ga
Posts: 4,615
|
well you seem to know what worked for you, so go for it. great luck on the build. you definitely will turn a couple heads at the range, should be a real tack driver too
__________________
My head is bloody, but unbowed |
|
|
|
January 10, 2015, 05:12 AM
|
#6 |
|
Member
Join Date: April 8, 2010
Location: PA
Posts: 61
|
Looks good but, "Planet of the Apes" and the gorillas firearms came to mind instantly.

__________________
Who Dares Wins! |
|
|
|
January 10, 2015, 09:15 AM
|
#7 |
|
Senior Member
Join Date: March 15, 2010
Posts: 8,236
|
I'm jealous lol... I'm still waiting on my parts, will just be a basic build...well I do have the lower and an eBay carry handle... The rest is still on order....paid for, but not arrived yet
__________________
Woohoo, I’m back In Texas!!! |
|
|
|
January 10, 2015, 07:02 PM
|
#8 |
|
Member
Join Date: August 13, 2014
Posts: 66
|
skizzums,
Glad you brought it up. I did indeed update the mounts on my .270 today. Just looking at it you can tell it will be more solid. And yes, I did go with a more expensive mount. Keeping the AR mount I ordered for now, but this update on my bolt should make it shoot a ton better. Thanks for the nudge.Before:  After: 
|
|
|
|
January 12, 2015, 04:05 PM
|
#9 |
|
Member
Join Date: August 13, 2014
Posts: 66
|
Got a bunch of parts in from Rousch_sports on eBay. Very impressed. They were well priced, and the fit and finish all all the parts that came in are much better then I expected. If that is not enough...I ordered them on Friday and they are here Monday. Not too bad.
  Gun assembly continues. Here is the assembled work. (so far) 
|
|
|
|
January 13, 2015, 03:42 AM
|
#10 |
|
Senior Member
Join Date: November 10, 2010
Posts: 1,149
|
Oh man, that's gonna be a great looking Rifle. Keep us updated!
__________________
Once Fired Brass, Top quality, Fast shipping, Best prices. http://300AacBrass.com/ -10% Coupon use code " badger " |
|
|
|
January 15, 2015, 12:35 AM
|
#11 |
|
Member
Join Date: August 13, 2014
Posts: 66
|
More parts came in today. The BCG came in from Aim surplus. I looked at many carrier groups- this one seems to be a pretty good bang for the buck as far as fit and finish go. Out of all the ones I looked at this one just seems to be nicer. Of course we will see how it works when its in the rifle.
 Also got my scope in today. Now this one is NOT going on the AR- I am taking the Leupold 2-7x off my bolt Weatherby .223 and putting it on the AR. The Weatherby is now getting the Vortex Viper 4-16x50. So far it looks really nice. Seems very clear. Have not had a chance to look at something longer then 50 yds in it. (neighbors might get nervous if I go outside and start aiming at the mailboxes down the street) Should be a good scope for the type of rifle it is. It is probably the most accurate rifle I own. It will be interesting to see how the AR keeps up.  One last note- I think I am going to switch barrels. Brownells has not even processed my order yet when nearly all other venders got the parts in my hand, and they were ordered several days later. Then I realized a company called Odinworks is local in Boise. They make a .223 Wylde barrel guaranteed to be sub-MOA. Anyway, strongly considering canceling with Brownells and knocking on the door of these guys: https://www.odinworks.com/223_Wylde_...223-18-dmr.htm Oh, and to keep the trend going here she in the current state of assembly:  Alex |
|
|
|
January 16, 2015, 01:18 AM
|
#12 |
|
Member
Join Date: August 13, 2014
Posts: 66
|
I got a shipping notification this morning from Brownells. They shipped the barrel. I was going to cancel and go with the Odin but now the White Oak Armament barrel is on the way. It should be fine.
Did get more parts in today. Upper and lower came in. Went in and paid the transfer free, and I'm good to go. The Aero set looks fantastic. Fit and finish is as good as anything I have seen so far. Very pleased. It is also labeled "Multi Cal" which is nice.  Continuing assembly...LOL.  Although I did manage to tap in the trigger guard....so I guess real assembly has indeed started. Tomorrow I will Duracoat it and hopefully my hardware kit comes in before the weekend so I can get going. Still no word from Boyds Stocks...no tracking # and they have not returned any of my calls. Pretty disappointing considering I have been pretty happy with their products, but customer service seems to be on the lacking end. 
|
|
|
|
January 16, 2015, 07:56 AM
|
#13 |
|
Senior Member
Join Date: March 15, 2010
Posts: 8,236
|
What color are you gonna dura coat it?
__________________
Woohoo, I’m back In Texas!!! |
|
|
|
January 16, 2015, 02:18 PM
|
#14 |
|
Senior Member
Join Date: March 2, 2014
Posts: 11,784
|
That is the thinnest barrel I've ever seen on an AR!!
|
|
|
|
January 16, 2015, 04:11 PM
|
#15 |
|
Member
Join Date: August 13, 2014
Posts: 66
|
Ok, well I got my Duracoat in and applied. It is actually not hard to put on. Let me preface by saying this: I am not a good painter. I have rarely painted something and thought "that turned out really well." Must be a patience issue.
Not with this build. I will tell you the steps and how I did it. Before:  First thing I did was don some latex gloves. I sprayed down the upper and lower individually with carb cleaner and then cleared it with an air gun. Several times. At no point from here on did I touch it with my bare hands. I then hung the components on our dining room chandelier with thin wire. Pro tip: It is much easier if you hang it from two points. Lastly I brushed the entire thing with acetone and let it air dry. I left the original coating AS-IS, and didn't scuff. (this is what the instructions recommended)  About taping and plugging holes: I didn't. This may or may not work against me. We will see. I didn't avoid holes or inside parts per se, but I didn't focus on them either. I made no attempt to coat the inside. Any overspray that happened, happened, but it's not like I layered it. I will be sure to let you know if this works against me during assembly. Something I did notice- the coating is very thin. See next post. |
|
|
|
January 16, 2015, 04:12 PM
|
#16 |
|
Member
Join Date: August 13, 2014
Posts: 66
|
Here is what I used to apply the coat:
 It was a $9 Harbor Freight gun. Worked flawlessly. I used a pressure regulator and sprayed at 40psi. I did light coats, was careful with my book keeping on where I had sprayed, and repeated 3 times. Overall it seems like a very thin layer, which I like. Time will see how it holds up. I did add more hardener, which they say you can do it you want a bit more of a gloss finish. Not more then they recommended, but on the high side. I like more of a glossy wipeable finish. It kinda makes the fisheye (not in a bad way) a bit bigger. What I like is it is VERY consistent and far as texture.   One word of caution: Don't put your leftover cleanup acetone in a knock off Dixie cup. I may have watched all 6 seasons of Breaking Bad, but apparently didn't learn anything.  All in all this is all I used. It should be good for many more guns.  One last pic of the upper. It is every bit as clean as the original coating. Very pleased. 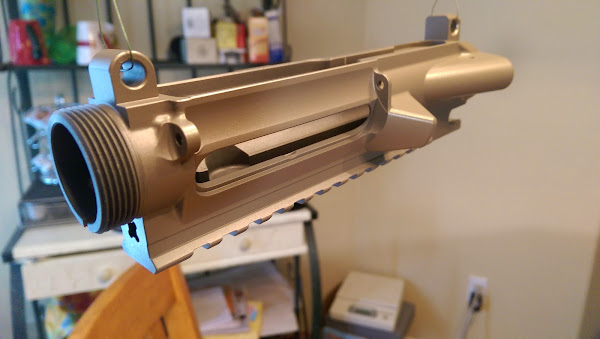
|
|
|
|
January 16, 2015, 05:06 PM
|
#17 |
|
Senior Member
Join Date: March 15, 2010
Posts: 8,236
|
Very cool
Ive got cogs in my head turning now, thinking about dabbling in duracoat
__________________
Woohoo, I’m back In Texas!!! |
|
|
|
January 16, 2015, 05:23 PM
|
#18 |
|
Member
Join Date: August 13, 2014
Posts: 66
|
Rickyrick,
This is Daniel Defense Flat Dark Earth. Alex |
|
|
|
January 16, 2015, 11:31 PM
|
#19 |
|
Member
Join Date: August 13, 2014
Posts: 66
|
Major progress!
After baking the Duracoat in the over for an hour it was ready for assembly. The Duracoat will take a week to fully cure, but they say you can assemble within an hour if you bake it or 24 hours if you let it be. Of course I didn't want to wait. Even after just an hour baking, the finish seems very hard. In fact I slipped a few times with the punch during assembly and thought "I've marred it all up for sure." without even a trace of chipping or scratching. Not quite willing to do a scratch test at this point, but I have to say the Duracoat held very well during assembly. I was as gentle as possible, but even so I slipped a few times. Don't mind the extremely dirty oven. Yes, we cook food in there. Yes, it's gross.  Installing components. The blue backing makes it look more green then it really is.  Just in case anyone is wondering... I was unsure of the sequence of installing things. I might as well share my process. Lower: 1. Trigger 2. Mag release 3. Buffer tube/spring retainer 4. Takedown pins 5. Safety One thing that was nice was this Aero lower was set up for a set screw for the rear pin detent. Just a quick clip of the spring and a screw which a local shop gave me means the keeper will not fall out when the stock is off. Nice little feature I was unaware of until today. Upper: 1. Forward assist 2. Dust cover 3. BCG/Charge handle. And that is pretty much it. You might notice I don't have my barrel yet....or furniture. Brownells didn't ship until this morning (a week after I ordered) and Boyds stocks hasn't even given me an update since the order. Nor have they replied to emails or voicemails. Not super happy. Hope their product is good when I get it. I do have them on other guns and have been happy, but with those I ordered from a 3rd party. The specs you see is just dust. The Duracoat really came out well on this.  And here she is at the moment. Now just waiting on furniture and the barrel.  I will keep you updated. |
|
|
|
January 17, 2015, 01:56 AM
|
#20 |
|
Senior Member
Join Date: March 2, 2014
Posts: 11,784
|
I've duracoated my AR builds--but I usually tape off the barrel threads and other "nooks and crannies" that involve operational parts as the layers of paint can build up enough to effect tolerances/clearances--some rail barrel nuts for free-float rails have very tight tolerances--at least that's been my experience
PS--looking at your last picture above--it almost looks like an awesome machine-pistol if you imagine the buffer tube is a barrel LOL Last edited by stagpanther; January 17, 2015 at 07:42 AM. |
|
|
|
January 19, 2015, 07:35 PM
|
#21 |
|
Member
Join Date: August 13, 2014
Posts: 66
|
Well it has been 12 days since I ordered and Boyds stocks hasn't even shipped. I left 4 voicemails and have yet to get a response. I have waited on hold for about 2 hours total only for it to go to voicemail eventually. I'm throwing in the towel. I can't even get ahold of them to cancel my order.
So I wen't back to here: http://www.woodforar15.com/product/stock-sets-2/ It was slightly more then Boyds, but they answered the phone in 2 rings, she got up and went to make sure it was in stock as I was on the phone, she said "Yep! We got a set. I can have it out the door by the end of the day!" Good enough for me. It's a shame, Boyds makes a good product. Too bad it's so hard to give them my money. Stocked up on mags today at Cabelas. Only $12 each. Of course I just had to fill them. 
|
|
|
|
January 21, 2015, 08:26 PM
|
#22 |
|
Member
Join Date: August 13, 2014
Posts: 66
|
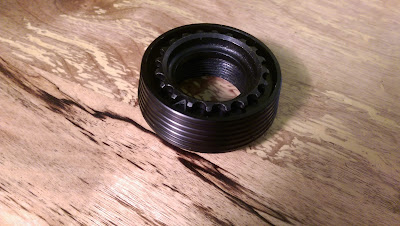
Great day today! The barrel came in along with the barrel tool. I have everything but the stock at this point.
I did run into one small hitch. The gas block I ordered doesn't take into account the far and of the grip support. (not sure what that is called.) What this means is the gas port didn't line up perfectly, as well as the indentation for for the set screw if this plate is used. I'm sure they make two types and I just happen to have the wrong one. No need to panic however, by taking some material off the back of the gas block equal to the thickness of the plate everything works fine. I ran it under the belt sander for a few passes taking a little at a time until it lined up. It left a shiny spot, which I can reapply Duracoat later. Lines up here without plate before modification:  Misalignment with plate:  Gas block modified:  Modification complete:  Upper complete:  Reattached to lower:  Now just waiting for the stocks to arrive. I got a voicemail from Boyds today saying they HAD shipped the stocks even though I had cancelled. So I will compare it to the other vendor and see which I like better. Ugh. I had the real urge to test rifle since everything is there now. I took a spent casing and installed a new primer (no bullet or powder) and chambered it Sure enough, it went "POP" when I pulled the trigger. A good day! Hopefully soon I can get the stocks and take it out to the range. Can't wait to sight in. Oh, one question about oiling: Where do I lube? |
|
|
|
January 21, 2015, 08:57 PM
|
#23 |
|
Senior Member
Join Date: March 15, 2010
Posts: 8,236
|
Nice!!!!
I'm still waiting on my parts... Not as fancy a rifle as yours, just a plain jane... But, I'm giving dura coat some serious thought now after seeing yours
__________________
Woohoo, I’m back In Texas!!! |
|
|
|
January 26, 2015, 05:08 PM
|
#24 |
|
Member
Join Date: August 13, 2014
Posts: 66
|
Build complete!
The Boyds stock came in today....only took a week and a half longer then the 2nd slowest vendor.... :nono:  Anyways, it took minutes to get it all thrown together. Away to the indoor range I went. Loaded her up...pulled the trigger....BOOM. Pulled the trigger again...nothing. The first 5 rounds did this, and I cleared manually each time. Note the round you see here is the spent round, and not the new one.  Took it into the gunsmith and we lubed the heck out of it. Greased the tube, wet everything, cycled by hand for a while. Now it will will clear the spend round, but not chamber a new one. It closes all the way by itself, it just doesn't seem to be going back far enough to take a new round with it. The general consensus so far it keep shooting it and let the BCG settle in a bit. I only shot about 60 rounds through it today. Next time I will bring 100 or so rounds and just keep firing and manually cycling each time. I will also verify gas block alignment tonight, although I did move it around a bit at the range to see if I could improve it...but nothing. I could make it worse but not better. I put the paper out as far as it would go in the indoor range. All of these shots were standing up, and I certainly wasn't taking my time. Pulled the trigger the second my crosshairs were over the target taking no time to steady. Happy to see a pattern emerge, and I never even touched the scope adjustments. In other words, I am glad to be on paper (within two inches) the first time I pulled the trigger after blindly mounting the scope and not bore-sighting. I will keep you up to day. Hope to get out in the next couple of days to fire off more rounds. Tonight I will be reloading a whole lot of rounds. I might even go pick up some cheap stuff just to get a few boxes through. Perhaps I will try the 5.56 variety for a bit.  All in all a good day. Not really discouraged, I think I just need to iron out the issues. From what I hear this is par for the course. Other ideas are always welcome. |
|
|
|
January 26, 2015, 05:26 PM
|
#25 |
|
Senior Member
Join Date: March 15, 2010
Posts: 8,236
|
Did the bolt stop in that position or are you holding it open for the picture?
And did you use a rifle buffer and spring? Others will help you out, I'm just curious.. Your rifle resembles a FAL at first glance very cool. But it's acting like a FAL gassing problems lol
__________________
Woohoo, I’m back In Texas!!! |
|
|
|
|
|


