
|
|
|||||||
| Forum Rules | Firearms Safety | Firearms Photos | Links | Library | Lost Password | Email Changes |
| Register | FAQ | Calendar | Today's Posts | Search |
 |
|
|
Thread Tools | Search this Thread |
 February 22, 2009, 01:55 PM
|
#1 |
|
Member
Join Date: December 17, 2008
Location: VA
Posts: 25
|
Do-it Yourself 1911 Upgrades
I just finished the upgrades on my Colt Series 80 MKIV Government Model 1911. Not only did I want to share my first experience at this, but wanted to hear from others, to see what I can learn for the next build up. Let’s hear and see them.
This is the first real work I have ever tried on my 1911, prompted by the fact that the front sight fell off at the range a few weeks ago; it lasted 20 years, so no complaints. Other than replacing springs and general cleaning, I had never attempted any work on it, having previously relied on a gunsmith, who is no longer in the area. For some time now, I have wanted some upgrades, but with the economy a little slow now, I was on a tighter budget. I did a lot of research on the web, and with my natural curiosity and previous career as an auto mechanic, I had most of the tools and the knowledge of how to use them. I thought why not give it a try. I stuck to primarily “drop-in” parts, with the expectation that they would all require fitting of some kind – most did. Since the sights were the catalyst for the project, I will start there. I chose PSI adjustable fiber optic sights (narrow tenon front sight), being a tech geek; I found the fiber optics a very cool novelty. My first order yielded some disappointment over the lack of communication from the vendor. The item was back ordered and later cancelled. The sights cost a few extra bucks from Brownell’s, but their service and ability to proactively notify their customers of the order status was well worth it. Brownell’s front sight staking tool, a 4oz hammer, a brass drift punch, red Loctite, a 4 inch machinist vise with non-marring jaw inserts, and a Dremel were all that were needed to install the sights. The instructions included with the staking tool and an online video or two were all the training required. For the barrel I chose the Ed Brown Stainless Drop-in Match Barrel, which included the matched bushing and link already installed. Barrel fitting required some filing of the hood, which quickly wore my file because of the stainless steel, so I switched to the Dremel with a grinding disk for a bulk of the work – finishing up with the file. Feeler gauges were used to measure side lug clearance and hood clearance, both were at the lower end of the fit range. I polished the throat of the barrel and the feed ramp with the Dremel and white compound. Lockup was very good, in the gravity test and vertically with minimal thumb pressure. I added an Ed Brown 2 piece guide rod, and Wolfe Springs (15lb recoil). For maintenance, I added an Ed Brown hardcore firing pin and stop, and a Wolfe extra power firing pin spring. An ambidextrous thumb safety from Mueschke was added, which actually dropped in. I wanted a beavertail grip safety, but didn’t want to add a commander style hammer; I found the King #203. The safety dropped right in, however, the stock hammer required quite a bit of filing and reshaping. The Dremel came to the rescue again, first with a grinding wheel, then a polishing stone. The underside was re-blued using a bluing touch up marker from Brownell’s, and the sides of the hammer buffed with the Dremel and white compound – it turned out nicely. Wolfe springs and new springs for my Wilson magazines finished off the lower end work. JAG custom grips and Pearce front grip panels now wrap the handle, held with some Hogue hex head grip screws. I have already dropped the laser bore sight in, and done my initial sight adjustments. Monday or Tuesday it goes to the range for zeroing. Mechanically, it has already had 100 rounds through the new barrel and mechanics, but because of the delay in getting the sights, it will be the first real accuracy test. The 1st 100 had no problems and felt great – but even without the front sights, accuracy seemed better with simple point shooting. This was quite a learning experience, a lot of fun, and a great way to spend a lot of free time in the cold winter months. I enjoyed it so much; I am considering building one from the ground up in the near future. Here are my before and after pictures, let’s see yours, and hear those stories. Before 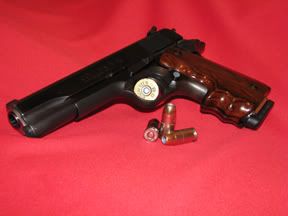 After 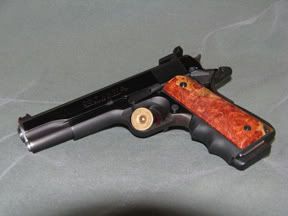 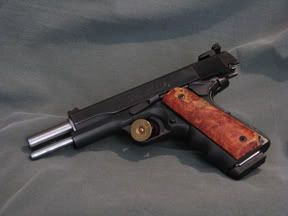
Last edited by deluxedirt; February 23, 2009 at 02:18 AM. Reason: shrink pictures |

|
|
February 22, 2009, 11:29 PM
|
#2 |
|
Senior Member
Join Date: May 25, 1999
Location: Too close to Houston
Posts: 4,196
|
Looks nice. How about using smaller pictures so we can read the text without having to scroll back and forth?
__________________
Proud member of the NRA and Texas State Rifle Association. Registered and active voter. |
|
|
|
February 23, 2009, 01:26 AM
|
#3 |
|
Senior Member
Join Date: May 17, 2004
Location: Out back Ky
Posts: 4,044
|
For the barrel I chose the Ed Brown Stainless Drop-in Match Barrel, which included the matched bushing and link already installed.
Why would you want to polish that barrel it should have been ready to go from box except for fitting. I would have at least shot it first. I would have left out the guide rod . I have never seen a reason for one . Might want to add a 16 lb spring as that factory other wise I think you had fun and did good 
__________________
Certified Armed Infidel Colt Defender ,Colt Mustang ,Dan Wesson CBOB, PPK/S, American Classic 1911,Bersa Thunder 380 http://bersachat.comHome of Bersa http://www.metroarms1911forum.com |
|
|
|
February 23, 2009, 02:20 AM
|
#4 | |
|
Member
Join Date: December 17, 2008
Location: VA
Posts: 25
|
Pic Size
Quote:
|
|
|
|
|
February 23, 2009, 02:23 AM
|
#5 | |
|
Member
Join Date: December 17, 2008
Location: VA
Posts: 25
|
Guide Rod
Quote:
Last edited by deluxedirt; February 23, 2009 at 02:34 AM. |
|
|
|
|
February 23, 2009, 10:13 PM
|
#6 |
|
Member
Join Date: December 17, 2008
Location: VA
Posts: 25
|
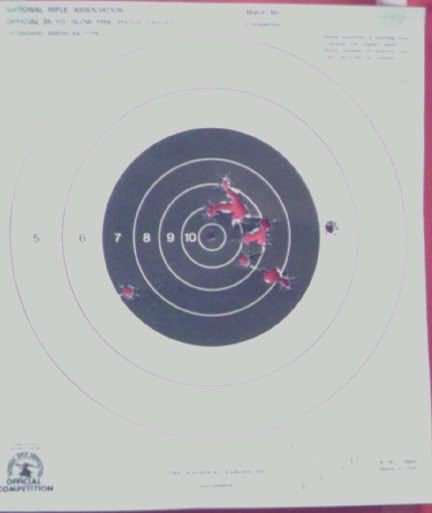
Success!!!
Testing went really well. The below is from 25yds, standing, and this is really good for me, 14 out of 14, with only one outside the black. I still need to fine tune the sights, but will wait for the bench rest I ordered. There was a recommendation to step up another pound our two on the recoil spring, think I will give it a try and place another order with Wolfe (thanks michaelT for the input).
|
|
|
|
February 23, 2009, 10:44 PM
|
#7 | |
|
Senior Member
Join Date: April 23, 2007
Location: Pennsylvania, USA
Posts: 1,918
|
Quote:
|
|
|
|
|
February 24, 2009, 12:49 PM
|
#8 |
|
Senior Member
Join Date: March 1, 2000
Location: Boise, ID
Posts: 8,518
|
Looks great, for a first effort.
My first build-up involved a box of parts that originated with eight or ten different manufacturers. I did some sort of fitting on every part but the plunger tube. I had Hallock's .45 Auto Handbook, and both volumes of Kuhnhausen's shop manual at hand, and went pretty slowly, as I had just about zero metalworking experience. Not even high school metal shop. The gun turned out pretty well, but it really was a learning experience, and it only whetted my appetite for doing more, better-quality work. I now do just about all of my own 1911 gunsmithing - anything that doesn't require a machine shop - and really enjoy it when I'm shooting well with a gun I largely built myself. Don't kid yourself that it will save any money, though. I spent $800 on that box o' parts project, and well over $1000 on each of the two after that. But, I got exactly what I wanted, rather than the cookie-cutter guns that all the manufacturers seem to offer. |
|
|
|
February 25, 2009, 01:03 AM
|
#9 | |
|
Member
Join Date: December 17, 2008
Location: VA
Posts: 25
|
Gunsmith discount?
Quote:
However, to call myself a gunsmith would insult many very competent individuals who wear that title - its an interesting line of work, and could easily become a hobby for me. Well has become anyway. |
|
|
|
|
February 25, 2009, 01:23 AM
|
#10 | |
|
Member
Join Date: December 17, 2008
Location: VA
Posts: 25
|
Quote:
|
|
|
|
|
| Tags |
| 1911 , amateur , build , colt government , custom |
|
|


