
|
|
|||||||
| Forum Rules | Firearms Safety | Firearms Photos | Links | Library | Lost Password | Email Changes |
| Register | FAQ | Calendar | Today's Posts | Search |
 |
|
|
Thread Tools | Search this Thread |
 September 19, 2005, 06:32 PM
|
#1 |
|
Senior Member
Join Date: September 15, 2005
Location: South Central West Virginia
Posts: 611
|
Patina finish on your guns?
Over the years I have done allot of blueing and rust blueing on my BP guns but have never owned one with or done the Patina finish.
I have seen the original Patina look on so many of the old guns from the civil war err and they look beautiful! I'm going to do my 1858 Remington as soon as I get caught up on a few other things. Have any of you have done this to your guns? Thanks for any replies or info, Mike |

|
|
September 19, 2005, 11:43 PM
|
#2 |
|
Staff
Join Date: November 2, 1998
Location: Colorado
Posts: 21,841
|
For guns...
Patina is something that occurs with the lack of conservation. It's aging through handling, holster wear and exposure to the elements, the lack of cleaning and oiling.
__________________
Vigilantibus et non dormientibus jura subveniunt. Molon Labe! |
|
|
|
September 20, 2005, 06:33 AM
|
#3 |
|
Senior Member
Join Date: September 15, 2005
Location: South Central West Virginia
Posts: 611
|
Gary, I'm aware of what causes it in different medals as well as wood but the look really ads caricture to the piece. One of the company's that produces the replicas offers a Colt or 1858 new army with the pitina look.
Somewhere years ago I read an artical, on how to do it but I can't remember where. They say one of the first things to go with age is your memory and I think there right  Thanks again Gary, Mike Thanks again Gary, Mike
|
|
|
|
September 21, 2005, 10:27 PM
|
#4 |
|
Senior Member
Join Date: June 16, 2005
Location: AZ
Posts: 3,113
|
Could you be thinking of color case hardening instead of patina?
|
|
|
|
September 22, 2005, 04:42 PM
|
#5 |
|
Senior Member
Join Date: September 15, 2005
Location: South Central West Virginia
Posts: 611
|
Kozak&, The Patina I'm refering to is just what Gary mentioned above but it's done with the rust blueing process which can give you a beautiful blue (takes about a week of hard work for one revolver) but it's the hardest blue I know of .
Instead of boiling the parts between carding like you would do for the deep blueing process you just use warm water and light carding. It will come out looking just like the aged and used revolvers from the Civil war and the wild west days.  I found the artical in my junk drawer in my shop and will do it in the next day or two and then post a picture.  Thanks for your replys on this guy's, Take care, Mike Thanks for your replys on this guy's, Take care, Mike
|
|
|
|
September 26, 2005, 07:12 PM
|
#6 |
|
Senior Member
Join Date: September 15, 2005
Location: South Central West Virginia
Posts: 611
|
Patina finish is done
Gary and Kozak6, here is the finished piece. Now it looks more like one that was used in the war. When I got this Remington a few years ago I gave it a total tune up and replaced that pole sight with a German silver blade sight that I made. Looks a whole lot better than the peg sight.Sure do love this gun and it goes in the woods with me all the time with an extra cylinder on my belt. Mike
[IMG]  [/IMG] [/IMG]
|
|
|
|
September 27, 2005, 04:23 PM
|
#7 |
|
Member
Join Date: September 27, 2005
Location: Missouri
Posts: 69
|
strip and refinish
I've seen instructions that say to soak metal parts in vinegar until desired amount of bluing has been removed then refinish with some cold bluing and then repeated applications of gun browning until desired color is reached. I may try that someday. If I ever do, I'd like to remove the printing and logos on the barrel to make it more authentic. There's still room inside the grip to put the Pietta name just so no one thinks you're trying to fake it.
|
|
|
|
September 27, 2005, 05:50 PM
|
#8 |
|
Senior Member
Join Date: September 15, 2005
Location: South Central West Virginia
Posts: 611
|
Osage, Been doing rust blueing for years and believe me it's the best blueing there is but it takes a week just to do one weapon and if you do rifles or shot guns you need tanks large enough and deep enough to boil them in water for about 10 minutes at a time.
Birchwood Casie makes a blueing remover that's really cheap and it will strip any gun down to virgin steel in short order with no muss no fuss,Lol. I striped this and then went through the rust blueing for two days but only used warm water so the blueing did not come out dark at all. Then I stoped the rusting process with bakeing soda and water. It will get just a little darker with time and that will be just right for what I want. The idea of getting rid of the writing is great but then you need to stamp the new writing in the steel and good stamps are not cheap. Wish I had a set, the cheap one's are a joke, been there done that,  Mike Mike
|
|
|
|
September 27, 2005, 07:39 PM
|
#9 |
|
Member
Join Date: September 27, 2005
Location: New Ulm, Minnesota USA
Posts: 24
|
Great stuff!
Here are a couple pics of my antiqued Pietta Remington. I stripped it with navel jelly (took about 5 seconds for the blueing to vanish), then applied (4) coats of Birchwood-Casey Plum Brown. It turned out pretty good, but I still might take some Flitz polish to it; I did that to my Uberti Cattleman and it made it look 100 years old!  
__________________
John |
|
|
|
September 27, 2005, 08:21 PM
|
#10 |
|
Junior Member
Join Date: October 16, 2002
Location: Lakewood, California
Posts: 10
|
Cap & Ball
Like I told Remington in another posting, I have two 1858 Remington New Army cap and ball revolvers. The first (this is the one that got me involved with black powder) I bought from someone at work that needed a fast $100.00. It has no numbers or markings on the barrel or frame. It fires a .454 ball pushed by 30 grains of black powder. (I was in error, Remington. It is fffg I use. I verified on the flask. Sorry.) Shoots great. It looked like the cylinder could use some blueing so I used Casey's blueing remover and then dried it and buffed it up. Used Casey's cold blueing and then found pitting jumping out at me. Stopped the process and went to a gunsmith both to get a spare cylinder and to have the old one cleaned up and reblued. He checked it out and asked why reblue it. When he took it out of the box and unwrapped it the cylinder had turned a right nice authentic shade of blue. It matched the rest of the revolver fine. Except for the pitting which didn't detract that much from the gun it looked like it came from the 1800's. He found a cylinder that worked in it from a Pietta. My second I bought from Cabella's with extra cylinders. I've put close to 500 rounds through the first one and only about 20 through the new one. Great shooters both.
Wouldn't let me post the picture of them. File's too big (318 kb). I'll take a picture of each separately and see if they'll post that way. I got the same error on the picture of the Walker.
__________________
Lakewood Lobo Last edited by Lakewood Lobo; September 27, 2005 at 08:42 PM. Reason: adding attachments |
|
|
|
September 27, 2005, 10:12 PM
|
#11 |
|
Senior Member
Join Date: September 15, 2005
Location: South Central West Virginia
Posts: 611
|
Thanks for all the info guys! Wish this site was like this a little more. Sometimes getting anyone to reply to your question or info is like pulling teeth in the old day's
 Johntst, That Rem looks great and can't wait to see more . I never get tired of pics or information about original Remington's . Sure wish I could afford an orginal Mike
|
|
|
|
September 28, 2005, 07:52 AM
|
#12 |
|
Member
Join Date: September 27, 2005
Location: New Ulm, Minnesota USA
Posts: 24
|
Thanks Mike!
Here is a pic of my original. It looks newer than my Pietta version because someone re-blued it long ago; I bought it very cheap because of that. Too bad, because it is military-marked & matching numbers everywhere! It is very tight, has a mint bore, and would make an awesome shooter if I wanted to  
__________________
John |
|
|
|
September 28, 2005, 08:20 AM
|
#13 |
|
Senior Member
Join Date: September 15, 2005
Location: South Central West Virginia
Posts: 611
|
Wow! Nice looking gun's! You guy's sure know how to hurt this poor dumb hill-billy
I do believe that I would have to remove that blueing real quick!!! That original 1858 is in great shape. Guess I would just have to shoot that one too. Mike |
|
|
|
September 28, 2005, 06:31 PM
|
#14 |
|
Senior Member
Join Date: September 10, 2005
Location: GOODLETTSVILLE,TN
Posts: 298
|
Stuck Clylinder Pin
Can Any Of You Give Me An Idea On How To Keep The Cylinder Pin From Getting Stuck After A Few Shots From My Pietta 1858?after I Shoot It Several Times I Cant Get The Cylinder Pin Loose With Out Some Love Taps.i Shoot Ffg Of 777.
|
|
|
|
September 28, 2005, 06:41 PM
|
#15 |
|
Junior Member
Join Date: October 16, 2002
Location: Lakewood, California
Posts: 10
|
I don't have that problem often. I don't use bp substitute either. What you're experiencing I usually only run into after after about 30 to 40 rounds fired off. When it does happen I just use my sheath knife and pop it loose with the edge. I wash the gun out with soapy water, dry it and put a few drops of gun oil, 3M household oil or Marvel oil. Put it back together again and I'm off and blasting again.
__________________
Lakewood Lobo |
|
|
|
September 28, 2005, 07:27 PM
|
#16 |
|
Senior Member
Join Date: September 15, 2005
Location: South Central West Virginia
Posts: 611
|
MPP1423, You really need to do a little work on that gun.The finish on most reproductions leaves alot to be desired, that's why you can buy them so cheap.
Take out the cylinder rod and polish it with sand paper and steel wool until it feels smooth to the touch. Don't over do it, just make it smooth. Now get a chamfer tool and lightly chamfer each end of the cylinder hole. If you don't have a chamfer tool you can do it with a cone shaped stone that goes on a dremel or drill but take it easy. You just want a slight chamfer. Next get a stick that will fit in the cylinder hole and wrap some sand paper around the stick and polish the inside of the cylinder hole. Put it back togeather and this time before you install the cylinder place some grease on the cylinder rod and use a que-tip to apply grease to the cylinder hole. Also place a small amount of grease on the star of the cylinder(Thats the end of the cylinder where the nipple are. When you fire the gun the BP resadue gathers in that cylinder hole and on the rod each time you cock the gun for the next shot. There are alot of other things you should do to that Remington but it's easier to have someone like you just buy this book, you will love it. It will tell you and show you with large clear pictures just how to work on your Reminton and how to tune it up. Before you start make sure you buy a parts kit for your Remington from Cabelas ( They don't advertise it , you have to ask for it) It's cheap and gives you all the extra parts you will need. Here is the link to that book. You can buy the book new or used. I bought a used one that was like new for about half price. This is a must have book for anyone who owns and shoots Remingtons or any BP revolver.Mike http://www.amazon.com/exec/obidos/tg...glance&s=books |
|
|
|
September 28, 2005, 07:49 PM
|
#17 |
|
Senior Member
Join Date: September 10, 2005
Location: GOODLETTSVILLE,TN
Posts: 298
|
Hey Guys,thanks.im Not A Pro By Any Means But I Have Had A Stainless 1858 From Cabelas For About 11 Yrs Now And I Just Bought A Pair From A Guy Off Gunbroker.com With The Old Worn Finish.i Bought Two Sets Of The Old Yellow John Wayne Grips The Other Day And Man They Really Set These Guns Off.these Guns Are A Hoot To Shoot And Very Accurate Too.i Shoot 30 Grains Of Ffg 777 Under My Own 200gr Cast Bullet.i Got The Mould From Lee Yrs Ago But I Love The Accuracy Of These Cast Bullets.i Knew If I Had A Question About These Gun Someone Here Could Help.thanks Again.
|
|
|
|
September 28, 2005, 07:59 PM
|
#18 |
|
Senior Member
Join Date: September 10, 2005
Location: GOODLETTSVILLE,TN
Posts: 298
|
By The Way,have Any Of You Tried The Conversion Cylinders From R&d For 45 Long?if So Do They Fit Like They Say With No Smithing?
|
|
|
|
September 28, 2005, 08:34 PM
|
#19 |
|
Senior Member
Join Date: September 10, 2005
Location: GOODLETTSVILLE,TN
Posts: 298
|
How To Remove Stuck Nipples In An 1858
I Have Another Problem Besides My Cylinder Pin I Forgot To Ask About.the Nipples In My 1858 Piettas I Bought Used Are Stuck And Will Not Break Loose.i Have Went Through 3 Nipple Wrenches And A Can Of Wd.any Ideas To Get Them Loose.
|
|
|
|
September 28, 2005, 09:16 PM
|
#20 |
|
Senior Member
Join Date: September 15, 2005
Location: South Central West Virginia
Posts: 611
|
MPP1423, Never tried the conversion cylinders. I think I would buy a colt repo before I did that. It seems that alot of people are getting them and they seem real happy with the way they work. One of the guy's was having a problem so he sent the gun and all to the people he bought the cylinder from. I like to keep my Remies in the old tradtion, Lol.
Go buy a can of Break Free or Liquid Wrench at the auto parts store. Set the cylinder in a small container with the nipples down . Fill each chamber with the Liquid wrench and make sure you use enough to let them soak submerged in the stuff for 24 hours and then try to loosen them. If that doesn't do it get back to me and I'll tell you how to make a socket fit them so you can use a ratchet. You may also have to heat them a little. Every time I clean mine I use Liquid lock ease on the threads before I replace them. Some guys use "never seize". Some of the other guy's on this site know more than I ever will about these guns and I'm sure they will jump in to help. Where did you get the grips for your remingtons? I have looked every where some that will fit. Mike |
|
|
|
September 28, 2005, 10:00 PM
|
#21 |
|
Senior Member
Join Date: September 10, 2005
Location: GOODLETTSVILLE,TN
Posts: 298
|
Thanks,man It Sure Is Nice To Be Able To Chat With Others That Know A Hell Of Lot More Than I Do.lol.the Grips Came From Western & Wildlife Wonders.web Address Is The Same.or Call Which Is Better Cause Their Email Is Down,ask For Don At 509-782-3018.he Is Located In Washington State.i Had To Fit Them Ever So Slight But Man They Look Great!!!!!let Me Ask You,is There Anyone You Know That Makes Custom Leather Good For Black Powder?i Had A Belt (2 1/2") Made For Both Of My Slim Jim Holsters But I'd Like To Come Up With An Idea For Storeage Of Caps,balls,and Powder For When Im In The Field Or Just On The Range.i'd Like To Keep Them All Seperate Though.there Was An Article Yrs Ago In One Of My Mag's About Just Such Of A Thing But I Dont Have It Anymore And Dont Remember What Was Done For This.
Kevin |
|
|
|
September 29, 2005, 06:13 AM
|
#22 |
|
Senior Member
Join Date: September 15, 2005
Location: South Central West Virginia
Posts: 611
|
MPP1423, Cabelas has what your looking for. It's the same thing the civil war boys had for there caps and cylinders. You can buy a leather spare cylinder pouch (I have two) so you can carry loaded and ready to go cylinders and a leather pouch for a canister of 100 caps.They come in black , brown , plain and fancy.
Thanks for the info on the grips, Mike |
|
|
|
September 29, 2005, 08:14 AM
|
#23 |
|
Member
Join Date: September 27, 2005
Location: New Ulm, Minnesota USA
Posts: 24
|
MPP1423: I have an R&D Conversion cylinder for my Cabela's/Pietta 5 1/2" barreled Remington (pictured below). It was a complete drop-in and was timed perfectly. Works flawlessly and I LOVE it! By the way, My shorty Remington was made in 2004.
Now on my older long-barreled Remington (pictured above) was made in 1987; the same conversion cylinder would not fit in it at all. Much fitting would be needed to make it work in the older gun. 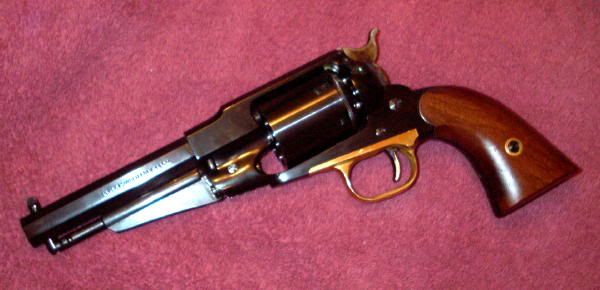
__________________
John |
|
|
|
September 29, 2005, 09:26 AM
|
#24 |
|
Senior Member
Join Date: September 10, 2005
Location: GOODLETTSVILLE,TN
Posts: 298
|
Johnrtse,thanks For That Info.so That Means If I Want One Of These Cylinders I Should Just Go Buy One Of The New Guns Also Because All Three Of My Rem,s Are Pretty Old.my Stainless Was Bought New In About 94' Or 95' And The Other Two Were Bought Used But Have Lower Serial #'s Than My Stainless.
Remington Kid,thanks For The Info On The Leather.i Actually Have One Of The Cylinder Cases From Cabelas But It Wont Fit On My New Belt Which Is 2 1/2" Wide.i Love My Slim Jim Holsters But I Have To Wear Them Butt Foreward On Both Sides(im Right Handed) Because Im What I Call Vertically Challanged,lol,im Only 5'5 So I Draw By Reaching On The Inside Of The Grips And Turn Them Around As I Clear The Holsters.this Gives Me More Leverage Because Of My Short Torso.well,anyway Im Rambling,i Need Leather Goods That Will Fit My 2 1/2" Belt.by The Way,i Tried The Break Free Idea And Let It My Cylinder Set Overnight In The Oil And It Still Wont Budge.whats The Socket Idea,i May Just Need Some Leverage. |
|
|
|
September 29, 2005, 05:24 PM
|
#25 |
|
Senior Member
Join Date: September 15, 2005
Location: South Central West Virginia
Posts: 611
|
MPP1423, OK , I would normally charge a small fortune for expert art work but for you I'll wave my fee
Hope you can understand what I'm trying to show you with this drawing. My wife is visiting our grandkids and she has my digital camera.....Anyway you will need a 5MM socket (I used a 3/8 drive socket), a hacksaw and a bastard file. You need to cut notches in the sides of the socket with the hacksaw and then smooth up the edges with the file. I make several cuts side by side for each notch and then when its wide enough I brake off these little ears with pliers. If you set the socket over the niple you will see why you need the notches cut out to clear the shoulders of the nipple. You want to make it fit as if it was made for takeing out the nipples so that there's no slipage when you do use it. Take your time. I use mine all the time and I use it with a 3/8" allen wrench. Works great! One of the guy's on one of the cowboy sites gave me this idea a few years ago. You stll may need to heat the nipples a little. Mike [IMG]  [/IMG] [/IMG]
|
|
|
|
|
|


