
|
|
|||||||
| Forum Rules | Firearms Safety | Firearms Photos | Links | Library | Lost Password | Email Changes |
| Register | FAQ | Calendar | Search | Today's Posts | Mark Forums Read |
 |
|
|
Thread Tools | Search this Thread |
 January 12, 2012, 04:40 PM
|
#1 |
|
Member
Join Date: December 26, 2011
Location: BC, Canada
Posts: 37
|
Correcting the gap between cylinder and forcing cone on '51?
Hi everybody!
Today my question is... how to correct the cylinder gap on an 1851 navy by ASP. The gap on mine is far to big and im sure im losing a fair amount of velocity and muzzle energy due to it. i have concocted a few ideas but still have some questions.. My first idea was to file the area where the 2 pins connect to the barrel assembly thing, and then file the pins down a lil bit aswell incase the holes arent deep enough after fileing but then after i do that, even if the gap is exactly how i want it, im wondering if the big flat pin that holds everything together will still fit in properly with the changes i want to make?? I'm open to any suggestions you all may have. -illus1on
__________________
"God made man... But sam colt made em equal." |

|
|
January 12, 2012, 06:22 PM
|
#2 |
|
Senior Member
Join Date: September 8, 2007
Location: Mississippi
Posts: 16,188
|
What are you calling far too big? .012 isn't unreasonably big. If you file down the barrel lug you throw the wedge slot out of position. You might be able to file the slot in the arbor to fit and weld the other end up.
|
|
|
|
January 12, 2012, 09:00 PM
|
#3 |
|
Senior Member
Join Date: October 8, 2006
Location: Northern Michigan
Posts: 2,772
|
Hawg's right. The proper way to 'adjust' cylinder end gap is to work the end of the arbor (preferred) or the wedge slot.
|
|
|
|
January 13, 2012, 05:43 PM
|
#4 |
|
Member
Join Date: December 26, 2011
Location: BC, Canada
Posts: 37
|
well the gap when pulled back at half cock is a few milimeters its pretty excessive, it def needs correction.
__________________
"God made man... But sam colt made em equal." |
|
|
|
January 13, 2012, 05:45 PM
|
#5 |
|
Member
Join Date: December 26, 2011
Location: BC, Canada
Posts: 37
|
and is there any way you guys mite be able to draw me a rough diagram in mspaint or somthing?? so i can understand a little bit better what your getting at??
I'd really like to fix this, but at the same time i dont want to do anything thats going to damage my weapon. It does fire and still has a good amount of velocity/muzzle energy but im positive the gap is far too big.
__________________
"God made man... But sam colt made em equal." |
|
|
|
January 13, 2012, 06:02 PM
|
#6 |
|
Senior Member
Join Date: October 8, 2006
Location: Northern Michigan
Posts: 2,772
|
Unfortunately, I don't have access to drawing tools to make the diagram you request.
If the cylinder end gap is truly too large (over 0.015"), that suggests that the cylinder arbor pin (the large round pin the cylinder fits on and rotates about) is bottoming out in it's cavity inside the barrel assembly block. You really need to measure the cylinder end gap to be sure it's too large. And do it with the hammer down; measurement of end gap with the hammer at half cock is meaningless as there is no constraint on the cylinder motion. To check the arbor pin length, remove the barrel assembly and the cylinder, then reinstall the barrel assembly upside down; that is, with the lug that fits over the two small pins up instead of down. Push it on as far as it will go, making sure the wedge doesn't interfere in the slot (you can actually remove the wedge from the barrel assembly for this test). Then rotate the barrel assembly around the arbor pin until the lug which fits over the two small pins is touching the pins. The back face of the lug should just match up with the front face of the frame where the two small pins are located. If it's too far back (towards the recoil shield) the arbor pin is too short (or the arbor pin hole is too deep). If doesn't reach the frame face the arbor pin is too long. Either add material using something like JB Weld, silver solder or weldment, or file to remove material. |
|
|
|
January 13, 2012, 06:19 PM
|
#7 |
|
Senior Member
Join Date: September 8, 2007
Location: Mississippi
Posts: 16,188
|
Sorta like this. If it doesn't match up flush it need adjustment.
|
|
|
|
January 14, 2012, 07:13 AM
|
#8 |
|
Senior Member
Join Date: November 2, 2007
Location: Northern Orygun
Posts: 4,923
|
http://www.theopenrange.net/articles...a_Part_One.pdf
http://www.theopenrange.net/articles...a_Part_Two.pdf The barrel lug should just contact the frame or be .001 from the frame when the arbor is bottomed out in the barrel lug. If the gap is to wide at this point then the frame and arbor require modification, and possibly the wedge slot. |
|
|
|
January 14, 2012, 07:35 AM
|
#9 |
|
Member
Join Date: July 5, 2011
Location: Ohio
Posts: 19
|
This a brass frame or steel one..
|
|
|
|
January 14, 2012, 07:52 AM
|
#10 |
|
Member
Join Date: December 26, 2011
Location: BC, Canada
Posts: 37
|
Hi guys.
i did what you asked and it is too far back (going past where it is supposed to) what confuses me tho is if its already going too far back and if i add material to correct this wouldnt that make the gap even bigger? ill try and obtain a caliper or some feelers to measure the gap. and this is a steel frame.
__________________
"God made man... But sam colt made em equal." |
|
|
|
January 14, 2012, 08:06 AM
|
#11 |
|
Member
Join Date: December 26, 2011
Location: BC, Canada
Posts: 37
|
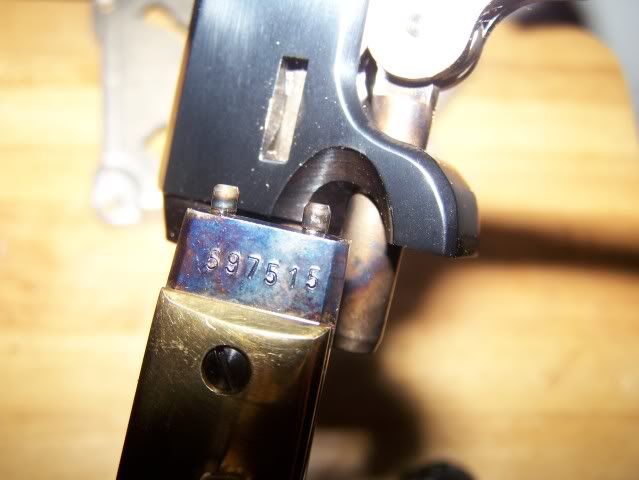
s*** picture
Hey guys i decided id try and take a picture of the gap (with hammer down and pulling back on the cylinder) to show you. my personal opinion was it was too large i could be wrong tho.
BTW sorry for the terrible picture. i used a little flip phone to take this pic 
__________________
"God made man... But sam colt made em equal." |
|
|
|
January 14, 2012, 10:10 AM
|
#12 |
|
Senior Member
Join Date: October 24, 2008
Location: Naples, Fl
Posts: 5,440
|
This is what I did....
....in a similar situation...
  BUT! In order to get the union of the two parts to look right it takes either careful work by hand or it takes a milling machine. AND! As others have said, this may throw off the arbor length and the location of the slot. I think that barrel did not come with that frame or perhaps that cylinder did not come with that frame and barrel.
__________________
Seek truth. Relax. Take a breath. |
|
|
|
January 14, 2012, 11:13 AM
|
#13 |
|
Member
Join Date: December 9, 2011
Posts: 47
|
Doc has a good point. You may have mismatched components among frame, barrell and cylinder.
Post another photo showing the gun completely, views from both sides if possible. That might help indentify just what you've got. Looking at the picture you posted it looks to me that the hammer is standing much to proud (high) of the cylinder and that it could possibly be a rebated cylinder. Personally, I have not seen a rebated cylinder on a '51 Colt Navy in 36 cal., but then again it just might be the picture quality. I've been wrong more than right and my eyes are not what they used to be but my advice is don't do anything until you get proper indentification of the gun. |
|
|
|
January 14, 2012, 12:15 PM
|
#14 |
|
Member
Join Date: December 26, 2011
Location: BC, Canada
Posts: 37
|
hi guys, yeah its possible the cylinder is from a diff gun i know the frame and barrel match tho. and its not .36 its .44 i use .454 balls and #10 caps and goex FFFg
ill try for some better pictures im on my laptop now maybe i can use builtin webcam. also the cylinder has engraving on it if that helps. when i looked up all the makers marks on it i discoverd it was made in the 70's i forget which year exactly i think 76 and its produced by armi san paolo (euroarms) thanks for all replies everyone esp those taking time to help which is all of you!
__________________
"God made man... But sam colt made em equal." |
|
|
|
January 14, 2012, 12:35 PM
|
#15 |
|
Member
Join Date: December 26, 2011
Location: BC, Canada
Posts: 37
|
Heres the best i can do for now, ill have to borrow a digi cam to get proper pictures. ive got pictures i took of it with a digi while it was all taken apart and being cleaned but i cant seem to find them right now, ill keep looking and post back if i find.
heres this for now though : =========================:EDIT:========================= Can i borrow your tools doc?? lol  ---I JUST NOTICED THE PICTURE IN THIS POST IS MIRRORD, COULDNT FIGURE OUT WHY I WAS SEEING DIFF SIDES OF GTHE PIN IN THE DIFF PIX WHILE IT APEARD TO BE SAME SIDE--- thats what i get for using some cheap online snapshot program lol.
__________________
"God made man... But sam colt made em equal." Last edited by illus1on; January 14, 2012 at 12:42 PM. |
|
|
|
January 14, 2012, 01:21 PM
|
#16 |
|
Senior Member
Join Date: October 24, 2008
Location: Naples, Fl
Posts: 5,440
|
illus1on
Looks like this might be a steel frame revolver. If that is the case it is worth a little extra effort to get it right. You could purchase a new cylinder for somewhere around fifty bucks and if that is the actual problem you would save yourself a lot of headaches. Do some homework before going that route.
If it is brass, I would not put a lot of money into it. You could part it out and make enough on it to buy yourself a good used but good condition revolver.
__________________
Seek truth. Relax. Take a breath. |
|
|
|
January 19, 2012, 01:12 PM
|
#17 |
|
Member
Join Date: December 26, 2011
Location: BC, Canada
Posts: 37
|
yeah it is steel doc, i think ima try and get a new cylinder for it before i go screwn around with any of that.
if i had access to the tools you do tho i would have prolly done it already lol. Thanks again for all the replies everyone! -illus1on
__________________
"God made man... But sam colt made em equal." |
|
|
|
January 19, 2012, 04:18 PM
|
#18 |
|
Senior Member
Join Date: February 25, 2009
Posts: 643
|
I wouldn't sink too much money in an ASP gun. If you did all the work and got it right you still will have an ongoing problem with parts.
|
|
|
|
January 21, 2012, 07:26 PM
|
#19 |
|
Member
Join Date: December 26, 2011
Location: BC, Canada
Posts: 37
|
Yeah its nothing for me to buy **** for it im not worried about money, im working on getting a restricted licence right now anyways so i can buy the weapons that truely interest me, thats not saying i dont love this type of firearm tho its got its own appeal forsure.
I would just like to have it working properly. even as it sits it fires almost every time and when it dont its usualy due to a faulty cap or the weapon getting too dirty. Also at 50$ for a cylinder i dont see te big deal, i originaly planned to convert it to cartridges anyways so 50 seems like nothing compared to what a decent conversion cylinder and ejector and the necicary modifications would run.
__________________
"God made man... But sam colt made em equal." |
|
|
|
January 21, 2012, 07:31 PM
|
#20 |
|
Member
Join Date: December 26, 2011
Location: BC, Canada
Posts: 37
|
Out of curiosity tho what do you mean exactly by ongoing problems with parts? is there certin things that keep needing repairs on this paticular weapon?
__________________
"God made man... But sam colt made em equal." |
|
|
|
January 22, 2012, 08:14 AM
|
#21 |
|
Senior Member
Join Date: October 24, 2008
Location: Naples, Fl
Posts: 5,440
|
In my opinion
....Original internal parts (by "original" I mean the original parts in some of the replica revolvers) were less than perfectly heat treated.
In fact some of the builders of kits from the seventies recommended that kit builders get smart about heat treating. Parts for ASM and ASP are hard to get and so repairs and replacements are done with Pietta parts or Uberti Parts or other parts which are not specifically designed for the replica in question. They need to be fitted and most often this is done by filing on the replacement part and so even if the part was heat treated, that hardened metal may be removed during the fitting process. So the problems are: 1) Properly fitting parts are not easy to find and many times you don't know until you get the parts. 2) Parts which don't fit need to be worked to get the pistol functioning properly. 3) The working of the parts MAY or MIGHT reduce their hardness and consequently their reliability in the application.
__________________
Seek truth. Relax. Take a breath. |
|
|
|
January 26, 2012, 11:37 AM
|
#22 |
|
Junior Member
Join Date: January 25, 2012
Posts: 6
|
Doc Hoy
Thanks for that picture of the mill for adjusting cylinder gap. It solved my problem. I recently picked up an almost new Dance by Pietta with about a .030 gap. Last night, using my mini-mill, I whacked .025 off the front of the frame (the front surface looked like it was finished by scraping it on the concrete driveway). Today when it warms up I need to take a few thou off the forcing cone to square it up and give me about 8 thou of gap. Funny thing is the arbor and wedge fit is perfect now. |
|
|
|
January 26, 2012, 01:14 PM
|
#23 |
|
Senior Member
Join Date: October 24, 2008
Location: Naples, Fl
Posts: 5,440
|
Halfslow
Try this trick for taking A TINY BIT off of the forcing cone.
Take the wedge out and turn the barrel on the arbor. You will likely need to hold the frame in a vise.  Sorry for using a junk pistol for these photos. But you get the idea. Then put a thin file between the cylinder and the forcing cone. Put some sandpaper over the file. The purpose of the file is to give you a hard flat surface. (A file also does a good job of holding the sandpaper in one place.)  Then slowly work the barrel back and forth pressing down ever so lightly so as to remove metal from the forcing cone. Take the barrel off frequently and inspect the cone to make sure the process is doing what you want it to do.
__________________
Seek truth. Relax. Take a breath. |
|
|
|
January 26, 2012, 02:27 PM
|
#24 |
|
Junior Member
Join Date: January 25, 2012
Posts: 6
|
That looks like a great way to sneak up on the proper gap and leave a smooth finish.
Right now, the gap is 6 thou on the left and 4 on the right, and kinda crooked from top to bottom. I figure the mill, using about 2 thou passes, will straighten it out. Then I can use the wet-or-dry to leave a surface that will be easy to clean. |
|
|
|
January 26, 2012, 07:57 PM
|
#25 |
|
Senior Member
Join Date: March 19, 2008
Location: High & Dry in Missouri Ozarks
Posts: 2,113
|
Excellent idea Doc. You gonna produce a picture series of rehabbing that brasser???
__________________
Fingers (Show Me MO smoke) McGee - AKA Man of Many Colts - Alter ego of Diabolical Ken; SASS Regulator 28564-L-TG; Rangemaster and stage writer extraordinaire; Frontiersman, Pistoleer, NRA Endowment Life, NMLRA, SAF, CCRKBA, STORM 327, SV115; Charter member, Central Ozarks Western Shooters Cynic: A blackguard whose faulty vision see things as they are, not as they should be. Ambrose Bierce |
|
|
|
| Thread Tools | Search this Thread |
|
|


