
|
|
|||||||
| Forum Rules | Firearms Safety | Firearms Photos | Links | Library | Lost Password | Email Changes |
| Register | FAQ | Calendar | Today's Posts | Search |
 |
|
|
Thread Tools | Search this Thread |
 June 3, 2011, 02:11 AM
|
#1 |
|
Senior Member
Join Date: July 24, 2010
Posts: 364
|
Inconsistent bullet tension
Getting inconsistent bullet tension after/during seating. Varies from: on one end in there real good and cannot turn or move the bullet to the other extreme of loose. Getting more seated well that not.
Backgound (all for .308): Annealed the cases before sizing, loading for bolt action so used Lee Collet neck sizer (used the suggested size-pause-half turn case-size pause technique), using Forster Micrometer seater. My available FL sizer is a Dillon. I also tumbled the cases to clean off lube already. And tried wiping the inside of the neck and bullets down in case there was any left over lube. I think it's inconsistent neck sizing because I can see a correllation between how much of the boat tail I can see sitting on top of the case mouth before seating and to how tight or loose the bullet will be. I'd like to redo the neck sizing (just in case that's the problem) but the cases are primed already. Unless there's a way to remove the deprimer rod on the Lee Collet sizer. I have a Universal Demprimer so that wouldn't be a big deal. |

|
|
June 3, 2011, 07:53 AM
|
#2 | |
|
Senior Member
Join Date: November 22, 2006
Posts: 3,077
|
Quote:
Unless your only intent is not to get cracks you are better off using a machine to anneal, or not doing it at all. Here is one I built, each and every case is done the exact same. 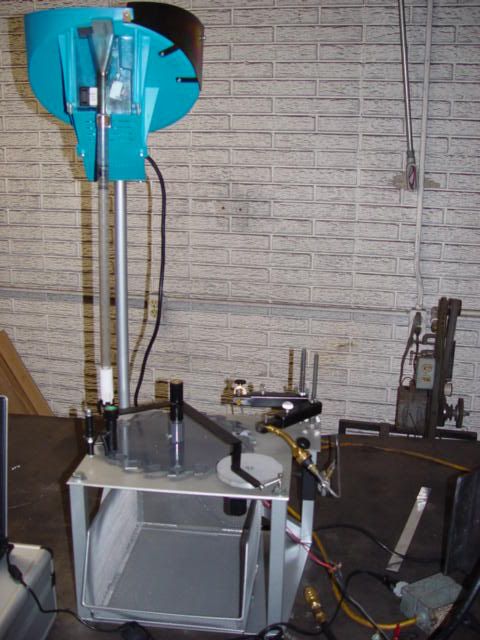
|
|
|
|
|
June 3, 2011, 08:12 AM
|
#3 |
|
Senior Member
Join Date: October 28, 2006
Location: South Central Michigan...near
Posts: 6,501
|
As suggested by the creator of the excellent annealing machine above, it is extremal important to anneal each case to the same degree or cases with too soft, still too hard, or inconsistent annealing and therefore, inconsistent bullet pull tension with most certainly result. Only anneal cases when you have to as will be indicated by necks beginning to split. Then, take much care to anneal uniformly using a very expensive-to-construct machine or temperature indicating "crayons".
In short, correct annealing temperature and heat uniformly applied around the whole neck is easier to contemplate than actually do. An alternative to annealing would be to buy at least 100 cases, do extensive case uniforming (neck turning, primer pocket uniforming, etc.), and then replace the lot when they begin to show neck splits. |
|
|
|
June 3, 2011, 09:15 AM
|
#4 |
|
Senior Member
Join Date: July 24, 2010
Posts: 364
|
Thanks!
Will see about the Tempilaq. Can I light off the rounds were the bullets aren't snug as they should be? Last edited by deepcore; June 3, 2011 at 09:26 AM. |
|
|
|
June 3, 2011, 09:42 AM
|
#5 |
|
Senior Member
Join Date: March 13, 2009
Posts: 107
|
Did you full length resize or neck resize...used lube? Did you trim the cases or check for consistant case length? Have you set up the seating die for any crimp?
|
|
|
|
June 3, 2011, 09:46 AM
|
#6 |
|
member
Join Date: September 14, 2008
Posts: 195
|
I also experienced inconsistent neck tension using the Lee neck sizer using it on a non-Lee press. I returned mine but have been told that the problem can be solved if you tweak the adjustment a little bit.
|
|
|
|
June 3, 2011, 10:29 AM
|
#7 |
|
Senior Member
Join Date: April 15, 2009
Location: Wyoming
Posts: 1,717
|
I'm not sure what the annealing step might have done in regards to the inconsistent tensions. I don't anneal so I just don't know. However, it can take a few cases to get used to the Lee neck sizer. The first time I tried to use mine, I got zero sizing at all. I measured the ID of the neck, put it through the sizer and measured again and it was exactly the same. I did that several times. I took the dang thing apart to see if there was anything wrong, couldn't see anything so screwed it back together. Tried it a few more times and it was working just fine.
A couple things to check on. Use your calipers and measure the inside diameter of the neck before and after. It doesn't size them down nearly as much as a regular FL sizer does to the necks. Mine go from 0.312" down to 0.307" after sizing. Forget about what Lee says regarding the 25 lbs of force. You need to really mash down on the sucker hard. Like you, I push down as hard as I can, hold it a second, release it, partially turn the case and mash on it hard again. I tried it with the suggested one turn at first, but it seemed to do better after I gave it another half turn. |
|
|
|
June 3, 2011, 02:00 PM
|
#8 | |||
|
Senior Member
Join Date: July 24, 2010
Posts: 364
|
Quote:
Quote:
Quote:
|
|||
|
|
|
June 4, 2011, 07:59 AM
|
#9 | |
|
Senior Member
Join Date: October 28, 2006
Location: South Central Michigan...near
Posts: 6,501
|
Quote:
|
|
|
|
|
June 4, 2011, 08:26 AM
|
#10 | |
|
Moderator Emeritus
Join Date: June 25, 2008
Location: Austin, CO
Posts: 19,578
|
Quote:
The collet die is designed so the collets are pressed together as the shell holder pushes the sleeve into the body of the die. Closing the collets does not take much force, though it does vary between calibers, and once they are closed no amount of force will produce any more sizing. The collet dies should be disassembled, cleaned and checked for burrs and machine marks on the moving surfaces. Many users (myself included) have found it beneficial to polish the surfaces that move/slide and apply light amounts of lube to the outer surfaces of the collets. I polished the decapping rods, outer surface of the collets, inner surface of the dies and apply a light coat of Eezox to all surfaces. Once the Eezox dries, I apply a bit more to provide wet lube to the collet outer surface.
__________________
Nobody plans to screw up their lives... ...they just don't plan not to. -Andy Stanley |
|
|
|
|
June 4, 2011, 10:03 AM
|
#11 | |
|
Senior Member
Join Date: December 26, 2004
Location: Louisville KY
Posts: 13,806
|
Quote:
|
|
|
|
|
June 4, 2011, 01:40 PM
|
#12 |
|
Senior Member
Join Date: December 1, 2002
Posts: 2,832
|
Lee's excellant collet neck die has a moving part that requires understanding and has a slight learning curve. It is NOT a conventional 'push the case in, pull the case out' kind of tool but those learn to use it correctly generally love it.
|
|
|
|
June 4, 2011, 02:36 PM
|
#13 |
|
member
Join Date: September 14, 2008
Posts: 195
|
There's no rocket science here. It is a simple machine that, for some reason, some of us cannot get repeatable results with right out of the box. The quality of the results from those that have mastered the machine is not being questioned.
|
|
|
|
June 4, 2011, 03:23 PM
|
#14 |
|
Senior Member
Join Date: January 26, 2009
Posts: 654
|
Not trying to knock Lee dies here but I had some issues with them. I only have a few Lee dies left in my kit. Most are now RCBS and Dillon. On some set-ups, I've gone through 3 sets of dies before I found a set that would give good results every time.
Try an other set of dies and see what happens. You might even find that you need to use FL dies to get what you want. Unless you way over heated your brass; the annealing was probably not the issue. The tricky thing about brass is the exact type of brass you are dealing with. Temps to anneal can range from 500 to 750 deg. C and even higher for some alloys. My general rule of thumb is that if its hot enough to see it glow in a well lit room, then its too hot. I usually dim the lights so any over heating is obvious. Keep in mind that you don't need to get the brass as soft as possible. It just needs to be soft enough to work without splitting. |
|
|
|
June 4, 2011, 08:37 PM
|
#15 |
|
Senior Member
Join Date: July 24, 2010
Posts: 364
|
Now here's the headscratcher:
I loaded the remaining 50 pieces of brass and all of them had great neck tension. The previous 50 had 5 REALLY loose necks and 10 marginal. All 100 of them were randomly (universal) deprimed, tumbled, annealled, sized, trimmed, hand primed, and as they were primed put in the blue ammo boxes. After which powder charged and seated. What are the odds all the odd ones wound up in the same box? Thanks for the replies. Will work on annealing consistency and keeping track of things (like before and after measurements during sizing). |
|
|
|
June 4, 2011, 10:13 PM
|
#16 |
|
Moderator Emeritus
Join Date: June 25, 2008
Location: Austin, CO
Posts: 19,578
|
Did you make any changes in between, such as removing and reinstalling the die?
|
|
|
|
June 5, 2011, 12:25 AM
|
#17 |
|
Senior Member
Join Date: January 30, 2009
Posts: 293
|
In addition to confirming annealing uniformity, try using a brass bore brush and scraping the necks after cleaning before final loading.
__________________
"From my cold, dead hands!" - Charlton Heston |
|
|
|
June 5, 2011, 12:53 AM
|
#18 | |
|
Senior Member
Join Date: July 24, 2010
Posts: 364
|
Quote:
Now, I did back out the seating stem on my Forster because I was planning to load the second batch .010 taller than the first 50 (experimenting with OAL). Don't know if that would have mattered. I don't think so because I did this time check each case's inside neck diameter in the second 50 with my calipers before I seated... .305..seat.. .306 seat... .305 seat etc. Didn't do that with the first 50. I don't claim to be the best with a caliper so not sure if the variations (though in the end all of the second 50 still wound up with good neck tension) were my measuring errors, "acceptable variations", or variations due to my first annealing attempt. Which brings me to what I now remember didn't do this round of case prep that I was doing the previous prep sessions. I used a bullet to check the neck after sizing (by lightly placing the bullet in the mouth) on EVERY case. Sorta of like a go/no go gauge. Not the most accurate test...maybe even brain surgery with a chain saw but it's quick. Now if there is a cylindrical shaped tapered tool with diameter marks on it you could stick down a case to measure/check neck diameter....maybe I can use/mark a bullet tip instead of using the base... |
|
|
|
|
|
|


