I am going to make a full-flap holster for a Colt Police Positive Special that I bought awhile ago. Inasmuch as there have been occasional questions posted here about making one's own holster, I thought that I may as well post pictures of the process as I go.
The first thing I do when I make a holster is to decide what kind of holster I am going to make. It may help to look at pictures of holsters by the various makers to see if one of their designs jumps out at you. Do not just consider the looks of the holster, but pay attention to how the holster is going to be fastened to the belt and consider how the holster is going to be used.
For instance, if you intend on using the holster for raccoon hunting with dogs (Norther style where you run after the dogs), you would not want a drop-loop holster because it would flop against your leg as you ran.
In this instance, I decided on a full-flap because I envision carrying the gun into my woods in the unlikely event of seeing some predator, most likely an opossum. I will carry the gun often, but will hardly ever need to draw it fast. Also, I like the looks of a full-flap and have not made one in many years. So, full-flap it is.
Secondly, I want a holster that I can change from belt to belt, including Sam Browne belts complete with braces...so I do not want to have to unfasten the braces to thread a loop belt on. Therefore I decided on a large-heavy clip. Now, a clip would not be very wise if a person was subject to bouncing on a horse, snowmobile, motorcycle, etc. But, keep in mind that I will just be taking leisurely walks in my woods and find it unlikely that I will be engaged in vigorous activity.
The problem with a clip is that it threads into the holster and could contact the gun, so I will mount the clip on a sew-on leather patch instead of mounting the clip directly to the holster. If you cannot visualize that at this point, you will understand when I post pictures of it when I get to that point.
After deciding on the style and mounting system I will use, I make a pattern using a thin cardboard cereal box. After cutting the pattern, it almost always has to have angles, radiuses (radii), etc. changed. The pattern will have to be adjusted as indicated when you wrap it around your gun to see how it fits. I subtract by cutting with scissors, add with pieces of cardboard held with scotch tape. The pattern need not be neat, inasmuch as it only has to survive being used once...unless you anticipate making more than one holster of that type for the same gun/frame.
Once you are satisfied with your pattern,
determine which side of the leather you want on the outside of your holster and draw the pattern on the leather accordingly with a lead pencil. If you are right-handing and draw the pattern on the wrong side, you will end up with a gun for a left-handed person.
You should also consider the weight of the leather you will use. In this case, I am using 5/32 thick (10 oz. weight), because for a full-flap, I will not be doing much bending of the leather or wet-forming...but will do some. There are several considerations that can decide how heavy of leather to work with. Generally, the heavier, the harder it is to work with.
The tracing can be cut out using a
sharp blade in a standard utility knife. Lay the leather on a table, on top of some corrugated card board and follow the lines.
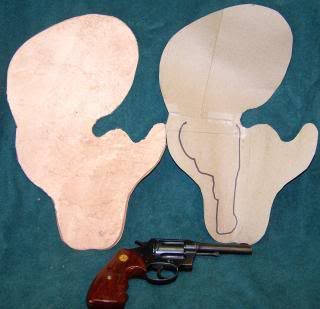
In the photo on the left, the leather as cut, the pattern (on the right), made from a cereal box, and the gun for which it is intended.
I will post again latter in the process.